08M - MAX485 - relay interface

mowman

New Member
Although I've been doing automation and controls for years, it's been at the system software level -- i.e., "take this and put it there and tell me when you've done it". I've always been jealous of the guys on the floor doing the cool stuff, and decided to give it a try after running into the PICAXE line of products.

My intention is to build a simple and generic relay controller module that I eventually can hang sensors off and stick on a network. Eventually, I'd like to replace the '485 with RF ( The Sparkfun 2400 is so economical - see specs here ), but because I'm a nooby I figured it best to begin with wires I can probe and troubleshoot.

I'll initially drive the components from a PC, but plan to build a PICAXE-based control module with LEDs, buttons and knobs fully festooned with blinking LEDs. Maybe hang one of those very cool vDrive USB drives off it. Add a Bluetooth interface. Maybe a brainwave frequency analyzer. You know, all the things a gadget guy *really needs* to flip a switch.

I took some electronics classes early in my college career, but that was way back in the days of the PLC, the TRS-80 and the Timex Sinclair and I've forgotten most of it.

I started with what I believe to be a pretty good tutorial project and attempted to build out from there.


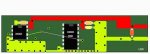
Download ExpressSCH schematic here...
Data sheet for the relay (L1) is here...
Data sheet for the diode (D1) is here...
Data sheet for the amp (Q1) is here...
Data sheet for the MAX485 (U1) is here...


My understanding (which probably is wrong) is that with this design, I can setup interrupts on the 8M's port2 (IO2, leg 5 -- I believe these all refer to the same pin) to wake up when data is available, which I'll read from port0. I'll also write to port2 after I set port2 (which I can only do if it's low).

I kind of like this strategy (which I got from here), because I think the code will be cleaner.

A couple questions for any and all that would care to share their experience...

1. Will this circuit work? I'd kinda hate to see smoke coming from my first project.

2. Are there significant drawbacks to the design? I'm sure there are better ways to skin this cat, but I doubt that I'd understand them at this point on my learning curve.

3. Can the schematic be improved in terms of placement of elements? It seems to me that the schematic ought to clearly convey the "logic" of the design which is different than the layout of the board.

Then again... I could be wrong - and probably am.

Thanks in advance for your help. I've kinda been obsessing on this. I have all sorts of gadgets I've always wanted to build.
 
Last edited:

eclectic

Moderator
Welcome to the Forum Mowman.
What a superbly presented question!

This looks like a serious initial project!

I'll stay well away from the right hand side of the schematic.
I'm a mains powered coward. :)

I've had a very quick look and, ......

Just as a starter, the Picaxe 08M chip.

Please refer to Manual 1, pages 25, for the
absolute minimum download circuit.

Pin3 / leg 4 needs a resistor to ground?

I'm also unsure about R2/R3 and diode D2.

Additionally, you'll almost certainly require capacitors,
very close to the Picaxe power legs.
100nF and 47uF, in parallel.

I'm sure that you'll get lots of more erudite responses soon.

Final (for the moment) advice.

DO NOT make a PCB or solder anything yet.
Breadboard the low-voltage section only.

Mains power is the VERY last thing you should connect!

e
 
Last edited:

BeanieBots

Moderator
Welcome to the forum.
I agree with everything eclectic has said.
In particular, how refreshing it is to see someone who has done their homework before posting.
A very neat and well layed out diagram.

As per eclectic. You will need decoupling capacitors (100nF) close to each chip's power pins.

Might be a good idea to include information regarding how the 5v will be derived. That will determine if your circuit should include any larger electrolytic caps.

The download circuit is certainly worth adding.
You need to pull-down serin anyway so it might as well be done via the download circuit.

The 1N4148 diode you have clamping the relay coil is a signal diode.
It's not really up for the task. Better to use something like a 1N4002.
 

lbenson

Senior Member
I also couldn't comment on the mains side of the circuit, other than to say that all the cautions you read should be taken seriously. I see two issues relating to your LED circuit--the Sparkfun source shows the LED connected to +5, not to 0V (with the transistor making the 0V connection as you have shown); and as an expressSCH user, I see that you have done what I have done a number of times--placed a resistor without breaking the line that it goes in series with.

I've used the Sparkfun RF--315mhz in my case instead of 433mhz because of interferrence in the 433 range. Very straightforward. Just get everything working with wires before you insert the RF modules.
 
Last edited:

mowman

New Member
decoupling capacitors

Thanks for the warm welcome and the benefit of your knowledge and experience. Wow... A join date of January 1970??

I appreciate the warning about starting out slow. I'm starting out with the 'experimenter' kit, then the datalogger.

This project will be the first one I'll build from scratch.

For the power, I plan to start out by incorporating the breadboard supply kit, then adapt to the battery supply used by the data logger. It's kind of hokey to have to plug in two things to control one, but if I put an LED on it I'll be OK with it. Especially if it blinks. Eventually, I'd like to be able to slice off some of the AC - but I'll leave that for later.

Thanks much for the tip on the decoupling capacitors. As you can tell, I'm way over my head in terms of the science, but I'm pretty good at synthesizing patterns. That's one I missed. I'm sure there will be many more.

I studied up on the concept (here's one of the references I saved for later perusal).

I understand this to mean that I need to do something like this to the '8M and the MAX485.


But....

eclectic, you wrote

"...100nF and 47uF, in parallel..."

...which I believe means something like this.


Is my understanding correct, and can you please comment (in nooby terms) the difference between the two?

I modified the schematic to include the download circuit (thanks, eclectic) and will post it once I get a handle on the decoupling capacitors and research the other suggestions.

Again, thanks much for sharing your experience.
 

lbenson

Senior Member
"...100nF and 47uF, in parallel..."

That is not meant to be parallelled inline on the 5V supply, but in parallel between +V and 0V--preferrably as close to the picaxe +V and 0V pins as possible.

The 1970 date is a bogus carryover from the previous forum software. Those who belonged before the cutover have been granted decades of prescient pre-picaxe experience.
 

mowman

New Member
Like this?


With the C1/C2 pair, do I still need C3?
Should I protect the MAX485 in the same fashion?

I should have caught this. The tutorial on the relay rig did a fine job of explaining everything wrapped around the relay - and the 08M did look a little naked by comparison in my initial try.

BeanieBots.. re:your question on power supply...

Did you ask it in order to find out how many amps it will be supplying? I was heading in that direction. Once I figured out the components I need I
was going to do the math, apply Ohm's law to make sure it works. Am I heading in the right direction?

Many thanks to all
 

BeanieBots

Moderator
C1 is a must and MUST be placed as close as possible to the PICAXE power pins.
Have a good read of the resource that YOU posted a link to.
It gives a very good explanation of the purpose and method behind decoupling.

I wanted to know your power supply for several reasons. In particular, to determine if C2 is really required.

C3 is quite simply wrong. Although your diagram does show it shorted out which ironically would be correct.

Yes, you should fit a cap close to the MAX485 as well but it is not as important as the one by the PICAXE. If the two chips are close to each other (shorts leads between their power pins) then they could share a single 100nF between them but one for each is better. (again, read the link).
 

SilentScreamer

Senior Member
Once a capacitor fills its stops current from passing through it (or something like that, I'm sure someone will correct me there :p). Therefore capacitors are almost always just put from +V to 0V.
 

BeanieBots

Moderator
Once a capacitor fills its stops current from passing through it (or something like that, I'm sure someone will correct me there :p). Therefore capacitors are almost always just put from +V to 0V.
Both an interesting description and comment.
You felt it worth posting, so it warrants a reply:p

When is a capacitor full?
As current flows into a capacitor, it's voltage rises linearly with respect to that current. As the voltage increases, the potential difference between whatever that voltage source is and the voltage across the capacitor decreases. In most cases, that will result in the current decaying with time as the two potentials get closer to becoming equal, so the rate at which the the two voltages merge will decrease. It never actually gets there.

http://hyperphysics.phy-astr.gsu.edu/Hbase/electric/capchg.html

"almost always just put from +V to 0V"
Curious. I genuinely wander how true that is?
The ONLY reason for a cap across the power rail is for the purpose of decoupling. A purely digital circuit such as a PC memory expansion board will only have caps across the power rail. One for each chip.
What about analogue circuits that involve filters? Maybe a dozen or more caps per chip with only one across the power rail?

Before the advent of home PC's, I would have said absolutely not.
Now though, in the digital age, maybe yes.
 

mowman

New Member
Am I seeing this correctly?

The following graphic is from the link I referenced above (http://www.interfacebus.com/Design_Capacitors.html).


Are the following assumptions correct?

1. Region B is V0.
2. Region C is V+.
3. The two regions are not connected where I've highlighted them at A

I think the chip on the right illustrates what you're trying to tell me.

Thanks
 
Last edited:

eclectic

Moderator
@mowman.

Just my personal opinion. Others may differ.

Don't worry about the complexities yet!

Buy the AXE090 kit (from Solar)
Buy the Datalogger.

Buy a few extra Picaxes (say 08m /20M / 28X2)

Get an assortment of resistors/capacitors/LED's.

Then play. Honestly. You'll absorb so much.

e
 

BeanieBots

Moderator
First off, remember that those chips will be 'typical' chips and not PICAXE chips.
The majority of chips have Vcc top right and 0v bottom left.
Hence, I'd say region B is Vcc and region C is 0v.

They are NOT linked at point A
There are TWO caps shown near point A, (across B & C)
The chip on the left has it's decoupler above it.
The left of the cap joins to pin 4 bottom left under the chip.
Just below the letter "B" is the power rail cap.
This would be a larger value of around 47uF.
 

mowman

New Member
e,

That's exactly what I've done, but I'm on the road and won't get my hands on them for a while. I'm also trying to avoid some of the failures of my earlier experiments. I've had this curiosity for quite some time. I clearly remember my first big failure. I was around 5 and had been experimenting with circuits by taking apart every toy I had to figure out how it worked.

I had mastered the concepts of 'open' circuits (if you cut a wire, the circuit didn't work) and 'short' circuits (if you crossed two wires that weren't supposed to be, the unit would spark, get hot, then wouldn't work) and polarity (if you switched the wires (put the red on the - and black on the +)) it wouldn't work.

I also was developing a fascination with AC, mostly because everyone kept telling me it was dangerous and not to touch it. Based on theories I had developed as a result of my experiments with batteries (you only got a jolt if you put your tongue on both terminals at the same time), I concluded that I'd be safe if I only touched one of the two wires - grounded plugs were practically non-existent back then.

I didn't have a breadboard to experiment with, and didn't want to leave evidence of my experiment in the form of a cut AC wire, so I decided to use a light socket as my test bed. Gosh, I remember this like it was yesterday. I remember the feeling of exhilaration as I selected the lamp, unscrewed the light bulb and used both hands to carefully touch just the center post, I mean come on -- this stuff was dangerous after all and I was very concerned with safety.

Needless to say, my experiment failed. Thank goodness I chose a standard light socket - not one into which I could fit my tongue. Can you imagine the funeral? People would have thought that I was just some poor schlub that put his tongue in a light socket. No one would have known that I gave my life in an effort to further the frontiers of science. That would have been sad.

It took a while for me to resume my experiments with AC. After all, the tech manuals were way over my head at the time. My second big experiment was just as big a failure. I had gotten a CB base station I had been craving - but it was battery powered which just wouldn't do. Battery powered devices were toys, things you plugged in were to be respected. But it had a very interesting plug on the back for an adapter.

It turned out that my transformer design was a bit lacking. In fact, it consisted of nothing more than a stripped AC cord I had found in my Dad's tool box. I had learned from my previous experiment, though. I was VERY careful not to touch anything when I plugged it in the wall. Safety first and all that.

This time around I want to do a little more legwork on the theories behind the experiments.

Sorry for the tangential journey and thanks for your indulgence if you got this far...
 

mowman

New Member
BeanieBot...

That was a BIG help. Thanks for your patience.

One more thing. I'm almost embarassed to ask it.

The 'lsd' on the lower right is insignificant and probably is the initials of the person that created the graphic, right?
 

BeanieBots

Moderator
No idea, judging by the colours he's used, probably what he had for supper the night before:cool:
Then again, it might be something boring like "Least Significant Digit".

CAD operators put some very strange things on their designs.
I once knew a guy who would always right a poem and conceal it within the dot of an "i" on all his drawings. Too small to ever be noticed in print but if you had the file, you could zoom and zoom and zoom and eventually be able to read it.
Guess it's one way of knowing your own work if it ever got ripped:p

An interesting tale you tell, and I fear one which has been done by several but maybe without your luck.
The sign of a good Engineer is one whos first instinct is "pull it apart" to see how it works.
The engineering skill evolves at an early age because pain is inflicted if you can't get it back together and working before mother finds out.

Humans are strange things in so far the more you're told don't, the more compelling it is to do:eek:
 

BeanieBots

Moderator
No, that's not what the layout is nor how it should be.

"B" is Positive.
"C" is 0v.

The caps are between Positive and 0v. (as described earlier)

Break the link between C1/C2 and C3.
Then connect that end of C1/C2 to 0v.
Then connect the left side of C1/C2 to the top of C3.
 
Last edited:

eclectic

Moderator
Mowman

I've altered the diagram slightly. See below.
It might help.

But, the easiest thing to do (IMHO),
is use a pencil and paper.
(And a colouring pen)
Code:
_______________  V+
|     |     |
C     C     C
|_____|_____|___  Gnd
where each C is a =

(And, you may soon be exposed to the
wonderful world of ASCII Art!)
It's a Forum speciality. :))

e

And I'll repeat my earlier message.
Have fun with the Picaxe.

Don't get too complicated.

e
 

Attachments

mowman

New Member
Actually, I'm driving and it's easier (and safer) to go this route. I also understand that you're indulging me and want my questions to be stated as clearly as possible.

Trying to stay away from stuff like...
I install AIX. CPU not see network. What wrong?
Would the upper right pin of our mystery chip be labelled v0?
 

eclectic

Moderator
Actually, I'm driving and it's easier (and safer) to go this route. I also understand that you're indulging me and want my questions to be stated as clearly as possible.

Trying to stay away from stuff like...


Would the upper right pin of our mystery chip be labelled v0?
Genuinely, I don't understand your quoted response.

And I am NOT indulging, but genuinely trying to help.

e
 

lbenson

Senior Member
>Would the upper right pin of our mystery chip be labelled v0

Well, if the mystery chip is a picaxe08M, then the answer is Yes; if it is a "typical" IC, if there is any such thing any more, it is likely to be No, it is probably +V and the lower left is 0V; or if it is the chip on your circuit layout, then No, as BB said, it is +V, but if it really is a mystery chip, then the answer is, "Who Knows--solve the mystery and the data sheet will tell you".
 

mowman

New Member
I'm trying to ask concise questions and I TRULY appreciate your help. Perhaps 'indulging' was a poor choice of words. A lot of the reference materials I'm studying up on doesn't make sense - yet - no matter how many times I read it.

Thanks to your help, it's starting to.
 

mowman

New Member
Well, if the mystery chip is a picaxe08M, then the answer is Yes
OK. That really helps. I'll reread the tutorial. I was understanding that we would put them off the v+ pin on the Picaxe, but they're on the v0 pin on this generic chip.
 

BeanieBots

Moderator
THAT diagram is an EXAMPLE.
Examples usually follow convention as closely as possible.
THAT example follows convention.
Vcc at the top, 0v at the bottom.
The (un-marked) chip is wired CONVENTIONALY.
0v bottom left. +v top right.

AS EXPLAINED EARLIER.

PIC micros do not follow convention where power pins are concerned.
I feel it is that which might be confusing you.
It is often felt (incorrectly) that one's first encounter with something is the way all things are done. Not so.
 

MartinM57

Moderator
Don't get carried away with the capacitors - the principles are very simple and have been enumerated in this thread enough times:
- decoupling capacitor, between +V and 0V close to chip, 100nF is a good choice
- power supply smoothing capacitor, 47uF to 100uF somewhere sensible on the ultimate PCB layout

There's pretty much no chance that the "mystery chip" on those (awful) diagrams/PWB(?) layouts is a Picaxe 08, but it doesn't matter either way. Just read and understand the data sheets for whatever you're using.

If your D2 is a LED then:
- it won't light up like that - it's the wrong way round
- it's unlikely to be very bright from a 5v source with a 1K resistor - go find some google pages on LED resistor values - you should be looking at more like 180R to 330R depending on the LED
- it will light (when the right way round) when the relay is off - fine if that's what you want it to do ;)

Your schematic is OK, but normally signal flow is left to right - you're starting mid-left, going left and then back to the right.

What's the magic 5(?)v power supply - you can't get 5v batteries, so there must be something there (regulator, supply caps (oh no, more caps!)) and it would be normal to show what it comprises
 

MartinM57

Moderator
I'll initially drive the components from a PC...

1. Will this circuit work? I'd kinda hate to see smoke coming from my first project.
Do you have a RS485 signal producing PC? No PC I know of will produce RS-485 out of the box, and would need some addon hardware card. Are you sure you don't mean RS-232 - in which case your circuit is miles out (and can be simplified significantly).

What will you have on the PC to drive your circuit - DOS commands, VB app, some packaged app etc?
 

mowman

New Member
"Don't get carried away with the capacitors..."

I get it.

re:the power supply... I figured I'd use the Breadboard power supply kit (which I believe includes the 'smoothing' capacitors I've been obsessing about) until I understand enough to do something else.

"it will light (when the right way round) when the relay is off"

That's hilarious. An "off" indicator. How fitting.

I'll dive back into the relay tutorial and fix that. The tutorial focuses on the relay and ends with a 3 connector jumper that the author connects to his Arduino. I tried to build out from that jumper by adding the Picaxe and the MAX485.
 

mowman

New Member
Do you have a RS485 signal producing PC?
I'm well stocked there. 232/422/485, line monitors, the works. I used to write controls software when all you had was twisted pair on the floor. That and token ring when talking to the heavy metal.

My early stuff ran on micro channel OS/2 with IBM's ARTIC Realtime Interface Coprocessor to handle the speed and massive amount of I/O. I eventually migrated to Unix which was cool because I no longer had to sit on a box on the floor along with the conveyor rats.

I'm kind of an old fart.
 
Last edited:

MartinM57

Moderator
Power supply kit looks fine - for the breadboard prototype anyway. I'm sure you'll use it lots in the future.

That's hilarious. An "off" indicator. How fitting.
I'll dive back into the relay tutorial and fix that.

Not really up to the relay tutorial to fix that - just put the LED resistor to +5v, then the LED with its pointy end to the collector of the transistor

You still really sure about RS-485 coming from your PC? EDIT: Yes you are. But RS232 could be a lot easier...
 
Top