readtemp/DS18B20 problem

meridian

Member
Hi everyone,
Its quite a while since I picked up the breadboard to play with the Picaxes - just got some new 20Ms.
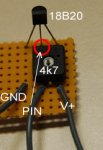
Also got some DS18B20s to play with, but no joy!?!

What's wrong with this (using an 8M)?
temp08M:

readtemp 2,b0
'debug b0
b1=b0/10
b2 = b0//10


sertxd ("T= ",#b0," ",#b1," ",#b2,10,13,10)
wait 5
goto temp08M

I'm sure that all the jumpers are in the right holes but all I get on the Terminal screen is:

T= 0 0 0


paulr
 

meridian

Member
Well I (partly) answered my question! By moving the wire to pin1 and changing the readtemp 1, b0, it worked! Is there a problem with pin2 as an input?

paulr
 

westaust55

Moderator
Cannot immediately see anything wrong with your code.

Do you have the 4.7 kOhm resistor from Vcc to the data pin as per page 135 in the current PICAXE Manual 2?
 

BeanieBots

Moderator
Should be OK on all except 3 for an 08M.
Try again, maybe by moving it you "corrected" some other fault.
Pull-up resistor maybe not connected? From memory that would return a zero.
 

meridian

Member
I haven't got the multimeter out but I suspect a link from the LHS of the breadboard to the RHS.

Thanka for the responses
meridian
 

nickwest

Member
I just dug up this thread trying to find why my 20m doesn't like READTEMP on certain pins. For example pin6.

Are there only certain inputs on a 20M compatible with READTEMP? Are inputs 4, 5, and 6 only suitable for simple on/off inputs?

I'm trying to make a lower-cost version of my 18X dual temperature sensor, which works a treat incidentally and displays beautifully on a hitachi LCD using the sample code in the picaxe manual. The only reason to try using a 20M is to save a few dollars.
 

premelec

Senior Member
Nickwest - I have a dual DS18B20 unit running on an 08M sending Fdeg in Morse to a squeaker - so I expect it could easily be done to an LCD as the Morse takes a lot of space and the C to F a bit also. I'm considering multiplexed DS18B20s selected with a CMOS 4053 and counter...
 

westaust55

Moderator
I just dug up this thread trying to find why my 20m doesn't like READTEMP on certain pins. For example pin6.

Are there only certain inputs on a 20M compatible with READTEMP? Are inputs 4, 5, and 6 only suitable for simple on/off inputs?

I'm trying to make a lower-cost version of my 18X dual temperature sensor, which works a treat incidentally and displays beautifully on a hitachi LCD using the sample code in the picaxe manual. The only reason to try using a 20M is to save a few dollars.
1. The READTEMP command should be working with all of the input pins except pin 6 for a 20M according to the manual.
This command cannot be used on pin0 or pin3 of the PICAXE-08M/14M, or pin6 of the 20M.
2. All 8 inputs (0 to 7) work with most commands basic input commands. Its just that
- inputs 0 to 3 also have extra functions (analogue and IR input capability).
- only inputs 1-5 may be used for an interrupt condition.
 

hippy

Ex-Staff (retired)
Is there a problem with pin2 as an input?
Just tested and READTEMP worked fine with 08M's pins 1, 2 and 4 and also with 20M pins 0, 1, 2, 3, 4, 5, 7 so it looks like you have a wiring fault or that particular pin has been damaged.

It may be worthwhile writing a simple program which reads pin2 and displays its result while connecting pin 2 to 0V and +V ...

Do
SerTxd(#pin2,CR,LF)
Loop
 

khosh

New Member
Same problem

I'm having the same problem as meridian first posted. I'm using a Picaxe 08M with the Dallas 18B20. I've connected it exactly as the manual advises and tried ports 1, 2 and 4 but I can't get it to show any temperatures, neither using debug or sertxd.

I noticed a text in the manual:
"NB: most project boards are pre-fitted with a pull-down resistor on the input pin. This must be removed to use the temp.sensor."

Does the 08M have this pull-down resistor? If so, where is it located and should it be removed?
 

BeanieBots

Moderator
Welcome to the forum.

The "08M" doesn't have any pull-up or pull-down resistors but your circuit / project board might. What circuit / project board are you using?
The DS18B20 MUST have a pull-up (4k7) to work.

If connected EXACTLY as shown in the manual, it should work.
 

westaust55

Moderator
If you are using the Rev Ed AXE003 starter pack for the PICAXE 08M, then the included AXE021 protoboard does not include any pull-down resistors by default.

As Beaniebots has indicated, have a look at the diagram at the bottom of page 155 in PICAXE Manual 2 (current Rev 6.9) which shows the connections and 4.7kOhm pull-up resistor


For Technical (or others at Rev Ed) - if not already noted
I see that the example program on page 155 has an error.

At the end of the positive temp section there is "GOTO Loop"
This should read "GOTO Main"
 
Last edited:

w7ky

New Member
Premelec.... I'd appreciate seeing your code for the DS18B20/08M/CW circuit. I'd like to try this with light instead of sound. Thanks w7spy
 

premelec

Senior Member
W7SPY - send me a PM [message] with your e-mail address and I'll send you the code - I don't want to publish it here yet as it's a bit messy... I keep meaning to clean it up but somehow there are always other things to do! :) I think I used Manuka's Morse method - but I may have used the Maine Bug method - similar but not identical...
 

khosh

New Member
Still not working

I had to put the project on hold for a while, but now I'm back on it trying to solve the problem. Thanks for your responses, but still no luck. I've connected everything as the manual says and tried ports 1, 2 and 4 but I can't get the Dallas to read any temps. Debug and sertxd are returning 0.

I tried running readadc and it gave a value of 13 ± 1 but readtemp returns nothing. And I have a 4k7 resistor (adjustable) between V+ and the pin. All the pins are working (as outputs), tested with a LED test board.

Does anyone have a clue to why it's not working? If a pin works as an output, shouldn't it be working as an input as well? And everything is connected as the manual says.

The problem is probably something ridiculously simple, but... I don't even know where to start looking.

The PICAXE manual says something about readtemp not working with "older DS1820 or DS18S20 as they have a different internal resolution". Since my components were bought late 2009 they shouldn't be "old".

EDIT:
I just noticed that I have two DS18B20, not DS18S20. I tried to search for the difference between the two, but all I found was this.

As I read it they should be identically connected, but is this causing the problem? Should the 18B20 be used somehow differently than the 18S20?
 
Last edited:

hippy

Ex-Staff (retired)
Hi Kosh,

The PICAXE's READTEMP commands will only work with DS18B20 so as long as you are using one of those it should work, you can forget about DS18S20's and the rest.

Can you confirm you are still using a PICAXE-08M and provide details of which board you are using the PICAXE on. A full circuit diagram and even a photograph of how you have everything connected will also help get to the bottom of the problem.
 

khosh

New Member
I'm still using the 08M on some kind of school kit board (don't know model or such). This is part of a course in school and our teacher bought all the components from the Finnish supplier www.stepsystems.fi. The deadline has passed and my teacher's not available at the moment, so I turned to the forums instead :)

Code:

main:
readtemp 2,b0
debug b0
goto main

Here are pictures of the board and the 18B20 connection.
 

Attachments

MPep

Senior Member
What is the TO92 package device by the terminating block in the first photo?

You need a direct connection to pin2 from the data leg of the temp sensor. And the 4k7 from pin2 to Vcc, of course :D.
 

inglewoodpete

Senior Member
The DS18B20 does not look like its connected to an I/O pin of the PICAXE, but rather to a buffer transistor. This will prevent the response coming back from the DS18B20 from reaching the PICAXE.
 

BeanieBots

Moderator
I agree with IP about the transistor.
Doesn't look like that board can be used with a DS18B20 sensor without doing a little modification.
 

khosh

New Member
What is the TO92 package device by the terminating block in the first photo?

You need a direct connection to pin2 from the data leg of the temp sensor. And the 4k7 from pin2 to Vcc, of course :D.
I moved the pin2 wire so it's directly connected to the data leg. By TO92 I guess you refer to the transistor marked in the picture? It's a BC547 doing something. To be honest I haven't got a clue. I'm quite lost when it comes to electronics. But I try ;)

The board came as a kit with assembly instructions and I just followed them. What kind of modifications are we talking about? Simply removing the transistor and/or resistor?
 

Attachments

inglewoodpete

Senior Member
You will need a soldering iron. Lift one end of the appropriate resistor and solder the wire that goes to the active pin of the DS18B20 to the pad where you've just lifted the resistor from.

If left in-circuit, the resistor and transistor would amount to a "pull-down", opposing the pull-up you require to make the DS18B20 work properly.

Finally, I see that you have a 4.7k variable resistor (potentimeter) on the sensor board. This is very risky because the variable resistor could be adjusted off the maximum value. The result could be more problems: at worst you could blow the output of the PICAXE.
 

westaust55

Moderator
Yes the device you have circled is a transistor whcih enables you to switch higher currents (100mA?) compared to the 25mA max of a PIACXE chip.

There are two options:

1. remove the transistor and resistor as you suggest, and connect the wire to the hole where the blue line goes to, or

2. you could try just connecting the wire to the end of the resistor where the blue line goes. It may just work if the resistor value is high enough to stop the resistor and transistor pulling the signal voltage down too much.

You could try 2 (if you want to make less changes to the original board design) and if you still have no success, then go to 1.

If you look at the attached mark-up of your photo, you will see where you need to take the wire to for your DS18B20 for either of the above options
Ultimately the signal has to get through to the PICAXE pin where the dashed portion of the line continues on to.
 

Attachments

Last edited:

hippy

Ex-Staff (retired)
Looking at the photo it seems pin 2 ( leg 6 ) goes to a 3-pin molex which either routes to an LDR/R or a transitor output buffer. If that's right, the easiest solution is to remove the molex link from the header, solder the DS18B20 signal line to the centre pin, or direct to pin 2 ( leg 6 ). Everything else on the board can be left intact.
 

westaust55

Moderator
Looking at the photo it seems pin 2 ( leg 6 ) goes to a 3-pin molex which either routes to an LDR/R or a transitor output buffer. If that's right, the easiest solution is to remove the molex link from the header, solder the DS18B20 signal line to the centre pin, or direct to pin 2 ( leg 6 ). Everything else on the board can be left intact.
Pin 2 is physical leg 5
 

Froggs

Member
Same problem (again?)

I'm struggling.

Im trying to used readtemp (with DS18b20). I have 28X2 and have tried using both onboard AXE091 28x2/DS18 AND separate 28X2/DS18 on breadboard. Both options return 0. I have used various code including derivations of code posted on this thread. I have checked the circuit etc as for typical 'errors' identified in this post. Am I missing a trick?

Oh? just a thought. I'm using 3*AAA cells ie approx 4.4v?

Thanks
 

Technical

Technical Support
Staff member
Welcome to the forum.

If you have a AXE091 simply jumper the 'T' temperature pin (for the on-board Ds18B20) across to any PICAXE-28X2 pin, e.g. C.0

Then try this program

Code:
#picaxe 28x2
#no_table
do
readtemp C.0, b1
pause 1000
debug
loop
If this does not work it may indicate a fault with the sensor on the board.
 
Last edited:

Froggs

Member
Welcome to the forum.

If you have a AXE091 simply jumper the 'T' temperature pin (for the on-board Ds18B20) across to any PICAXE-28X2 pin, e.g. C.0

Then try this program

Code:
#picaxe 28x2
#no_table
do
readtemp C.0, b1
pause 1000
debug
loop
If this does not work it may indicate a fault with the sensor on the board.
Yes. Everything works now. Thank you for your help. I’m new to all this but with a steep learning curve. I thought I had read and understood the (3) manuals; but perhaps I assumed too much too soon. I think that my error was to look at the examples in the documentation and not too apply mind?

My original code construct used >>>> readtemp 0, b1
Your code construct used >>>>> readtemp C.0, b1

But this did work with the LDR >>> readadc 1, b1

Am I right? If so, perhaps a later revision to the documentation may help (for those of us that want to hit the road ‘running’)?
 

hippy

Ex-Staff (retired)
I think that my error was to look at the examples in the documentation and not too apply mind?

My original code construct used >>>> readtemp 0, b1
Your code construct used >>>>> readtemp C.0, b1

But this did work with the LDR >>> readadc 1, b1

Am I right? If so, perhaps a later revision to the documentation may help (for those of us that want to hit the road ‘running’)?
In the non-X2 PICAXE both Digital I/O Pins and Analogue Channels are referenced by using a single number, on the X2's, Digital I/O Pins are referenced using a port.pin notation, however, Analogue Channels are referenced by a channel number.

Thus when converting to use X2 PICAXE, Digital I/O Pins need their references changing ( "0" to "C.0" for example ), but Analogue Channels remain the same ( though the actual Channel Number may need adjusting ).
 
Top