Tvmender
Active member
Hi All
I have recently completed my prototype PICAXE Lasertag project. I did in the past work for Laser Quest as an Electronics Engineer and always fancied building my own kit, I then had kids which gave me an excuse!
Some info:
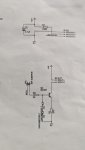
System is based on PICAXE 20M2 of which each pack has 3. The front pack contains the main game processor unit which deals with the IR comms, incoming IR data from 4 x 40KHz IR sensors, serial sound effects communications and battery status monitoring. The second PICAXE purely deals with the displays driving multiplexed LEDs both front and back and on the phaser. The LEDs can be red, green or yellow depending on the team selected and will flash all in tandem when hit.
The rear pack contains the third PICAXE which deals with the real-time radio communications using a 433MHz module (Tx and Rx) a bit like a modem allowing control of the game packs and scoring in real time and some more battery level monitoring. The encoding and decoding is done via HT12D and HT12E decoder/encoders. This communicated with a base station made from a modified version of the pack's rear board and will allow serial comms with a PC for PC based game control.
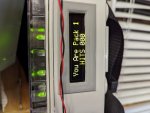
Sound effects are via the SPE033 MP3 player with 1Gb SD card. Player display is an OLED display.
The phaser contains a 14M2 and deals with encoding the IR data based on the packs ID setting, trigger activation and rapid fire modes and laser activation.
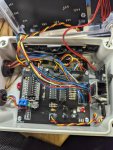
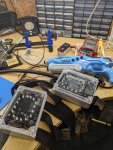
I have utilized the PICAXE 20M2 development board by standing it on risers giving me more PCB space below and the fact the protoboard has most of the supporting hardware on it too further reducing board space.
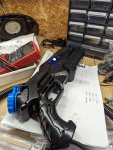
The PCBs are from JLC and were incredibly cheap (total of about £16 for 15 boards!) and I do love them in black. The phaser casing are cheap water pistols from Amazon and the lasers are low power (although I do make the kids wear those green laser "shades" just in case). I used 2" webbing for the straps and the electronics are encased in IP65 clear fronted WISKA boxes.
Anyway, just thought I would share this! I am still messing around and refining software and hardware but the kids seem to enjoy it! Total build cost of around £200.
I have recently completed my prototype PICAXE Lasertag project. I did in the past work for Laser Quest as an Electronics Engineer and always fancied building my own kit, I then had kids which gave me an excuse!
Some info:
System is based on PICAXE 20M2 of which each pack has 3. The front pack contains the main game processor unit which deals with the IR comms, incoming IR data from 4 x 40KHz IR sensors, serial sound effects communications and battery status monitoring. The second PICAXE purely deals with the displays driving multiplexed LEDs both front and back and on the phaser. The LEDs can be red, green or yellow depending on the team selected and will flash all in tandem when hit.
The rear pack contains the third PICAXE which deals with the real-time radio communications using a 433MHz module (Tx and Rx) a bit like a modem allowing control of the game packs and scoring in real time and some more battery level monitoring. The encoding and decoding is done via HT12D and HT12E decoder/encoders. This communicated with a base station made from a modified version of the pack's rear board and will allow serial comms with a PC for PC based game control.
Sound effects are via the SPE033 MP3 player with 1Gb SD card. Player display is an OLED display.
The phaser contains a 14M2 and deals with encoding the IR data based on the packs ID setting, trigger activation and rapid fire modes and laser activation.
I have utilized the PICAXE 20M2 development board by standing it on risers giving me more PCB space below and the fact the protoboard has most of the supporting hardware on it too further reducing board space.
The PCBs are from JLC and were incredibly cheap (total of about £16 for 15 boards!) and I do love them in black. The phaser casing are cheap water pistols from Amazon and the lasers are low power (although I do make the kids wear those green laser "shades" just in case). I used 2" webbing for the straps and the electronics are encased in IP65 clear fronted WISKA boxes.
Anyway, just thought I would share this! I am still messing around and refining software and hardware but the kids seem to enjoy it! Total build cost of around £200.
Attachments
-
 748.2 KB Views: 55
 -
 843.7 KB Views: 54
 -
 727.4 KB Views: 55
 -
 843.7 KB Views: 53
 -
 964.8 KB Views: 53