PICAXE-14M Starter Pack Error

DLP1

New Member
Error hardware not found... what's wrong?

I recently bought the PICAXE-14M Starter Pack from spark fun and have installed both programming software and usb download cable drivers. I set up the com port and the correct chip in the programming software but when I try to communicate (Run, firmware) I get Error hardware not found on comport 9. Ive tried different ports, reinstalling drivers and software and resetting the chip.

But one problem is when I get the error message it says to reset the chip to disconnect the battery, then go to picaxe, run and reconnect the battery when the progress bar appears. Wll I don't get a progress bar and I'm not sure whats wrong because from reading the manual I have done every thing right. I would just like to get this working but every thing I have tried leads to the same error.
 
Last edited:

manuka

Senior Member
Assuming a correct layout & config. (& no 14-M damage) I'd initially look at the editing PC & USB-D9 adapter. Details?
 

DLP1

New Member
PC type and cable? I'm using an hp compaq with windows xp media center edition and the picaxe usb programming cable. I have it connected to a usb port on the back and my pc sees that fine. If I connect an LED to an ouput it does light up. I have tried using the pcb that came with the package and also tried using a solderless bread board and came out with the same result.
 

moxhamj

New Member
There are quite a few possibilities. Any chance you could post some photos? Eg 2 photos of the soldered board, one of each side. And a photo of the breadboard setup. There are some tests to do with voltages that will be helpful. Have a look at page 26 of manual #1 in the help. With the diagram of the 3 pin plug, can you measure the volts between "1" and "3" (3 being the tip), and "1" and "2" and "2" and "3".

Also the volts between physical leg 1 of the picaxe and leg 8.
 

DLP1

New Member
Well I do not have a way to test the voltage right now :(
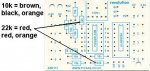
. But here are some pictures of it soldered.


And when using the solderless breadboard I had + going to pin 1 and - going to pin 14.
 

moxhamj

New Member
Great. Though I think my eyes are getting dim - the pictures are a bit blurry. The picture says 800x600 so should be really sharp so I'm wondering - could you maybe take the shots again.

Also re measuring volts can you get a multimeter? I saw them on special yesterday at the hardware shop for $9 so shouldn't hurt the budget too much. It will be very helpful to measure some volts around the place.
 

DLP1

New Member
Alright, I am now a proud owner of a multimeter. :)
In the programming editor I used the test function. Using the serial in pin and 0v I got a reading of .001 using 2v. Then selected the LED on option and got 0L. And from what the manual says that means the multimeter has reached it's maximum voltage so the test did work. I think.

And I tried to get better pictures but if the camera moves just a little bit then it gets blurry.
 

westaust55

Moderator
In the programming editor I used the test function. Using the serial in pin and 0v I got a reading of .001 using 2v. Then selected the LED on option and got 0L.
OL usually means over load or in your case over voltage.
Try setting the multimeter to a 10V or 20V DC setting.

PICAXE work on a voltage around 4.5 to 5Vdc. The meter should be set to the voltage range no less than the PICAXE supply voltage for most testing
 

westaust55

Moderator
But one problem is when I get the error message it says to reset the chip to disconnect the battery, then go to picaxe, run and reconnect the battery when the progress bar appears. Wll I don't get a progress bar and I'm not sure whats wrong because from reading the manual I have done every thing right.
Do you get a pop-up window?

That is where the progress bar is. (See attached file). If no connection is made then another pop-up winding appears indicating no connection found.
 

Attachments

Last edited:

DLP1

New Member
Yes that is the window I see then the error pops up. Also I tested again at 20v and had 0 with the led off and with it on I got 3.48.
 
Last edited:

westaust55

Moderator
I tested again at 20v and had 0 with the led off and with it on I got 3.48.
3.48V seems a bit low but indicates connection is being made.

While the PICAXE's can operate on lower voltages, for programming I think the voltage needs to be at least 4.5V and NOT MORE THAN 5.0 Volts.

What is your battery/supply voltage?
If the voltage is good (that is 4.5V to 5.0V) then you may need to check that the resistors for the serial programming pins are correct. See attached diagram - we cannot ascertain from the photos posted already.

I'm using an hp compaq with windows xp media center edition and the picaxe usb programming cable. I have it connected to a usb port on the back and my pc sees that fine.
Have you installed the USB drivers from the Rev-Ed website?
Look in this webpage: http://www.rev-ed.co.uk/picaxe/ then click on the Software TAB.

under the heading: AXE027 PICAXE USB Download Cable about 80% way down the page.

There are MS Windows drivers but apparently they will not work in the PICAXE arrangement.
 

Attachments

Last edited:

moxhamj

New Member
Just double check those volts. Looking at the circuit on page 19 of the picaxe manual 1 -there is #2 of the download circuit which goes to the junction of the 10k and 22k resistors. It is the same download circuit for all the picaxes. Measure the volts between that point and ground. You shoud get something like minus 11 or minus 12V. There are some USB to serial drivers, and there are some PCs (laptops) where the volts are -5V, or worse, 0V, which isn't a valid RS232 voltage. Proper RS232 volts are -12V and +12V (at least from a PC) and sometimes device drivers skimp and give you 0V and +5V.

Also can you leave the negative lead of the multimeter on the ground, and put the positive on physical leg 1 of the picaxe chip and just test it reads 5V. Leave the multimeter on the 20V range for all this.

At the very least you need proper RS232 signal levels and proper power supply levels to get a picaxe to work. If all that is ok we can move on to other tests :) Hang in there, we will get this working!
 
Last edited:

DLP1

New Member
Well I tested from 0v to pin 1 and got around 4.8. Also something I've been wondering about was the jumper. When I get the error it says "Is pin 0 in the program position on boards fitted with a jumper link?" It is also mentioned on page 19. I do not have anything connected right there. Is that a problem?
 

eclectic

Moderator
DLP.

The "jumper" is only fitted to the 08M board.

Going back to the comments made by Dr-A and 212;

Can you please try again with the photographs?

Flash ON and resting the camera on a FIRM support.

e
 

DLP1

New Member
Thank you guys for all that helped! I decided to just take every thing off the board again and resolder it (probably should have been the 1st step but I was so sure that it was right). Well I plugged it in and got the download screen and it was successful. I'm guessing that I switched one of the resistors around. I'll be back. :)
 

westaust55

Moderator
good to see that progress has been made and you now have communications between the PC and PICAXE.

I guess you did not check the resistor locations in advance of removing all parts.
It could have been a "cold" solder joint. experienced one myself recently which took a while to find as the joint was mechanical okay but extremely high resistance.
 

Dippy

Moderator
Good news DLP1.

Don't worry, you aren't the first and you won't be the last.

But at least you persisted and didn't blame the PICAXE like some have done :)

A lesson learnt for the next time eh.
 
Top