ideas for lcd mounting needed

rjconway

New Member
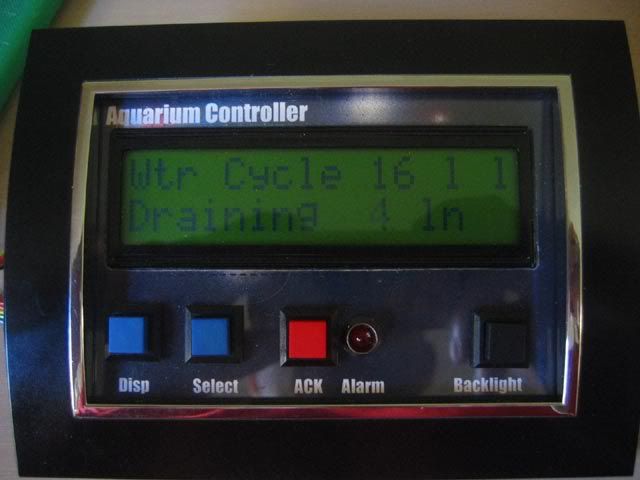
A couple of years ago I mounted a lcd and buttons in a small picture frame. It was OK but still looked like DIY. I have also downloaded the front panel design software where I can get a front panel manufactured. However this is approx US60.00 for a very small aluminium panel.

I have a 4x20LCD (actual Display size 100mmx40mm) needing 4 buttons and was hoping a couple of holes that I can icnlude a ir and LDR. I have also been searching without luck for a set of mylar buttons that can simply stick onto the front bezel. The PC based display solutions are all too small for my LCD.

Anybody seen any good designs or suggestions on mounting this equipment. I want to finally install this into a door of an aquarium.

rob
 

BrendanP

Senior Member
I need to make some mounting plates for my incubator controls/lcd. I was going to have some panels cut out as well but after seeing the good results possible with hand made panels I will give it a try.

What is the the hack saw you refer to BB? Just a smaller version of the normal full size hack saw?
 

Andrew Cowan

Senior Member
A junior hacksaw is like a normal hacksaw, just with a narrower blade.

I tend to use a dremel with cutting disc (for metal), or chain drilling and a file (for plastic or wood).

A
 

BrendanP

Senior Member
Thanks guys, the blue/chrome buttons will look good with the blue lcds I have Hippy.

I have a dremel Andrew, I find it difficult to get a nice straight cut with it.

I'm thinking that if I g clamped a bit of light flat bar steel on top of the ally sheet I could use the steel as a straight edge to run the cutting wheel along the four sides of the lcd aperture. The button holes I can do in the drill press. I've seen people use duct or insulation tape stuck over the soft ally sheet to prevent it getting scratched whiles it is being worked on.
 

hippy

Ex-Staff (retired)
Duct and insulation tape not only avoids scratches and allows hole positions to be marked but also prevents tool skidding, but be careful of getting what you used ripped up and wrapped round the tool head. From a memory of metalwork class from way back when, we used some blue dye to paint the surface and scribed (*) layout lines and centre-punched hole locations.

I find using straight edges as guides not to work well, better to cut roughly and file perfect, but it depends on ones skills and patience. One of the times practising on a bit of off-cut makes sense.

(*) That brings back fond memories of one Mr Eddie "scribe an arc" Turner who not so much taught Geometrical and Engineering Drawing as made people fall in love with the subject.
 

westaust55

Moderator
Thanks guys, the blue/chrome buttons will look good with the blue lcds I have Hippy.

I have a dremel Andrew, I find it difficult to get a nice straight cut with it.

I'm thinking that if I g clamped a bit of light flat bar steel on top of the ally sheet I could use the steel as a straight edge to run the cutting wheel along the four sides of the lcd aperture. The button holes I can do in the drill press. I've seen people use duct or insulation tape stuck over the soft ally sheet to prevent it getting scratched whiles it is being worked on.
Beware that a combination of aluminium filings and steel filings, if warm enough from cutting/grinding, can create a very nice "bang" (aka explosion). :eek:
 

rjconway

New Member
This is a pic of my first unit I biult a couple fo years ago. Its a picture frame with a perspex lense, you just cut through it, mount an appropriate background and clip the frame together. It worked OK however the next version I want to look even better. I think its the buttons that whilst they mount OK its nothing like a "real" interface that they use touch sensitive button pads. I was also thinking if I just mounted a three ldr's behind a small hole of the lense the use would just place their finger over the hole to simulate a press. I would mount one ldr to monitor ambient light and then compare the other ldrs from this reference to see if its pressed. It would probably work during the day however not so well at night. Any other ideas about a "finger" sensitive button, It would be good if it worked at night.

 
Last edited:

womai

Senior Member
You can design very attractive frontpanels and bezels from regular printed circuit boards (PCBs). Provided you already order a professionally made PCB for your circuit, simply add the frontpanel layout to it. Usually setup cost for small PCB orders is substantial but additional PCB area is comparably cheap.

Then cut the frontpanel from the actual circuit PCB. Vendors like PCBCart offer different colors for soldermask and silkscreen, that gives even more variety. Since it's a normal PCB you can get holes of different size, cutouts etc. for no or little additional cost.

Attached is my latest design that uses that trick, with white silkcreen on red soldermask. The enclosure is an off-the-shelf Serpac model, but front and back panel are my custom design. Adds less than a dollar to the cost of the instrument and saves me a ton of work. (not to mention it looks much more professional that something I cut out and label myself).

Wolfgang
 

Attachments

Last edited:

hippy

Ex-Staff (retired)
Elegance and style can often be achieved through being discreet which I imagine is what using LDR's as button seeks to achieve but you may not need to go that far. There are 6mm x 6mm tactile push buttons which have long stalks for the button activation, and these can be mounted to sit in a ~3mm diameter hole with just a bit of the stalk showing so effectively flush. Likewise you can get flat-topped small LED's of similar size.

Another alternative are TV remote control or calculator buttons which aren't silk-screened. A bit of hack-sawing and hole cutting may be all you need to get a nice low-profile button.
 

rjconway

New Member
Hippy, I have seen those long stork swicthes. Maybe I should take another look at them. The LCD module I ahve has a pcb overhang of about 15mm both top and bottom so the buttons would have to be quite low compared to the screen.

I must investigate flat surface LED's. Never seen these however would look so much better sticking through a hole.
 

hax

New Member
For the below panel, I had a glazier cut and polish a rectangular piece of 4mm safety glass for me. The capacitive touchbuttons are from a company called Qprox. My local printer uses a laser printer sublimation technique to transfer the toner to the glass. The image is deposited on the back of the glass so that it will not wear out. The pcb was made by pcbcart and the front panel was made in open office draw. Its important to use a vector drawing package such as draw so that you can send it to any printer and they will know what true size it should be when printed.

Each step costs only a few dollars but it adds up... the final result was around AU$100 per panel in a run of 5 units. But that includes all the materials and the PCB. It is the setup costs that kill you. In a large run the material cost would be less than $5 each.
 

Attachments

rjconway

New Member
OK I got a new method.....I have created a panel design and included button outlines with an LCD cutouot. This is simply done in powerpoint and printed on color paper. I then laminated the paper and palce tactile buttons under the laminate film. The laminate is soo clear it will also make a great LCD lense.

I'll post some early pics on the weekend.
 
Top