How to write the demands for the motors? I am using MacAXEpad.
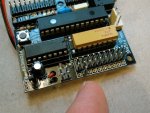
Here is how I connected, I connected the motors to A & B already, but I don't know how to control it by programming.
Here is the data sheet for my project board: http://www.picaxe.com/docs/axe020.pdf
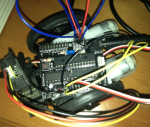
Here is how I connected, I connected the motors to A & B already, but I don't know how to control it by programming.
Here is the data sheet for my project board: http://www.picaxe.com/docs/axe020.pdf
")