help !

sid

Senior Member
I am new to picaxe and have just written my first program which runs well enough in simulator.:D, however I can't download the program to the 08m.:(
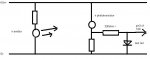
I have downloaded and installed the AXE027 drivers and have set the coms port.
I'm connected to the chip via the axe 027 usb-board cable , but when I press run I keep getting the error message "hardware not found on com1":(
I have checked all the connections etc and have run out of ideas.:confused:
Any advice anyone can offer would be greatly appreciated.
 

ylp88

Senior Member
Have you checked that you are using the correct COM port and that your cable is working by performing a loopback test?

What are you powering your circuit with? Battery/plug pack? Direct/regulator?

Are you breadboarding it, or have you fabricated a PCB?

ylp88
 

sid

Senior Member
picaxe

thanks,
how do I do a loop back test ?
I'm powering the baord with a model rail controller set at 5v (tested with a voltmeter,
Oridiginally I was using the axe29 connected to the breadboard after a couple of hours of playing with this I gave up and made a veroboard version following the diagrams in the manuals and I still get the same message.
I have checked that I'm plugged into com port3 (in my case) and that the editor is set to com port 3
?
 

sid

Senior Member
I meant to add, I did the test where I measured the voltage across the input and output pins 2&7 and got a reading of 0.16v on both boards and when I hit the green test button I got 0.49v.
I'm beginning to think that the cable might be a fault ?
I could just be missing the obvious !
 

Technical

Technical Support
Staff member
You should measure beteen leg 2 and 0V, not legs 2 ad 7.
Do you get 5V across legs 1 and 8, the chip power legs?
 

sid

Senior Member
yes I get 5v between pins 1&8
my mistake on the previous message, the usb help states...
3) Use a multimeter on the DC Volts setting to measure the voltage between the PICAXE serial input pin and 0V.
4) When the LED is off, the signal should be between 0V and -1V.
5) When you click on the LED the signal should switch high.


I now understand this to be pins 2&8, I still don't get any high reading
 

westaust55

Moderator
thanks,
how do I do a loop back test ?
I'm powering the baord with a model rail controller set at 5v (tested with a voltmeter,
A model railway controller -ouch !

That controller may have a lot of ac ripple voltage, or could even be pulse width modulated.

None of these things are very kind to the PICAXE chip and in fact may even exceed the absolute maximum voltage ratings of the PICAXE chip.

Please get 3 x AA (1.5V) batteries and a battery holder for a known power supply.
 
Last edited:

westaust55

Moderator
To check if you have selected the right Comm port,

Go to Control Panel / System / Hardware / Device Manager /

Then open the directory "ports"

It should list the AXE027 and indicate exactly which COM port is being used.
Then select this in the Programming Editor.

Note that if you start the programming Editor without the AXE027 cable plugged into the PC (does not need to be plugged into the PICAXE board) the Programming Editor will not find the AXE027 and reverts to COM1.
 

ylp88

Senior Member
To perform a loopback test, connect the RX and TX pins together on your serial cable (i.e. the points you are using to connect to the SERIN and SEROUT pins of your PICAXE chip). Then using Programming Editor's "Terminal" facility, ensure that any text that you send is echoed back to you.

ylp88
 

BeanieBots

Moderator
A model railway controller -ouch !
This needs emphasisng even more!
Use 3 X 1.5v AA batteries. If it still doesn't work, don't waste any more time on it until you have purchased a new chip. Your "model railway controller" is very likely to have destroyed your chip. Even if your multimeter says 5v, the controller is unlikely to be putting out a clean 5v DC. MOST put out PWM volts which can peak at about 24v.
 

moxhamj

New Member
While you are waiting for the 3 batteries to arrive, you can still do the loopback test and test that RS232 data is getting to the chip. Take the chip out for the moment, but leave in place the two download resistors. Measure the volts at the point where the 10k and 22k resistors join. You should get -9V. You might get -5V and you might get -12V. Now, with no chip in place, just try downloading a program. It will fail, but before it comes up with the error message, the voltage should change to a positive voltage. This will test that the com port at least is working. If that works we can move on to a loopback test.

Also, do you have access to a camera? If so, a quick photo of your board may help a lot - people here are pretty good at spotting chips in the wrong way or resistors not quite right.
 
Last edited:

sid

Senior Member
Thanks for your advice, I thought 5v was 5v ?
Anyway I've now connected to 4.5v from 3cell battery and have managed to download to a new 14m chip (I guess I've damaged the 08m through inapproriate voltage, ah well you live and learn !)
But now having downloaded the program into the chip all it does is ignore the program and flash an led on output 0 (pin13)
Any ideas ?
 

westaust55

Moderator
Thanks for your advice, I thought 5v was 5v ?
Anyway I've now connected to 4.5v from 3cell battery and have managed to download to a new 14m chip (I guess I've damaged the 08m through inapproriate voltage, ah well you live and learn !)
But now having downloaded the program into the chip all it does is ignore the program and flash an led on output 0 (pin13)
Any ideas ?
For future reference, some multi-meters are just average reading and others are true RMS (root mean square) measuring. Most cheaper meters are just averaging and the true RMS types generally cost quite a bit by comparison.

Others may take me to task over the simplicity but if you have pure DC then both will show the same reading.

Likewise, if there is ac ripple on the DC or a pulsed signal the averaging meter will not show the ripple component but the true rms will show some variation.

If you then measure on the ac volts range, a pure dc voltage will give 0 Vac but if there is an ac ripple or it is a pulsed signal you will see some voltage level.
 
Last edited:

sid

Senior Member
Thanks for the advice, I'm new to all this and learning.
Any ideas why led flashs on output 0 rather following the program I downloaded into it ?
 

Dippy

Moderator
Post your code and schematic (i.e. a drawing of how you've connected it).
It's sometimes easy to overlook something.
 

hippy

Ex-Staff (retired)
Any ideas why led flashs on output 0 rather following the program I downloaded into it ?
Have you downloaded a program to it ? I thought that was the problem, that you couldn't.

As to why Pin 0 may flash ... That's the Serial Out line as well as Output 0 so it could be that the 08M has got itself into a state where it thinks a download is occuring and tries to acknowledge that, download doesn't follow, it gives up, resets, starts again, only to end up in this forever repeating state.

If you haven't damaged your PICAXE this could point to a wiring error when it comes to the download interface.
 

sid

Senior Member
Thanks,
I'd neglected to add the 10k resistor to the breadboard. doh!
The program has now loaded and works (apart from some required tweeks)
My first picaxe project.
I've also bought a book from maplins re power supplys
Many thanks to all for all the advice
Rgds,
Sid
 

Dippy

Moderator
Good news... you aren't the first to forget it and won't be the last.

Keep up the good work, keep posting... but PLEASE treble check wiring first yeah? :)
 

sid

Senior Member
(unfortunately I'm unable to attach a photo)
but my first picaxe program and circuit is up and running!
The board is my version of a down load board,
It has two screw terminals to connect another board to the inputs on pins 3&4.
The program is a very simple led on/off strobe effect just to prove that it works.
The beauty of this system is that I can leave the board plugged into the pc, write some code, down load it and see if it does what I want, brilliant!
The circuit is the start of a control modual for a 3 aspect color light signal for my model railway, the idea being that the train pass's over an ir emitter/photransistor which I'm hoping can be used as switch on input3,
This is the next part of the project so doubtless more posts to come
Cheers, Sid
 

boriz

Senior Member
I used a digital camera > Put image on PC > Edited image for size and framing > Uploaded it to a host (in this case my own webspace provided free by my ISP) > Copied the URL of the image > Embedded the image into my post by using the IMG tags thus: {img}http://image_url.jpg{/img}

(Note you must replace '{' with '[', and replace '}' with ']'. If I had typed it that way, the forum would think I am trying to post an image)

Once you know the URL of an image anyplace on the net, you can embed it in your post with the IMG tags.

If you right-click my image above > Select properties. You can see the URL of the image. Same with any image on any webpage.
 
Last edited:

sid

Senior Member
cheers for that, Afraid i don't have a web site so won't be posting pictures anytime soon,
Back to the matter in hand, my board has three leds on op pins 0,1,2 if I write a simple program to light each led or all leds in any combination of sequences it works.
If I add a switch to the program on ip pin 3 the program works ok on the simulator but not when downloaded to the 14m, I'm using 5v from the postive rail as the input to pin 3
I would be grateful for any advice
 

eclectic

Moderator
cheers for that, Afraid i don't have a web site so won't be posting pictures anytime soon,
Back to the matter in hand, my board has three leds on op pins 0,1,2 if I write a simple program to light each led or all leds in any combination of sequences it works.
If I add a switch to the program on ip pin 3 the program works ok on the simulator but not when downloaded to the 14m, I'm using 5v from the postive rail as the input to pin 3
I would be grateful for any advice
Sid.
1. You don't need a website.
A digital camera or a scanner. Save the image as .jpg.
When you reply, use the "Manage attachments" option.

2. Please post your program.

3. You also need to post your circuit.
If, at the moment, you haven't got any schematic software, then make a neat line
drawing, then scan and continue as 1 above.
Alternatively, use Paint or a similar drawing program.

e
 
Last edited:

hippy

Ex-Staff (retired)
If I add a switch to the program on ip pin 3 the program works ok on the simulator but not when downloaded to the 14m, I'm using 5v from the postive rail as the input to pin 3
Did you add a pull-down resistor between Pin 3 and 0V ? A 10K pull-down is common, but anything between 1K and 10K and even a little higher should be okay.

When your switch is closed you put +5V into pin 3 but when it is open Pin 3 is just 'dangling there in space, not connected to anything', also called "floating". It doesn't usually do any harm to a chip but it very likely will confuse the software which reads that pin.

See page 25 of PICAXE Manual 3. The 1K shown there isn't an absolute necessity, just good practice.
 

sid

Senior Member
Thanks,
That's solved the problem!
I've now printed the manuals to refer to
Thanks again
Rgds,
Sid
 

sid

Senior Member
Sid.
1. You don't need a website.
A digital camera or a scanner. Save the image as .jpg.
When you reply, use the "Manage attachments" option.

2. Please post your program.

3. You also need to post your circuit.
If, at the moment, you haven't got any schematic software, then make a neat line
drawing, then scan and continue as 1 above.
Alternatively, use Paint or a similar drawing program.

e
Thanks for the advice, I drawn a diagram in paint, but every time I try to upload it to the attachments option I get a "file not recognised" error message.
I've tried changing the .bmp to jpg, jpeg, txt, doc etc but keep getting the same error message,
any ideas?
 

westaust55

Moderator
File types

Did you save the file from Paint in the jpg format, or

did you change the filename extension after it was saved?


You must save the file from Paint as the type jpg.
 

moxhamj

New Member
I use paint shop pro but it is an old version. The new versions cost $100, but the old versions were/are shareware. My version is 4.12 http://www.oldversion.com/program.php?n=psp and if not there, hopefully you can get the shareware version somewhere.

PSP is a full featured drawing program and is a lot easier to use than paint. It allows resizing of pictures, and this is very useful when you have a 2Mb photo from a camera and you want to shrink it down to 640x480. I use the resample/resize function almost daily.

It also has a screen capture. So you can start the screen capture program, PSP then goes away, you run whatever program you want, and then when you hit F11 it captures the screen (even deletes the mouse if that was over the picture). Then grab the bit of picture you want, do a copy, do a 'paste as new image' and save that new image as a jpg. Takes less than 15 secs when you get used to it.

Also useful for creating a passport for DrAcula when chatting to Nigerian scammers. Passport is only valid for night time travel though.
 
Last edited:

westaust55

Moderator
I concur with Dr_Acula. MS Paint is far from ideal for doing schematics. No zoom capability and difficult to draw a continuous line when it needs to be longer than the screen width.

Like Dr_A, I also have an earlier version of Paintshop Pro (Full V5 came on a mag coverdisk a couple of years ago).

But until recently I did my tidy sketch snips for upload to the forum in Excel - it includes a simple drawing package with lines, boxes, text and all these can be coloured. Then I would print to a pdf file using one of the free PDF Creator type programs. No problems uploading a pdf file.

.pdf files can be up to 972 kBytes in size as can jpg files. But note that jpeg file extension limits the file size to just 19.5 kBytes so make sure you pick the right file extension/type.

But as mentioned in post 28 (back a page), I recently gave DIPTRACE a trial after B]Mycroft [/B] advised there is a fee copy from the program creators website (with a 250 hole limitation – but that still gets you quiet a reasonable sized circuit) and am now hooked on it. Now I am gradually working thru CAD’ing all my hand sketches.
 

sid

Senior Member
Thanks for all the advice chaps re attachments.
ir switch.jpg
hopefully this has now worked
I've now got my 14m working fine, so the next stage of the project is the ir switch.
the idea being that a model train passes over the the emitter and reflects ir back into the sensor/phototransistor which then goes high and can be used as an input to the 14m.
At the moment the ir reciever is only connected to a test led as I'm asuming that when it senses ir it will go high and therfore pass enough current to light the led. This way I can visably see if the circuit is working.
when I can get this to work it will be connected to the input pin via a 10k & 1k resistor as coached in an earlier post
The sensors are from rapid electronics and I have no idea of the resistor values, so have just been playing around with different values.
I realise that the emitter can only take 1.5v.
Anyhoo it doesn't work so again I would be grateful for any adice
cheers,
Sid
 

moxhamj

New Member
Ballpark figures. 5V supply, the resistor on the IR led = ?1k.

On the phototransistor = ?2k7. But I'd leave out the other resistor and the indicator led for the moment. Power up the IR led. Power up the IR transistor. Leave out the picaxe. Use a multimeter to measure the volts on the output of the phototransistor. Just check what it does when the train goes through.

I'm not sure it will work with reflecting light. Unless you have some aluminium foil on the underside of the train or a small mirror or something. Maybe better to shine the light across the track and the train blocks the light as it goes through.
 

sid

Senior Member
Hi Dr acula,
I took your advice and got my multimeter out.
I have attached a couple of photos as It makes it easier to explain.
The led on the left is the ir emittor, the ir on the right is the phototransistor (I have also tried a ir sensor in this postion with the same results).
The resistor connected to the source is a 1k and after noticing a slight variation and then playing around the resistor connected to the sensor/phototransistor is 1meg. I have covered both leds with a sleeve to contain the ir light.
The odd thing is that when both leds see each other I get a reading of 4v (although for some reason this 4v will not light an led or get the picaxe to ackowledge it as an input). when both leds can't see each other then the reading drops to 0v. This is the reverse of what I expected to happen.
I can get the progam to act upon either a high or low reading but as expalined above the 4v does not seem to make anything work ?
your advice would be most welcome
IR CIRCUIT1.jpg

IR CIRCUIT2.jpg
 

sid

Senior Member
Thanks e,
I already had the fairchild datasheet and was working from it, but the circuit doesn't work at all when wired as Figure 1. Common-Emitter Amplifier only when wired as a Figure 2. Common-Collector Amplifier :confused:.
I will print off the stuff from the electronic club web site and see I can make sense of it.
Cheers,
Sid
 

boriz

Senior Member
Can’t see for sure, but it looks like you might have the meter+ve lead connected to the + rail and the meter–ve lead connected to the –ve leg of the phototransistor. If true, then your readings are normal and correct. You are measuring the voltage across the phototransistor. This is the opposite of what the AXE input will see. Try connecting your meter across the phototransistors resistor. You should always have the meter-ve connected to the 0v supply rail of your circuit when possible.

The way you have your circuit, all the test LED current comes through the phototransistor and that’s too much for the phototransistor to handle. Don’t ‘load’ your phototransistor, it’s not designed for that, see the datasheet for it’s max current. Also, you are limiting your AXE input voltage to the forward voltage drop of the LED.
 

moxhamj

New Member
Well if you can read a voltage on a multimeter then you can read it on a picaxe. So the phototransistor circuit is very simple - just a resistor and the phototransistor. Nothing else. You can tinker with the resistor, but I'd just read this in using readadc. You will get a number from 0-255 and you can do clever things with that in code, such as detect if it is over a certain value. It doesn't matter if it goes lower or higher when the train goes through - you can fix that in code. Though Boriz has already spotted the reason the volts are the opposite to what you expect. Readadc is going to be a lot more flexible than reading high or low as 4V may or may not be quite enough to trigger a high. (actually, as boriz points out, if you are measuring from 5V, then what you are reading as 4V is in fact 1V with respect to ground, and 1V is not low enough possibly to trigger a low which I think trips at 0.8V. ) In your case, use readadc and just test if the value is > or < 128.

Just watch that sleeve that is blocking the light. It may well look black and be blocking visible light but it might not block infrared light. I have found a little metal tube works best - if you are working with model trains have a look for some brass tubing next time you are down at the hobby shop.
 
Last edited:
Top