ESP8266 BASIC
- Thread starter Electronics Learner 123
- Start date
Electronics Learner 123
Well-known member
Bought the components today 
Electronics Learner 123
Well-known member
Would it be possible to start the code even though my parts haven’t arrived yet and will probably arrive end of next week?
lbenson
Senior Member
It appears to me that hippy has made a huge step towards solving the web page problems you will face in this thread:Would it be possible to start the code even though my parts haven’t arrived yet
Where's the Wizard ?
Prompted by the current thread about web-enabled ESP things, I revisited the PICAXE Net Server. ( https://www.picaxestore.com/net002 ). I have a couple of these, bought as scrap for £1.20 each, and both work fine, but I've not done anything with them. It was something relating to TC/PIP...
He has code serving a page with a 28X2 and I have it working with a 40X2 serving a page like the one you're working on. He has coded it so that it is set up to run also on a 20X2, but there could be some question of whether the scratchpad is large enough on that chip.
If you download his file, note that it has to be broken into 4 pieces, 3 of which are then "included" in the short main stub.
Electronics Learner 123
Well-known member
Hi Ibenson,It appears to me that hippy has made a huge step towards solving the web page problems you will face in this thread:
Where's the Wizard ?
Prompted by the current thread about web-enabled ESP things, I revisited the PICAXE Net Server. ( https://www.picaxestore.com/net002 ). I have a couple of these, bought as scrap for £1.20 each, and both work fine, but I've not done anything with them. It was something relating to TC/PIP...picaxeforum.co.uk
He has code serving a page with a 28X2 and I have it working with a 40X2 serving a page like the one you're working on. He has coded it so that it is set up to run also on a 20X2, but there could be some question of whether the scratchpad is large enough on that chip.
If you download his file, note that it has to be broken into 4 pieces, 3 of which are then "included" in the short main stub.
This is a great source.
Does this mean that I will need to get a picaxe server or can it be preferably be run of the NodeMCU?
In his code he uses #include is this Basic
lbenson
Senior Member
PICAXE net server is no longer sold. Hippy is producing what I see as an upgraded replacement, using a 28X2 or 40X2 PICAXE and an esp8266 like the ESP-01 or NodeMCU to provide wifi access.
The #include files are basic code. His code with my html code (similar to your 2-pushbutton code) is about 3K, so too big for a 20x2.
The #include files are basic code. His code with my html code (similar to your 2-pushbutton code) is about 3K, so too big for a 20x2.
Electronics Learner 123
Well-known member
Would it be possible to store the HTML on a website (so not stored on the Picaxe) which the Picaxe then can access
lbenson
Senior Member
I don't see how that makes things any easier from the picaxe side. How do you think it might?Would it be possible to store the HTML on a website (so not stored on the Picaxe) which the Picaxe then can access
Hemi345
Senior Member
Yes, this is what I initially did with my first PICAXE-powered humidistat. I had a very basic web page programmed into the PICAXE that referenced Javascripts on my website. The javascripts made AJAX calls to other files on the website that built most of the web page. Then I was able to get as fancy as I wanted to without the storage and programming limitations of using the PICAXE to serve up the entire page/site.Would it be possible to store the HTML on a website (so not stored on the Picaxe) which the Picaxe then can access
FWIW, I eventually abandoned the concept of using the PICAXE as a webserver because it was much easier to keep the PICAXE doing what *I* think it's best used for (interacting with sensors, ADC, etc) and let the ESP handle the web communications with a simple UART bus between them.
Most of my IoT devices only publish data to the web. My home HVAC system's humidifier is controlled by a PICAXE and reports the stats to the web. My window blinds are also PICAXE controlled and used to have the capability to open and close on demand rather than light level, but because they're 12ft off the floor, they needed to be battery powered and the ESP was much too hungry to leave powered up all the time. Now they just check in once a day to report battery voltage so I know when I'll need to break out the ladder and swap the batteries
")
Electronics Learner 123
Well-known member
Hi, thanks for the information, would it be possible for you to send the HTML/css/javascript etc... code for your actual website and for the Picaxe so that I can have a look at how it works?Example webpage on PICAXE:
Code:<!html> <head> <link type="text/css" rel="stylesheet" href="http://mywebsite.com/s.css"> <script src="http://mywebsite.com/s.js"></script> </head> <body></body> </html>
Kind Regards
Electronic Learner 123
Hemi345
Senior Member
Take a look at this TUTORIAL. She pulls it all together at the end of the article and that's basically what I was doing in a nutshell.
Note how she includes the script file at the end of the document. That ensures the DOM has finished loading and the various page elements will be ready to be manipulated with the JS.
My example in the previous post won't work unless you use a ready function to ensure the DOM has loaded. Otherwise, your JS code will fire before the page has finished rendering unless you programmatically check that the DOM is loaded and ready before doing anything.
Last edited:
Electronics Learner 123
Well-known member
I was thinking of doing this to save space on the PICAXE and have a better designed website without having to worry about storage etc... Would this be okay?I don't see how that makes things any easier from the picaxe side. How do you think it might?
Electronics Learner 123
Electronics Learner 123
Well-known member
Will you be able to help in terms of getting the webpage to talk to the nodemcu to send variables etc...
No reason not for it to be ok if you can figure out how to do it.
Hemi345
Senior Member
The process is the same regardless if the webpage is delivered by the PICAXE or from remote scripts.Will you be able to help in terms of getting the webpage to talk to the nodemcu to send variables etc...
All the code on PICAXE:
Code:
<!html>
<body>
<form method="get">
<button type="submit" name="L" value="0">LED Off</button>
<button type="submit" name="L" value="1">LED On</button>
</form>
</body>
</html>
Code:
<!html>
<body></body>
<script src="http://mywebsite.com/s.js"></script>
</html>
Code:
document.body.innerHTML = '<form method="get">' +
'<button type="submit" name="L" value="0">LED Off</button>' +
'<button type="submit" name="L" value="1">LED On</button>' +
'</form>';If programming in JS is comfortable for you and you have a website, then I would go that route. If you don't have a website and/or aren't comfortable with JS, then just put it all on the PICAXE like in the first code snippet at the beginning of this post.
Electronics Learner 123
Well-known member
Will you still be able to help with the AT commands and controlling picaxe over the web?I'm afraid I know nothing about this kind of use, and my goal is not to have to program more than one device.
Electronics Learner 123
Well-known member
Thanks, how would I go about controlling the Picaxe from a webpage now, for example I would like to turn a led on? I haven’t got all my parts yet but still would like to know how to do it!The process is the same regardless if the webpage is delivered by the PICAXE or from remote scripts.
All the code on PICAXE:
Will look and operate the same as having only following on the PICAXE:Code:<!html> <body> <form method="get"> <button type="submit" name="L" value="0">LED Off</button> <button type="submit" name="L" value="1">LED On</button> </form> </body> </html>
which references s.js on your website that actually builds the form:Code:<!html> <body></body> <script src="http://mywebsite.com/s.js"></script> </html>
Above is extremely rudimentary but gets the point across without getting down into the weeds of the JS language. The difference and main advantage of using JS is you don't have to keep reprogramming the PICAXE when you want to change/tweak the content or look of the webpage. You make all your changes in the code on your website and your browser will fetch and merge this content when it requests the page from the PICAXE.Code:document.body.innerHTML = '<form method="get">' + '<button type="submit" name="L" value="0">LED Off</button>' + '<button type="submit" name="L" value="1">LED On</button>' + '</form>';
If programming in JS is comfortable for you and you have a website, then I would go that route. If you don't have a website and/or aren't comfortable with JS, then just put it all on the PICAXE.
lbenson
Senior Member
Sure, if I understand how web page values are getting back to the PICAXE through the ESP8266 which invokes javascript to build a web page residing on another site. But Hemi seems to have experience with this.Will you still be able to help with the AT commands and controlling picaxe over the web?
Hemi345
Senior Member
Once you get the PICAXE and ESP hardware and program it to serve up a page, come back if you still need help figuring out how to act on a response to turn an LED on/off. There is a wealth of information on this forum. Search here for Wiznet as those threads cover a lot of the concepts for serving up a page and acting on data returned in the query string.
I have to say that this is a very ambitious project for your first experience with the PICAXE and ESP. You'll in for a lot of reading.
I have to say that this is a very ambitious project for your first experience with the PICAXE and ESP. You'll in for a lot of reading.
Electronics Learner 123
Well-known member
My Picaxe 20-X and project board came today, can I use this: https://www.ebay.co.uk/itm/USB-To-RS232-TTL-CH340G-Converter-Module-5v-3-3v-Serial-Port-Module-PL2303-UK/253513002243 to program it, and if so how?
Hemi345
Senior Member
No, that won't work without building something to invert the signals. Buy official AXE027 programming cable: https://www.picaxestore.com/picaxe/picaxe-download-cables/axe027My Picaxe 20-X and project board came today, can I use this: https://www.ebay.co.uk/itm/USB-To-RS232-TTL-CH340G-Converter-Module-5v-3-3v-Serial-Port-Module-PL2303-UK/253513002243 to program it, and if so how?
lbenson
Senior Member
Ok, I hope this does not represent a total hijack of the thread, since I think it's going in a direction which will help the OP.
I followed up Hemi's idea of hosting a web-page producing javascript file and a CSS file on a web server on a Raspberry Pi Zero-W on my local network. It's too complicated at this point to fold in the ESP8266 and the PICAXE, so I'm invoking it from my PC.
Here's my PC browser code (note my pi webserver is on port 20780), named js5.html:
<html><head><link type=text/css rel=stylesheet href=http://192.168.1.144:20780/s.css>
</head><body><script src=http://192.168.1.144:20780/b5.js></script></body></html>
Here is the file, s.css:
And here is my javascript file, js5.js:
Here is the output when I put js5.html in my browser (with path specified)
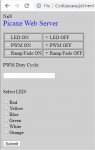
So far so good, except that I have no idea where "NaN" at the top comes from.
If I click some buttons and submit, I get "js5.html?L=0&P=1&R=1&N=511&X=W" as expected (indicating main LED off, PWM on with a duty cycle maximum of 511, ramping and fading, and the white LED lit), and could suppose that this would come back to the PICAXE through the ESP8266 ok, and I can deal with starting PWM and turning on LEDs as indicated.
My question is, how do I refresh the web page so that it shows the proper radio buttons checked and the current PWM Duty Cycle value in place?
I followed up Hemi's idea of hosting a web-page producing javascript file and a CSS file on a web server on a Raspberry Pi Zero-W on my local network. It's too complicated at this point to fold in the ESP8266 and the PICAXE, so I'm invoking it from my PC.
Here's my PC browser code (note my pi webserver is on port 20780), named js5.html:
<html><head><link type=text/css rel=stylesheet href=http://192.168.1.144:20780/s.css>
</head><body><script src=http://192.168.1.144:20780/b5.js></script></body></html>
Here is the file, s.css:
Code:
body {
    background-color: #d0d0d0;
}

h1 {
    color: #fff;
    font-family: Arial, Helvetica, sans-serif;
}
Code:
document.body.innerHTML = +
'<html><head><title> LED Control</title></head>' +
'<body><form name = input method = get>' +
' <font color=blue><font size=5>Picaxe Web Server</font><br><br>' +
'  <font color=black>' +
'  <table border="1">' +
'  <tr><td><input type="radio" id="A" name="L" value="1">LED ON</td>' +
'  <td><input type="radio" id="B" name="L" value="0" checked>LED OFF</td></tr>' +
'  <tr><td><input type="radio" id="C" name="P" value="1">PWM ON </td>' +
'  <td><input type="radio" id="D" name="P" value="0" checked>PWM OFF</td></tr>' +
'  <tr><td><input type="radio" id="E" name="R" value="1">Ramp/Fade ON  </td>' +
'  <td><input type="radio" id="F" name="R" value="0" checked>Ramp/Fade ' +
'    OFF</td></tr></table>' +
'' +
'  <p>PWM Duty Cycle:</p>' +
'  <input type="text" id="G" name="N"><br><br>' +
'' +
'  <p>Select LED:</p>' +
'  <input type="radio" id="H" name="X" value="R">Red<br>' +
'  <input type="radio" id="I" name="X" value="Y">Yellow<br>' +
'  <input type="radio" id="J" name="X" value="B">Blue<br>' +
'  <input type="radio" id="K" name="X" value="G">Green<br>' +
'  <input type="radio" id="L" name="X" value="W">White<br>' +
'  <input type="radio" id="M" name="X" value="O">Orange<br>' +
'' +
'  <br><button type=submit>Submit</button>' +
'</form></body></html> 'So far so good, except that I have no idea where "NaN" at the top comes from.
If I click some buttons and submit, I get "js5.html?L=0&P=1&R=1&N=511&X=W" as expected (indicating main LED off, PWM on with a duty cycle maximum of 511, ramping and fading, and the white LED lit), and could suppose that this would come back to the PICAXE through the ESP8266 ok, and I can deal with starting PWM and turning on LEDs as indicated.
My question is, how do I refresh the web page so that it shows the proper radio buttons checked and the current PWM Duty Cycle value in place?
Last edited:
Electronics Learner 123
Well-known member
What does PWM on/off do and what is a PMW Duty Cycle: ?
lbenson
Senior Member
This is just sample html code to illustrate a few different html input controls.What does PWM on/off do and what is a PMW Duty Cycle: ?
For PWM and PWM Duty Cycle, check manual 2, PWMOUT. It's used for, among other things, fading and ramping up brightness of LEDs.
That's "Not a Number". I would guess from the plus after the equals ...So far so good, except that I have no idea where "NaN" at the top comes from.
Code:
document.body.innerHTML = +You either get the PICAXE ( or whatever ) to send a new page back or use AJAX/REST to read the page and update your current one.My question is, how do I refresh the web page so that it shows the proper radio buttons checked and the current PWM Duty Cycle value in place?
Electronics Learner 123
Well-known member
What would be the BASIC code for the Picaxe to receive these variables/ signals etc...
lbenson
Senior Member
Right you are. I changed it to: document.body.innerHTML = "" +That's "Not a Number". I would guess from the plus after the equals ...
Maybe the |"" +| isn't needed.
Nothing is ever as straightforward as one would like it to be.You either get the PICAXE ( or whatever ) to send a new page back or use AJAX/REST to read the page and update your current one.
Last edited:
lbenson
Senior Member
This has been a good exercise, but I'm still not convinced that it is the way to go. I'd like to see how easy it is to update the page before continuing down what might be a dead end.What would be the BASIC code for the Picaxe to receive these variables/ signals etc...
Hemi345
Senior Member
My question is, how do I refresh the web page so that it shows the proper radio buttons checked and the current PWM Duty Cycle value in place?
Code:
<html><head><link type=text/css rel=stylesheet href=http://192.168.1.144:20780/s.css>
</head><body></body><script src=http://192.168.1.144:20780/b5.js></script></html>To make it so the page loads with the options pre-selected as they currently are on the PICAXE, you can add something like the 1st script contents in the following example to your js5.html:
Code:
<html><head><link type=text/css rel=stylesheet href=http://192.168.1.144:20780/s.css></head>
<body></body>
<script>var arrayCurVals = [0,1,1,511,W];</script>
<script src=http://192.168.1.144:20780/b5.js></script>
</html>
Code:
sertxd ("<script>var arrayCurVals = [",#b0,",",#b1,",",#b2,",",#b3,",",#b5,"];<script>")
Code:
var ledStatus = arraryCurVals[0];  // this will be "0"
var pwmStatus = arraryCurVals[1]; //this will be "1"
//...
var ledColor = arrayCurVals[4]; // this will be "W"
//etc

var ledInputOn = document.getElementById("A");               // reference the first LED radio button, ID "A"
var ledInputOff = document.getElementById("B");               // reference the first LED radio button, ID "B"
if (ledStatus == 1) {
    ledInputOn.setAttribute("checked", true);
}
else {
    ledInputOff.setAttribute("checked", true);
}Hemi345
Senior Member
The allure to me was I could develop the web page look and feel and immediately see the results without ever having to (re)program the PICAXE. Having the PICAXE deliver the basics withThis has been a good exercise, but I'm still not convinced that it is the way to go. I'd like to see how easy it is to update the page before continuing down what might be a dead end.
Code:
<html><head><link type=text/css rel=stylesheet href=http://192.168.1.144:20780/s.css></head>
<body></body>
<script>var arrayCurVals = [0,1,1,511,W];</script>
<script src=http://192.168.1.144:20780/b5.js></script>
</html>Also, the Content-Length header needs to be accurate otherwise the browser will keep waiting and eventually timeout if the content length is too long or truncate the content because you miscounted and came up short. I got tired of manually counting bytes or stripping out my PICAXE code and pasting it into Word to count characters. I'm constantly tweaking the interface, adding new features, etc and am reasonably comfortable with JS, so that's the path I chose to go.
Electronics Learner 123
Well-known member
What would I use the USB To RS232 TTL CH340G Converter Module 5v 3.3v Serial Port Module for? And how would I use it?Those should work fine. I have several similar. A bit on the clunky side as an appendage to a PICAXE, but they should have all the necessary features.
Do you have breadboards or flying wires (e.g., Dupont 40-pin cables) or the like for making connections? A usb serial module like this: https://www.ebay.co.uk/itm/USB-To-RS232-TTL-CH340G-Converter-Module-5v-3-3v-Serial-Port-Module-PL2303-UK/253513002243
Picaxe and means to program it?
lbenson
Senior Member
Connect USB module TX to ESP RX and USB RX to ESP TX, 0V to 0V, and 5V from somewhere--5V from my USB module worked to power the ESP8266 D1 Mini that I used, but some ESPs may need to be separately powered (e.g., from a hefty phone charger, with 0V also connected). Plug USB module into your PC. Don't connect 5V to ESP 3V3.What would I use the USB To RS232 TTL CH340G Converter Module 5v 3.3v Serial Port Module for? And how would I use it?
Then start puTTY or your favorite terminal program at 115200 baud and the proper COMM port for the USB module, type AT<Enter><Ctrl-J> and see if you get back "OK". If you don't, check your wiring; if you do, proceed with other AT commands such as "AT+GMR" and additional AT commands to find and hook up to your wifi. Hippy's code in the above-referenced "Where's the Wizard?" thread goes through all the necessary steps.
If your ESP has its own USB connector, you can plug that it and use your terminal with that (though again, sometime you will need a heftier power supply than you will get from your PCs usb port).
Last edited:
lbenson
Senior Member
Hemi--this is great stuff. So hard to learn this by just searching the web.To make it so the page loads with the options pre-selected as they currently are on the PICAXE, you can add something like the 1st script contents in the following example to your js5.html:
So I did everything to the extent of my understanding, and I'm still not getting the initial values I think I have set. Can you see what is wrong?
js5.html on the PC (from view source):
Code:
<html><head><link type=text/css rel=stylesheet href=http://192.168.1.144:20780/s.css>
</head><body></body>
<script>var arrayCurVals = [1,0,0,111,R];</script>
<script src=http://192.168.1.144:20780/b5.js></script>
</html>
Code:
document.body.innerHTML = "" +
'<html><head><title> LED Control</title></head>' +
'<body><form name = input method = get>' +
' <font color=blue><font size=5>Picaxe Web Server</font><br><br>' +
'  <font color=black>' +
'  <table border="1">' +
'  <tr><td><input type="radio" id="A" name="L" value="1">LED ON</td>' +
'  <td><input type="radio" id="B" name="L" value="0">LED OFF</td></tr>' +
'  <tr><td><input type="radio" id="C" name="P" value="1">PWM ON </td>' +
'  <td><input type="radio" id="D" name="P" value="0">PWM OFF</td></tr>' +
'  <tr><td><input type="radio" id="E" name="R" value="1">Ramp/Fade ON  </td>' +
'  <td><input type="radio" id="F" name="R" value="0">Ramp/Fade ' +
'    OFF</td></tr></table>' +
'' +
'  <p>PWM Duty Cycle:</p>' +
'  <input type="text" id="G" name="N"><br><br>' +
'' +
'  <p>Select LED:</p>' +
'  <input type="radio" id="H" name="X" value="R">Red<br>' +
'  <input type="radio" id="I" name="X" value="Y">Yellow<br>' +
'  <input type="radio" id="J" name="X" value="B">Blue<br>' +
'  <input type="radio" id="K" name="X" value="G">Green<br>' +
'  <input type="radio" id="L" name="X" value="W">White<br>' +
'  <input type="radio" id="M" name="X" value="O">Orange<br>' +
'' +
'  <br><button type=submit>Submit</button>' +
'</form></body></html>        '
var ledStatus = arraryCurVals[0];  // this will be "1"
var pwmStatus = arraryCurVals[1]; //this will be "0"
var pwmRamp = arraryCurVals[2]; //this will be "0"
var pwmDuty = arraryCurVals[3]; //this will be, e.g., "321"
var ledColor = arrayCurVals[4]; // this will be "R"

if (ledStatus == 1) { document.getElementById("A").setAttribute("checked", true); }
else { document.getElementById("B").setAttribute("checked", true); }
if (pwmStatus == 1) { document.getElementById("C").setAttribute("checked", true); }
else { document.getElementById("D").setAttribute("checked", true); }
if (pwmRamp == 1) { document.getElementById("E").setAttribute("checked", true); }
else { document.getElementById("F").setAttribute("checked", true); }
document.getElementById("G").innerHTML=pwmDuty
document.getElementById(ledColor).setAttribute("checked", true);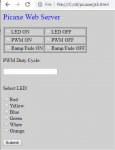
Last edited:
Hemi345
Senior Member
Good evening Lance. While viewing your web page, press F12 to bring up the developer tool bar. This will help you debug and view the "new" source code after the JS manipulates it (see the "Elements" tab). If you view the "Console" tab, it'll mention any errors or issues as the page executes. The "console.log" statement I included below is an example of how you can write things to the console, just like sertxd'ing data to the terminal in PE6.
I forgot to include double quotes around the "W" in my example for the array. Strings need them.
I also had a misspelling when referencing the array ("arraryCurVals"). Sorry about that.
Here's a working b5.js:
The "document.body.innerHTML = " statement is telling the browser to replace everything in between the <body> and </body> tags. You don't want to redeclare the <html> <head> etc, within that.
I forgot to include double quotes around the "W" in my example for the array. Strings need them.
Code:
var arrayCurVals = [1,0,0,111,"G"];Here's a working b5.js:
Code:
document.body.innerHTML = '<form name = "input" method = "get">' +
' <font color=blue><font size=5>Picaxe Web Server</font><br><br>' +
'  <font color=black>' +
'  <table border="1">' +
'  <tr><td><input type="radio" id="A" name="L" value="1">LED ON</td>' +
'  <td><input type="radio" id="B" name="L" value="0">LED OFF</td></tr>' +
'  <tr><td><input type="radio" id="C" name="P" value="1">PWM ON </td>' +
'  <td><input type="radio" id="D" name="P" value="0">PWM OFF</td></tr>' +
'  <tr><td><input type="radio" id="E" name="R" value="1">Ramp/Fade ON  </td>' +
'  <td><input type="radio" id="F" name="R" value="0">Ramp/Fade ' +
'    OFF</td></tr></table>' +
'' +
'  <p>PWM Duty Cycle:</p>' +
'  <input type="text" id="G" name="N"><br><br>' +
'' +
'  <p>Select LED:</p>' +
'  <input type="radio" name="X" value="R">Red<br>' +
'  <input type="radio" name="X" value="Y">Yellow<br>' +
'  <input type="radio" name="X" value="B">Blue<br>' +
'  <input type="radio" name="X" value="G">Green<br>' +
'  <input type="radio" name="X" value="W">White<br>' +
'  <input type="radio" name="X" value="O">Orange<br>' +
'' +
'  <br><button type=submit>Submit</button>';
    var ledStatus = arrayCurVals[0];  // this will be "1"
    var pwmStatus = arrayCurVals[1]; //this will be "0"
    var pwmRamp = arrayCurVals[2]; //this will be "0"
    var pwmDuty = arrayCurVals[3]; //this will be, e.g., "321"
    var ledColor = arrayCurVals[4]; // this will be "R"

    if (ledStatus == 1) { document.getElementById("A").setAttribute("checked", true); }
    else { document.getElementById("B").setAttribute("checked", true); }
    if (pwmStatus == 1) { document.getElementById("C").setAttribute("checked", true); }
    else { document.getElementById("D").setAttribute("checked", true); }
    if (pwmRamp == 1) { document.getElementById("E").setAttribute("checked", true); }
    else { document.getElementById("F").setAttribute("checked", true); }
    document.getElementById("G").value=pwmDuty;
    var ledColors = document.getElementsByName("X"); //collection of all radio buttons for led color
    console.log("Led color options: ",ledColors.length); //display in teh browser how many radio buttons were found for color
    for (var i=0; i<ledColors.length; i++) {    //loop through the led color radio buttons
        var curRadio = ledColors[i]; // current radio button
        if (curRadio.value == ledColor) {
            curRadio.checked = true;  // select the radio button that matches the value from the array
        }
}Electronics Learner 123
Well-known member
How would I receive at commands at the Picaxe side (what BASIC would be needed) and what would be any prerequisites?
lbenson
Senior Member
Trying to get to that point, but still working out bugs.How would I receive at commands at the Picaxe side (what BASIC would be needed) and what would be any prerequisites?
For the picaxe to work with the ESP, you will need everything that is in hippy's code in the "Where's the Wizard?" thread (although you can and probably should ultimately set up the ESP to connect to your wifi on power-up (but the picaxe would still need to check that it is connected, and attempt the connection if it is not)). No way to avoid that long call-and-response sequence if the picaxe-to-esp combination is used. Hemi's technique just offloads the actual building of the web page to the javascript on the server machine.
lbenson
Senior Member
Perfect, Hemi. Thanks very much for your time (and knowledge). Everything works. I should have figured out about the quotation marks. Didn't know about the F12 trick (though I had been doing Right-click, Inspect (but didn't know what to look for)). Good stuff.While viewing your web page, press F12 to bring up the developer tool bar. This will help you debug and view the "new" source code after the JS manipulates it (see the "Elements" tab). If you view the "Console" tab, it'll mention any errors or issues as the page executes. The "console.log" statement I included below is an example of how you can write things to the console, just like sertxd'ing data to the terminal in PE6.