I use the toner transfer method, just have to be very specific as to what paper you use, and make sure you have your iron NICE AND HOT. take your time tranferring the patterm.
Here's what I do:
FIRST: put on a set of nitrile gloves -it protects the copper from your finger oils, protects for fingers from copper dust, and will allow you to reach into the etchant should you need to get the board situated. That last bit is especially important if you're using a homebrew etchant like I am.
1) I scuff the copper with 220 grit sandpaper (many people will say thats too rough, but it works perfect every time for me without jagged edged traces). I've tried pre-etching it in solution, using 1,000 grit wet-or-dry sandpaper, using a scotchbrite pad, steel wool... nothing performs as well as 220 grit.
2) I wipe the entire board down with alchohol and dry thoroughly (this removes oil residue and sanding residue at the same time. after this don't touch the board anywhere you want the transfer to stick.
3) turn the Iron up as HOT as you can get it with the steam off. Then Iron the paper on, I usually iron until I can see the traces faintly. This guarantees good adhesion. It will take some time to get it right. I go over a few times with the iron flat, then use the tip to push on the paper as I slide it around. I know I have good adhesion when I can see the traces through the paper.
4) soak it in warm water, wait until the entire piece of paper is thoroughly soaked through then give it 5 more minutes to loosed the fibers. Work in the middle, working your way out by rubbing your fingers against the soaked paper, it will come off in little "rolls" one layer at a time. It doesn't take long to get them all off. Once you're down to jut a few straggling pieces of paper between traces, brush gently with a toothbrush to get them off. Don't worry about making all the traces perfectly black. When the board dries, they will most likely be a frosty white because there are paper fibers stll stuck to the toner. Don't try to lift the entire sheet from the edges, that almost guarantees pulling traces off the copper, then you get to start over!
5) let it dry - air dry or pat gently. DO NOT USE WARM AIR TO DRY. If you do, you run the risk of "reflowing" the toner, or remelting it, causing it to lose what little adhesion it has... bad juju!!
6) drop it in the ethant and have a frosty beverage! I like to put a couple of pieces of soda straw on the surface of the etchant and then set the board down on them and let the board push them into the liquid. This causes the board to be held up off the bottom of your etchant container and makes the bottom side etch faster. The etchant I use is simple and cheap to make: 2 parts Hydrogen Peroxide and one mart Muriatic acid. I've made batches from 1/4 cup total (2 tbsp peroxide, 1tbsp acid gets close to 1/4cup) to make little bitty boards all the way up to making 4 cups for cutting a 10 inch by 5 inch board. - all with the same results. fantastic!!
I use "Goof off" to get the toner off the board, comes off in one swipe. I am sure other things will work too, but Goof off is cheap. I think laquer thinner also works, I've never used it. Goof off works too well to try anything else.
If you're doing double sided boards, the process is much the same, except when you get the first side done, drill a couple of "centering holes" flip the board over (I usually put it on a legal pad, or spiral notebook or something to keep the heat from transferring directly to the counter), push a couple of pins into the corresponding cetnering holes on the bottom side sheet of paper, then lay the bottom sheet down, lining the holes up with the pins. Get as perfect as you can.
Don't remove the pins until you have run the iron over the shet a few times. THEN remove the pins. This tacks the sheet down, keeping it form sliding away when you push on the iron. Then iron as you did the first side.
Same tactic of getting it into the etchant using soda straws as a spacer.
There are a million recommendations for paper our there, I know. BUT: here's what works for me, and the paper is readily available: I use HP Semi-Gloss Inkjet paper. Product Q5498A. I've had pretty good success with many different types of paper, but this one seems to work the best, especially on larger boards that are in the drink longer. Other papers will transfer just fine, but the traces tend to pull up in long etchings. This HP paper doesn't give me that problem.
Another tip would be to make sure you have your laser printer on the darkest setting possible... as dark as it will go. you want a lot of toner to transfer. make sure to spray the traces with clear laquer when you're done soldering on it. I've also use mop-n-glow to do the same thing, works great and is super cheap. Tarnish will set in FAST if you don't. then you have a noisy, useless board.
I don't use and PCB layout software. all my boards are made in Corel Draw (yes, oldschool..) mainly because the blacks are TRULY black. It's a littler harder to do and you have to know the mechanics of how to set up a board (which is what most PCB software does automatically) but it works for me. works darn well for me in fact.
Like I said, I can get .5 to .25 traces without any issue whatsoever. Soldering was a challenge until I got my hot air unit and some solder paste, not I can put a uMAX 8 lead chip on the board in a matter of seconds and it's perfect every time. I get results like this:
pardon the "gooey look" thats from the flux - I had JUST finished soldering this up. These are all .25 traces. the pins around the perimeter are 2.54mm standard spacing so I can plug the chip into a breadboard. This board is about the size of 2 postage stamps, so we're WAY zoomed in here.
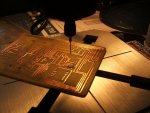
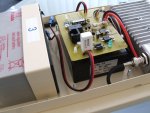
This is one of THE very first boards I did in homebrew etchant, took 5 minutes. This board is now running a winch and some lights on my truck. Been in service for over a year now.
This is a closeup (microscope) of one of the traces on the board above.
Sorry for the long post, I hope that helps. there are a TON of write-ups on how to make these things. If anyone thinks that a picture tutorial would help, I'd be happy to make one if it can be stickied on here.
")