I’m new at PICAXE, and I will probably be accused of beating an already decaying horse, but, I’m hoping to bring some additional information and clarity to the table, ahem forum.
My current project (still in design) was getting a bit complex for only using discreet logic and I also wanted to see if I could reduce the cost somewhat. The easiest way to do that was with a micro controller. I have not used them for several decades so I quickly zeroed in on the PICAXE because of its really complete design environment and I also did not want to resuscitate my decades old memory of (by now archaic) C, or start to learn assembler for yet another chip again. (been there, done that, no more)
My new design is an instrument that needs two selection switches, one for a frequency range selection (25 selections in a 1-2-5 sequence) and another selection switch for a DC or pulse output amplifier with calibrated outputs (15 positions, also in a 1-2-5 sequence). Rotary switches for 25 positions are pretty rare and expensive, so I wanted to switch to Rotary Encoders. Both will feed a counter, and two separate 14M2 chips will process the data, drive the selection hardware and as a bonus also display the settings on one line each of an OLED display (AXE133Y) to save on the front panel engravings.
If you have not used a rotary encoder before, look here for more information :http://www.electro-labs.com/rotary-encoders-understanding-practical-implementation/
In any case, I needed some software for the Rotary Encoders, so I started to look at this forum, and also Google “around”.
There are many different solutions available, some simple, some overly complex and some that simply did not work reliably when I tried them. After quite some time, I zeroed in on one design I liked by forum member Christophe (vertigo) which worked really well for me.
Here is the post : http://www.picaxeforum.co.uk/showthread.php?13590-Rotary-encoder-usage
This is by no means the “one-and-only” solution. But, as I said, it took me a long time (way too long) to find one that works reliably. I found that some approaches were very theoretically based and some overly complex with complete state machines. Some were designed for maximum speed and therefore complex. Then others where tailored to other embedded processors, and they are different enough from the PICAXE family to avoid them as well.
In my application, I needed a reliable and moderately fast solution for my selection criteria. I have no need to “spin” the knob to quickly go from one selection to the next, or from one end of the scale to the other. So, I decided to document this particular solution with enough details to show how it works, and why.
The solution I picked out of the many is simple, very simple. It also lends itself to be used as part of a larger program, eliminating the need for a dedicated (08M2?) controller to just encode the switch.
So, with this post I’m trying to show why I selected this method and to try to explain it using a scope to show timing diagrams. With the aim to help others going through the same selection process. Once you understand the details, you can tweak the code or, decide to hunt for other solutions, based on what you learned.
So why is this solution simple? We’ll if you look at the datasheet, it is easy to get tempted into a design that will have an overly complex solution. This is not needed. The author of the code, Christophe, calls his solution “early detection” and it is indeed just that. Let me try to explain this in simple terms. The two inputs from the rotary encoder, A and B, are switches that feed pulses in an order (time wise) that are depending on the rotary direction. If you turn the knob of the encoder one indent (a click) to the right (clockwise), the A switch will close first, and a little while later, the B switch closes. If you turn one indent to the left (anti-clockwise), the B switch closes first, and the A switch follows a little later.
It is really as simple as that.
Now then, the timing between the closure of the switches is depending on the speed of rotation, so the faster you turn the knob, the quicker the closure of the switches follow each other, and therefore the duration of the pulses get smaller and smaller.
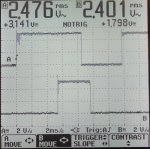
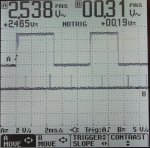
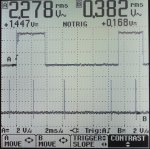
The following scope screenshot of a move from one indent to the next shows this.

There are two things I would like to point out here. First note that the signals are not always as symmetrical as the datasheet lets you believe. It depends on how “even” the speed of your turning is and also on the quality of the mechanical design of the encoder.
The other thing to note is the noise on the leading edge of both switches. A lot depends on the mechanical construction of the encoder, so you may want to check that. Some solutions I found use extra hardware to eliminate this switch bounce, but for most if not all applications, there really is no need for that. First of all, the pulses stay in the “high” area, don’t even go near ground, and the rest can be done in software.
The program from Christophe (vertigo) that we will discuss here uses an interrupt to start the decoding process, as soon as switch A changes position. Note that this is regardless of the direction of the rotation. I also elected to use a positive going transition, and I used the schematic below to document the design of the circuit around the encoder, but it is simple to go to an active low pulse.

It cannot get much more simple. The resistor values are not very important, 10K is fine, and so is 4K7. Lower values will use more current, higher values could add more “bounce” noise.
Here is the code I used for this post. I modified it slightly for the 14M2, and added some more comments, but it follows the original code almost completely, although I “instrumented” it to track the timing on a scope. Because this is part of a much larger program, some of the structure and definitions are left in. Sorry.
I'm out of room and attachments, so I'll continue on the next post.
My current project (still in design) was getting a bit complex for only using discreet logic and I also wanted to see if I could reduce the cost somewhat. The easiest way to do that was with a micro controller. I have not used them for several decades so I quickly zeroed in on the PICAXE because of its really complete design environment and I also did not want to resuscitate my decades old memory of (by now archaic) C, or start to learn assembler for yet another chip again. (been there, done that, no more)
My new design is an instrument that needs two selection switches, one for a frequency range selection (25 selections in a 1-2-5 sequence) and another selection switch for a DC or pulse output amplifier with calibrated outputs (15 positions, also in a 1-2-5 sequence). Rotary switches for 25 positions are pretty rare and expensive, so I wanted to switch to Rotary Encoders. Both will feed a counter, and two separate 14M2 chips will process the data, drive the selection hardware and as a bonus also display the settings on one line each of an OLED display (AXE133Y) to save on the front panel engravings.
If you have not used a rotary encoder before, look here for more information :http://www.electro-labs.com/rotary-encoders-understanding-practical-implementation/
In any case, I needed some software for the Rotary Encoders, so I started to look at this forum, and also Google “around”.
There are many different solutions available, some simple, some overly complex and some that simply did not work reliably when I tried them. After quite some time, I zeroed in on one design I liked by forum member Christophe (vertigo) which worked really well for me.
Here is the post : http://www.picaxeforum.co.uk/showthread.php?13590-Rotary-encoder-usage
This is by no means the “one-and-only” solution. But, as I said, it took me a long time (way too long) to find one that works reliably. I found that some approaches were very theoretically based and some overly complex with complete state machines. Some were designed for maximum speed and therefore complex. Then others where tailored to other embedded processors, and they are different enough from the PICAXE family to avoid them as well.
In my application, I needed a reliable and moderately fast solution for my selection criteria. I have no need to “spin” the knob to quickly go from one selection to the next, or from one end of the scale to the other. So, I decided to document this particular solution with enough details to show how it works, and why.
The solution I picked out of the many is simple, very simple. It also lends itself to be used as part of a larger program, eliminating the need for a dedicated (08M2?) controller to just encode the switch.
So, with this post I’m trying to show why I selected this method and to try to explain it using a scope to show timing diagrams. With the aim to help others going through the same selection process. Once you understand the details, you can tweak the code or, decide to hunt for other solutions, based on what you learned.
So why is this solution simple? We’ll if you look at the datasheet, it is easy to get tempted into a design that will have an overly complex solution. This is not needed. The author of the code, Christophe, calls his solution “early detection” and it is indeed just that. Let me try to explain this in simple terms. The two inputs from the rotary encoder, A and B, are switches that feed pulses in an order (time wise) that are depending on the rotary direction. If you turn the knob of the encoder one indent (a click) to the right (clockwise), the A switch will close first, and a little while later, the B switch closes. If you turn one indent to the left (anti-clockwise), the B switch closes first, and the A switch follows a little later.
It is really as simple as that.
Now then, the timing between the closure of the switches is depending on the speed of rotation, so the faster you turn the knob, the quicker the closure of the switches follow each other, and therefore the duration of the pulses get smaller and smaller.
The following scope screenshot of a move from one indent to the next shows this.

There are two things I would like to point out here. First note that the signals are not always as symmetrical as the datasheet lets you believe. It depends on how “even” the speed of your turning is and also on the quality of the mechanical design of the encoder.
The other thing to note is the noise on the leading edge of both switches. A lot depends on the mechanical construction of the encoder, so you may want to check that. Some solutions I found use extra hardware to eliminate this switch bounce, but for most if not all applications, there really is no need for that. First of all, the pulses stay in the “high” area, don’t even go near ground, and the rest can be done in software.
The program from Christophe (vertigo) that we will discuss here uses an interrupt to start the decoding process, as soon as switch A changes position. Note that this is regardless of the direction of the rotation. I also elected to use a positive going transition, and I used the schematic below to document the design of the circuit around the encoder, but it is simple to go to an active low pulse.

It cannot get much more simple. The resistor values are not very important, 10K is fine, and so is 4K7. Lower values will use more current, higher values could add more “bounce” noise.
Here is the code I used for this post. I modified it slightly for the 14M2, and added some more comments, but it follows the original code almost completely, although I “instrumented” it to track the timing on a scope. Because this is part of a much larger program, some of the structure and definitions are left in. Sorry.
Code:
; Rotary Encoder Test
;
#picaxe 14M2
#no_data
;
; INPUT C.0 A input, C.1 B input of the Rotary Encoder
DIRSC = %00000000 ; 0=input, 1=output
;
; OUTPUT B.1 Used as an indicator for the scope
DIRSB = %00000010
;
; used variables
; bit vars
SYMBOL getBits  = b0 	; C.0=A and C.1=B of the rotary decoder
; byte vars
SYMBOL dir      = b4	; direction (left|right)
SYMBOL savepos 	= b5	; previous value of rotary position
SYMBOL fpos		= b6	; frequency counter & position
;
; interrupt definition
setint %00000001, %00000001 ,C ;set interrupt on C.0 (rot enc A) going high

main:

	GOSUB init

	DO
		; wait for an interrupt coming from the rotary decode

	LOOP ; forever

END

init:
	;
	OUTPINSC = %00000000
	; set all to low, the pulse for the scope will be positive
	OUTPINSB = %00000000
	;
	; PIC CPU Clock Settings
	SETFREQ M8 ; m1, m2, m4(default), m8, m16, m32
	PAUSE 3000	; only needed if not at M4
	;
return


; Rotary Encoder
;
; http://www.picaxeforum.co.uk/archive/index.php/t-13590.html
;
interrupt:
; on entry, the interrupt is disabled, need to set it again at the end
;
        PAUSE 1 ; workaround for a bug in the microcode
	PULSOUT B.1, 2	; show the entry of the routine on the scope
	PINSC = getBits ;read the rotary encoder pins
	; move A and B inputs to b0
	bit1 = pinC.1	; B input
	bit0 = pinC.0 	; A inout

	getBits = getBits & %000000011 ;isolate the two rotary encoder pins

	if getBits <> 0 then ;if both pins are low, direction is undetermined : discard
		dir = bit1 * 2 ; dir(ection): determined on the B input
					   ; if bit2=low=0  then 2 x 0 = 0 -> dir=0=right(up)
					   ; if bit2=high=1 then 2 x 1 = 2 -> dir=2=left(down)
		fpos = fpos - 1 + dir ;change a "tracking" counter with -1 or +1
		; The following is a structure from my larger program,
		; I left it in to keep some of the timing intact
		if dir = 0 then ; up/right
			PULSOUT B.1, 2 ; show this point in time on the scope
		else			; down/left
			PULSOUT B.1, 2 ; show this point in time on the scope
		endif

		;now wait for the encoder to go to the next indent position
		;to finish the full "click" cycle
		do while getBits <> 0
			getBits = PINSC & %00000011
		loop
	endif

	setint %00000001, %00000001 ,C ;restore the interrupt on C.0 going high

	PULSOUT B.1, 2 	; show this point in time on the scope,
					; as we are ready again for the next indent
return
Last edited:


