A voltage boost mosfet driver

gengis

New Member
I'm trying to run the picaxe and a camera from the same 3 V battery. Even the so-called logic level mosfets won't work down that low.

The datasheets claim the LL mosfet will work down to 2 volts, and they will, sort of, but if you read the datasheet that 2 volt specification is only guaranteed at whopping drain current of 250 microamperes and 25 degrees C. Look at the graph and you find the 2 volts is up to 2.5 volts at 250 milliamps and 2.75 volts at one amp!

The 'axe output voltage with 3 volts in is 2.3 volts. Even the logic level device won't work. The load itself can be finicky too. My camera checks the battery voltage before it agrees to come on. If the turn on isn't sharp enough it senses a low battery condition and refuses to initialize. (there's another gotcha in the datasheet called threshold pulse response or something like that)

My design goal is reliable operation down to 2.7 volts from 3V alkaline batteries from 0 C to 50 C temp.

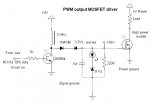
The solution is to generate a separate bias power source to turn on the power mosfet. I tried a voltage multiplier using the PWM output. That proved unwieldy because it took a lot of stages and each stage takes a hit from the forward voltage drop of the diodes used. Getting a solid ten volts out took 20 stages of multiplication.

Using the pwm to switch an inductor turned out to be a bulletproof way to get good solid bias supply. With 10 volts nearly any mosfet will switch fast are reliably. (the bias circuit itself can generate up to about 80 volts with the right component selection, and no loading)


I'm driving it with a pulse train of 40 KHZ with a 10% duty cycle (10% high 90% low). None of the component values are all that critical. It works well with a 10 KHZ 50% duty on up, but high speed, low duty cycle, keeps the power dissipation low. It uses about 30 - 40 milliwatts of power. Including what the axe supplies to drive it. If the 1 K is raised to about 20 K it can run as low as 5 milliwatts. The inductor is a 3 mhy type, but 1-3 mhy is fine, or 30 turns of magnet wire on a ferrite core or bead works well. The 220 K on the output is to give the mosfet a discharge path. The 3 Vz diode is only there so the mosfet won't turn on and stay on with a higher supply voltage (like 4.5). The 8 volt zener and LED keep the voltage limited to ~10 volts, and give a visual indication that it works.

A second seperate source can also be derived from the same inductor with the duplicate addition of everything west of the inductor. It can also be used as a negative supply by changing the rectifier around and leaving out the 3 Vz and switching the polarity of the output limiter. (you may have to tweak it a little since I didn't really spend time with it, just verified it would work). It can also be used as an isolated supply by winding a core or bead with two 30 turn windings and moving the limiter section to the isolated output winding. - For a high-side switch N channel mosfet switch.

This is the test program I'm using to run it with the 14M
Code:
'10 V power supply transistor driver W/10% duty cycle
'picaxe 14M

start:
	pause 100
	pwmout 2,24,10	'generate 40khz pulse train on pin5 (pwm2)
	pause 500 		'wait half a second
	pwmout 2,0,0 	'turn off pulse train on pin 5
	low portc 5		'make pin 5 low
	pause 500		'wait half a second
	goto start		'repeat forever
Pin means "leg" in 'axespeak - the physical I.C. pin, not the logical I/O number
 

212

Senior Member
Hi Flooby, we may have something in common here, I am also interested in controlling camera operations with a Picaxe. I was intending to use a mosfet I have used for other things, but I may need to put your circuit into play also. What do plan to do with the camera. if I may ask?

Here is the mosfet I intended to use with mine:

http://www.fairchildsemi.com/ds/RF/RFD14N05L.pdf
 

moxhamj

New Member
I'm working on exactly the same thing. Now I have an LCR meter, inductors are much less mysterious! I'm using a 160uH inductor with thick 1mm wire so the resistance is negligable, a 914 diode and a 1000uF cap, driven directly off a picaxe with a BUK555 mosfet. I pull the gate low with 100k while it is on the breadboard just in case the wire to the picaxe comes loose and the gate floats. Load tests are with a 1k resistor and so far have got up to 23V. But I haven't been able to use pwmout as the frequency for max efficiency is peaking lower than pwmout can go.

After playing with stepup converters for years, I've found it is pretty easy to get some higher voltage output, but harder to peak the efficiency. There are several variables, including the capacitance of the mosfet gate (lower efficiency at higher speeds) and the diode switching times. A 914 is a good choice for testing - much better than a 4001. Too long a pulse and the coil saturates. Too short and there are losses in various components. Too big an inductor and the resistance losses get too high. It is a great circuit to experiment with!

Interestingly, the circuit that gives 23V at 23mA with a BUK555, managed only 3V at 3mA with a BC547 driven via a 1k to the base. Mosfets make a big difference.

Just an aside - is there a storage capacitor somewhere (the 0.1uF won't store much), and once it has reached 10V, is battery supply critical (ie is it ok to dump power via the zener and led) or does it not matter? If you have a spare ADC pin on the 14M you can detect overvoltage directly via a voltage divider (but then you need a 5V reg on the 14M - it is all about compromises).

Has anyone tried a IRF540?

I'll post a bit later today - I'm working on a lower efficiency "joule theif" to get 1.5V up to 3V to get the picaxe going, then the picaxe takes over and boosts up to 7V then back to 5V via a reg via its own stepup converter.

As an aside, a "joule thief" http://www.joulethief.com/kit.php will give much higher voltages if there is no load - up to 40V and beyond. The white led limits the volts, but a joule thief and an 8V1 zener and led to make 10V (remove the white led) will cost well under $2. The inductor is one of the RF inductors that look like fat resistors.
 
Last edited:

gengis

New Member
Hi 212

I have one camera up and running and made some channel mounts for my motorcycle and kayak. I take pictures of the river and ocean and road trips. While it was in the breadboard stage it sat on the dash of my truck and took pictures of the boat ramp. I made a waterproof case for it using an ordinary plastic hobby chassis with a plastic window. It has been interesting. The boat ramp was a good place with all the traffic - even managed to get some guy getting arrested. Camera one is an Aiptek mega cam (lots of hack info on line and it is only $9). The picture quality is nothing to brag about but very good for the price - and I don't mind if I lose it.

The axe reads a variable resistance and sets the time delay between shots. It turns on the camera, delays while the camera initializes, takes a picture, delays while the pix goes into memory, then goes to sleep until the next shot. The camera holds 60 shots and the delay can be from one to eight minutes per shot. Just a time-lapse camera . . .

Camera two, the one I'm working on now, is going live out on an island and take pictures of river and port traffic for a week. It is an Aiptek "pocket cam X" (also marketed as the "Jazz") and way better quality than the mega cam (#1). It says it can take 600 high resolution shots on an SD card but I have a 1 gig card in it and it is over 900 shots - but as the number goes up the length of time it takes to go into memory is longer and I have to work that out. This one senses ambient light too. Turns on at dawn and off at dusk. The camera is $19 and ~7$ for an SD card.

Still some bugs to work out, but the breadboard worked for a week on one set of 3 NiMH AA cells and took >900 shots. I want to get the voltage down to 3.0 volts instead of 3.6 so I can use a pair of alkaline D cells and try to get ~1500 shots/week. And I have a motion sensor I'm fooling with too. After that - maybe a servo to pan the camera.

Camera three is an idea only now. But the mega cam only weighs an ounce or so and I was thinking of sending it aloft on my kite. The kite powers the kayak so it needs to be light and waterproof.

One problem with mosfets pulling the camera low to turn on the power to the camera is that for the shutter to work (also gets pulled low) it has to have a very low RDS "on" or the shutter won't trigger. The mega cam was easy to trigger, the pocket cam less so. It is working now with an open collector to ground but I have the feeling it is borderline - when the batteries weaken it stops triggering reliably. The 10 volt bias supply may get used for that too - a capacitively coupled 10 volt signal is triggering it very reliably. I suspect the pocket cam uses an internal DC/DC converter and it runs at a higher voltage, so low batteries aren't swinging enough voltage for reliable triggering.

I looked at the mosfet. I don't know what voltage you'll be using and the datasheet is not too enlightening - the graph leaves a lot to be desired and a lot will depend on your choice of camera. I'm using an IRLZ24 mosfet - almost the same specs as yours but 18 amp current and .06 ohm RDS "on" I use the TO220 case and cut the tab off.

A small relay is another choice instead of a mosfet. A good choice might be a latching relay so power to it doesn't have to be maintained. I'm going to stay with the mosfet. On my bike and kayak it takes a beating .

The choice of camera is important. Some cameras require power continuously or the internal memory may default to some protocol you don't want - like flash on, or low resolution, or just sit there and wait forever while you tell it the date and time. The two Aiptek cameras don't care, the feature memory is non-volatile and it comes up ready to go.

Some folks are using the USB port to supply battery power to the camera and keep it turned on always - but that drains the battery quickly.

Tell me about your plans. Send a private message if you don't want to chat on the forum. I'm relatively new here too and don't know how they feel about off-topic posting. I am interested in hearing more about camera operations.
 

212

Senior Member
I'm sorry they did not give much info on the mosfet I linked to, but there is more than I can understand anyway. We have been using that particular one to control camera contacts though, so it may work for you too. I did connect one to a 6 volt 20 watt halogen bulb today, and powered the mosfet with two weak alkalines cells. There was very little voltage drop going from the 6 volt battery to the light....so maybe...

I'll PM you later, because you are right about getting off topic I think.
 

Dippy

Moderator
I may have misunderstood, but essentially you just want to trigger the camera shutter with a 3V supply PICAXE circuit - is that right?

Why not use a signal PNP transistor such as a BC184 or similar, the Vce will be tiny.. mV.

Or if you want to use that PICAXE for anything else including ADCing, why not use a S/mode step-up (boost) to 5V? Quiescent currents are pretty small.
 

gengis

New Member
I don't know where to start. This would be easier on a Usenet group.

Dr_Acula: I like fooling with this stuff too. My goal with the camera was to just switch on a mosfet from 3 volts and not to build a power supply - but what you are doing is interesting too. The blocking oscillator "joule theif" circuit as a start up supply from 1.5 volts, will be useful if you can keep the efficiency high. Post some schematics when you have them.

Just an aside - is there a storage capacitor somewhere (the 0.1uF won't store much), and once it has reached 10V, is battery supply critical (ie is it ok to dump power via the zener and led) or does it not matter? If you have a spare ADC pin on the 14M you can detect overvoltage directly via a voltage divider (but then you need a 5V reg on the 14M - it is all about compromises).
The .1 uf is the storage cap. The object is only to turn on a single mosfet with a below threshold supply. With a 40 KHZ chopper a .01 uf will work. I just wanted to turn on the mosfet when the picaxe tells it too, not to make a 10 Vpower supply. The zener/led does use a little power but without some means of curtailing the voltage it can get high enough to damage the mosfet gate. Keeping the base drive to the NPN low mitigates that possibility (20K instead of the 1K). I want the option to work at 2.7 - 4.6 volts and the shunt regulator allows that.

Increasing the .1 uf to a larger value makes for less ripple but the mosfet takes longer to come on and shut off - longer time in the linear region. At 40 khz it takes a low ESR low inductrance cap for a good low loss filter. Like you were saying the mosfet matters? Q of the inductor and ESR of the filter also matter if your goal is a power supply. I left the 1K on the schematic because should someone build it with a marginal inductor I wouldn't want it not to work for them. This is just a bias supply not really intended to supply heavy currents.

BUT I did use the flyback pulse from the circuit without any shunt limiter and no filter at all, and put a low resistance high Q inductor in place of the load while playing around. So I was using the flyback pulses from the 3904 to directly drive the mosfet at 40 KHZ and that looks like it could have some potential as a boost supply. No plans to do anything with the idea right now - but it looks like it could be worth tinkering with - maybe something like a joule theif to drive a high current mosfet to do some higher effiency switching? I just wanted to see what would happen . . .
 

gengis

New Member
212,

Your choice of a mosfet should work. It is just that the graph they show is not readable to the resolution necessary to predict operation down at low threshold voltages - the Three temperature lines over lap and its looking like maybe an amp of current requires ~2.25 volts of gate voltage, but I wouldn't bet on it from that graph. (figure 8, Transfer Characteristics) Threshold voltage on the bottom, current on the left.

It has a lot to do with power supply voltage - with 3.6 volts I have it working with no boost supply whatsoever. At about 3.3 volts, the operation starts to get unreliable because the picaxe's "high" output is only 2.7V. I want the whole thing, axe and camera to work down to 2.7 or where a logical high is only 2.0 volts.

I'm not using the mosfet to trigger the shutter, but it is the shutter gets unreliable because the camera power is not being connected to ground when the mosfet isn't turned on hard enough, its point three volts higher than zero/ground - which occurs at 3.3 volts of battery power supply.

If I were to leave the camera connected to ground, the shutter is not critical. But if I leave the camera grounded and "on" it uses too much power from the batteries. The object is to keep the camera off and have the picaxe sleep and only get active while actually shooting a picture. A high side switch (turn the + connection to the camera on and off for control) is another option - that leaves the minus at ground potential and the shutter should work. (or not . . . it seems axiomatic in engineering that every solution comes with its own set of problems).

How are you powering down your camera? Or are you using the axe to control the power?
 

gengis

New Member
kevrus,

Yeah that (voltage multiplier) was where I started. The output is NOT 2X or 3X the way they state. It is 2X minus two or more forward voltage diode drops. Start with two volts, and subtract .6 volts for one stage with germanium (expensive) or hot carrier diodes. Three steps forward and one step back. The picaxe gives you a double hit right out of the gate - it drops . six volts and only comes within . six volts of ground. So before you even start pumping the voltage multiplier you only have 1.5 volts, peak to peak, to work with.

The multiplier works very well when the input voltage is significantly higher than what the diodes are going to drop. I thought the same thing initially, light goes on in head, feeling of euphoria - just use the PWM output and a voltage multiplier - that lasted long enough for me to get a 5 stage multiplier using 1N4148 diodes that I had on hand and I got about 3 volts out.
 

gengis

New Member
Dippy and Beanie Bots,

It starts getting complicated trying to explain all the interactions but here goes.

I have a low side mosfet to turn the camera on. I'm switching the battery minus connector inside the camera to ground and leaving the + side connected to my +3V.

That was not practical with a regular bipolar transistor since the gain of a bipolar drops as collector current goes up. The load (my camera) has three killer (current) power glitches 1. when power is applied and the internal display drive comes on and caps charge, 2. when the shutter fires and 3. as the picture starts going into memory. The first is the worst and critical since the internal circuitry of the camera see's the voltage sag and tells me the battery is too low, and disconnects the camera internally and shuts off. To use a bipolar in the positive leg I have to drive it hard enough to allow a collector current of ~5 amps (just to start - not average) If my transistor has a gain of 10 when pulling an Ic of five amps, I need 500 milliamps from somewhere - even if it only has to be there for 100 milliseconds. And the bipolar will still drop more than a mosfet when turned on.

A relay works like a champ, but it is vibration sensitive and less reliable mechanically. Any relay current sensitive enough will be vibration sensitive as well for chatter and contact bounce, since the spring has to be weak for a weak current to work.

There's an interaction between the low side mosfet that turns the camera on and the shutter trigger. I'm using a bipolar transistor to click the shutter low - direct to ground to take a picture. Let the power mosfet that controls the minus power input to the camera (camera ground) drift up a few millivolts and my shutter transistor isn't pulling it close enough to "camera ground" for the shutter to function. If the camera is hard wired to the picaxe ground the shutter will work.

And the mosfet that controls the camera power still has to turn on hard enough - that 2 volts they claim is only at a drain current of 250 microamps not 5 amps. For the 5 amp surge I need a drive of ~3 volts which isn't going to happen with a picaxe running from a 3 volt supply - the best it can do is about 2.4 volts.

I have to turn my mosfet on hard to meet the turn on glitch the camera sucks down and keep it low enough for the shutter transistor to work. The boost bias supply does that. I may also run the shutter from the boost supply since that will give me a 9+ volt swing and AC couple the camera shutter - effectively pulling it below its internal ground reference as a way to insure it gets enough voltage differential to trigger.

AS LONG AS I HAVE YOUR ATTENTION . . .

The camera takes longer and longer to stuff a picture into memory as it fills up the memory. I could just increase the delay depending on what number of picture it is loading. 1 second for an empty memory, and 6 seconds at picture number 900, for instance. But that only works if I keep power to the axe - shoot 300 shots one day and turn it off and it starts counting from one so my delay will be back at 1 second not 2.

The shots are going into a SD card in jpg format. Is there an "enable" line or "OK to send" or "ready" line on the SD card that I can monitor to let it set the delay - and just let the 'axe monitor it? Any links you could point me to? I'd put the scope on it, but the camera is a pain to open and get to the connector - and I have to unplug the display just to get it opened and at the connector.
 

Dippy

Moderator
Excellent, you've got it sorted, though I would look at that hexFET I showed you. And you DO realise that you can parallel similar MOSFETs - that may help if you have drawer full of those ones.

You could scope SD terminals I guess, it may be as simple as the camera siwtching the SD card off after a write. Be careful though.
 

gengis

New Member
Dippy

Neither of the mosfets you suggest look any better than what I have. One has a higher RDS on and graph starts at 20 amps, the other doesn't show a graph of the transfer characteristic but the threshold notes suggest it would also be up around 2.5 volts or so.

Any ideas on the SD card?

3 volts is more or less a self imposed limit. I want the batteries to last ~2500 hours for this application and if I do decide to use this same idea in a kite flying version I want to keep it at 3 volts to keep the weight low without having to do a major redesign.

Attaching a schematic of the camera. The diode that doesn't connect to anything to the left of the axe, is not used in this version but was necessary in the earlier camera.
 

Attachments

Dippy

Moderator
Firstly, if your circuit works then go for it.

I can't agree that the two FETs are that similar.

The IRF3708 @ 3V. (Fig3)
Vgs=3V Idrain = 70A @ Vds of 15V
Vgs=2.7V Idrain=50A

The IRLZ24 @ 3V - (Fig3)
VGs=3V Idrain = 3.5A @ Vds of 25V
Vgs=2.7V Idrain=1.5A

I realise they are pulsed tests, but they are miles different.

Even the 'static' tests indicate the 3708 is miles better:
Rds = (typ.) 14.5 milliOhms at Vgs=2.8V

Have you a second identical MOSFET and tried paralleling????

Anyway, up to you. Or you could go for high-sided, but then the search will be on for a suitable -Vgs....

SD, well, like I said, you may be able to detect power. If you were more daring you could buffer a data pin and detect 'traffic'. Actual data would be too fast. But be darned careful.
BTW: SD Pin 5 is 'clock' you could possibly look at that?
 

BCJKiwi

Senior Member
@Flooby

Re your timing for writes:- you could poke the picture number to eeprom before you tun off the PICAXE, then it will be available for the next power cycle, the number could be used as a factor to determine the delay.
 

gengis

New Member
Tell me more. I thought that was only good for 28M parts and higher. Where should I be reading about this, I did see Writemem and Storage variables.
 

lbenson

Senior Member
read and write go to EEPROM, and don't go away when power is removed, only when a new program is downloaded. 08M, 14M, and I suppose 20M parts share EEPROM with program memory, so a total of 256 bytes is available.
 

BCJKiwi

Senior Member
Sorry, my mistake (brain fade I guess!), POKE/PEEK - available all parts - is temporary.

WRITE/READ are also available for all parts. On parts up to and including 18 & 20M this shares available memory space with the program, on parts above 20M a separate memory space is used.

eeprom is rated for 1,000,000 writes, infinite reads.

See Manual 1 page 38 "data memory".

You beat me to it ibenson!
 
Last edited:
Top