Dave Harpe
New Member
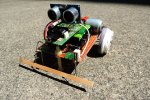
More coming on this. I just got it working and made a picture and a video. I want to do an article on building this one, because it can be done with very little money. I finally got a way to use the new "08M2" which does not work with my Power PC Mac. I have an old, but nice enough Mac Intel laptop. I had some trouble getting it working with Picaxe, but I finally did yesterday, so I built this. Cheap, easy to build, and kind of fun, it might be a very good first robot project for someone who wants to build one. Here is the first Youtube video, it's just running a test program now, and everything seems to work. http://youtu.be/WJcAkyVeFqg
One further note, There is one more pin available on the chip, and I want to add an ultrasound sensor, but I need one that uses a single pin. Those cost quite a bit more than the one I used on Mr. Magoo. It will probably have to wait a while. I could do it with the c.5 input pin, but I want this machine to be easy to do the programming on.
Got Sonar!
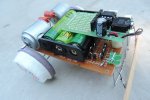
Hey, guess what? The dirt cheap robot now has sonar, and it's still dirt cheap. I got these 'HY-SRF05" sensors from a Chinese vendor on Ebay, and it did not take as long as I expected to get them. They were less than a buck and a half each, including shipping.
So here I am holding a handful of sensors, and looking at my robot which didn't have one. It would be really cool if it had one, there ought to be a way.
I had to try this, and I figured out a way to do it.
The "HY" model has no "mode" pin, instead there is this thing called "out". From what I have seen it does something if there is an object at a preset distance, and it was used for curb sensing on cars. It only has one mode, and that's 2 pins, not 1. To use it, you pulse the "trig" pin, and then look for the pulse on the "echo" pin.
Well, that's a problem if you have only one pin available to use with it.
The original way I built this robot was to make the bumper switch normally high, and go low when it hit something, by shorting to ground. I realized that I could make it go high instead by putting the c.3 pin and its pullup resistor on the normally closed pin on the switch. Then I could tie the center pin to the "echo" pin on the sensor, instead of directly to ground. This pin is normally low, so if the bumper switch opens, this line goes high, and a pulse from the sensor also goes to the c.3 pin. Then all I need is "pulsin". If it's a number in the low hundreds, it's the sensor, and if it's zero, it's the bumper. The only sacrifice is that if the robot bumps into something, "pulsin" will totally time out before it moves on, and the robot will sit there for about 0.6 seconds before it responds, pushing on whatever it hit. Not a serious problem.
So I did all this, and connected the "trig" pin to c.4, and that's my "pulsout" to start the sensor. It works great. This will definitely be part of the finished design whenever I get to put it all together to publish. https://youtu.be/exh9Lroe-Uc
One further note, There is one more pin available on the chip, and I want to add an ultrasound sensor, but I need one that uses a single pin. Those cost quite a bit more than the one I used on Mr. Magoo. It will probably have to wait a while. I could do it with the c.5 input pin, but I want this machine to be easy to do the programming on.
Got Sonar!
Hey, guess what? The dirt cheap robot now has sonar, and it's still dirt cheap. I got these 'HY-SRF05" sensors from a Chinese vendor on Ebay, and it did not take as long as I expected to get them. They were less than a buck and a half each, including shipping.
So here I am holding a handful of sensors, and looking at my robot which didn't have one. It would be really cool if it had one, there ought to be a way.
I had to try this, and I figured out a way to do it.
The "HY" model has no "mode" pin, instead there is this thing called "out". From what I have seen it does something if there is an object at a preset distance, and it was used for curb sensing on cars. It only has one mode, and that's 2 pins, not 1. To use it, you pulse the "trig" pin, and then look for the pulse on the "echo" pin.
Well, that's a problem if you have only one pin available to use with it.
The original way I built this robot was to make the bumper switch normally high, and go low when it hit something, by shorting to ground. I realized that I could make it go high instead by putting the c.3 pin and its pullup resistor on the normally closed pin on the switch. Then I could tie the center pin to the "echo" pin on the sensor, instead of directly to ground. This pin is normally low, so if the bumper switch opens, this line goes high, and a pulse from the sensor also goes to the c.3 pin. Then all I need is "pulsin". If it's a number in the low hundreds, it's the sensor, and if it's zero, it's the bumper. The only sacrifice is that if the robot bumps into something, "pulsin" will totally time out before it moves on, and the robot will sit there for about 0.6 seconds before it responds, pushing on whatever it hit. Not a serious problem.
So I did all this, and connected the "trig" pin to c.4, and that's my "pulsout" to start the sensor. It works great. This will definitely be part of the finished design whenever I get to put it all together to publish. https://youtu.be/exh9Lroe-Uc
Attachments
-
 317.2 KB Views: 91
Last edited:
")