Prologue
WPS or Wireless Positioning System is described as the use of wireless access points to determine geographical location.
Virtually all modern handheld devices incorporate a wireless connection Ipod Touch, Playstation portable, Laptops and even phones. What they don't have is GPS. Now the purest would argue that GPS is the only reliable method of accurately calculating geographic location and for the most part this is true but when GPS meets the the high rise building the playing field changes. Some GPS units cannot even penetrate the humble roof of the average domestic house let alone 30 stories of concrete and steel.
Wireless on the other hand is designed to go through many walls, each wireless access point is unique and in this modern world wireless AP's are plentyfull. Drive down the average suburban street and my Ipod Touch picks up on average 4-5 access points every 100 metres or so.
So WPS is perfect? No not really -
Access points are only really situated in suburbs and towns, if your lost in the middle of the desert WPS will not help you.
Signal strength is dependent on many variables weather, cars parked near the access points.
Access points move, get replaced, die etc.
For WPS to work the unit accessing the access point location needs access to a look up table.
During this project I hope to address these issues and hopefully have a solution for some of them.
So how does WPS work?
Your access point (assuming you have one) will advertise a MAC address, the MAC address lives in the http://www.petri.co.il/osi_concepts.htm data-link layer of the OSI model. It is required to make a connection on a network, if your wireless gadget picks up on a wireless connection you have the access points MAC address.
To find the MAC address of the computer you are on right now goto a command prompt and type ipconfig /all (windows) you will get something back like this
Here it is listed as Physical Address.
To find MAC address of other computers on your network type arp -a
I know the gateway for my PC is my access point so the MAC of my access point is 00-08-A1-52-AE-XX using google earth I can find the longitude and latitude of my house and use this access point to find my location or anyone else can for that matter.
The only time that the MAC is not available may be when the Access point has MAC filtering turned on. This method blocks access via the MAC address of the gadget attempting to connect to it. Depending on router this will virtually make the access point invisible or in my case advertise the Access point but deny access. Many other methods may be available to prevent external access to a router which I will undoubtedly discover. Considering most users fail to even activate the simplest of security on there router I doubt this will be too much of an issue.
So all I need to do now is drive around the streets stop every time my laptop finds a wireless network use google earth to find longitude and latitude and we are set. I should finish my small town by 2010.
Alternatively I could use a program like net-stumbler with a GPS and drive around and get the laptop to do all the work. Considering it costs $1.80 a litre for fuel at the moment I cringe at the thought also how slow would I need to drive to make sure I get an accurate reading? Even at a log every second I'm several meters away from the actual hit point by the time it 's all saved to disk. I could put a laptop in a bag and cycle around with that but the weight and battery life come into the equation.
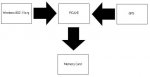
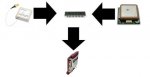
So I figure the solution is to make a unit about the size of two cigarette packets and strap it to the bike and go for gold.
WPS or Wireless Positioning System is described as the use of wireless access points to determine geographical location.
Virtually all modern handheld devices incorporate a wireless connection Ipod Touch, Playstation portable, Laptops and even phones. What they don't have is GPS. Now the purest would argue that GPS is the only reliable method of accurately calculating geographic location and for the most part this is true but when GPS meets the the high rise building the playing field changes. Some GPS units cannot even penetrate the humble roof of the average domestic house let alone 30 stories of concrete and steel.
Wireless on the other hand is designed to go through many walls, each wireless access point is unique and in this modern world wireless AP's are plentyfull. Drive down the average suburban street and my Ipod Touch picks up on average 4-5 access points every 100 metres or so.
So WPS is perfect? No not really -
Access points are only really situated in suburbs and towns, if your lost in the middle of the desert WPS will not help you.
Signal strength is dependent on many variables weather, cars parked near the access points.
Access points move, get replaced, die etc.
For WPS to work the unit accessing the access point location needs access to a look up table.
During this project I hope to address these issues and hopefully have a solution for some of them.
So how does WPS work?
Your access point (assuming you have one) will advertise a MAC address, the MAC address lives in the http://www.petri.co.il/osi_concepts.htm data-link layer of the OSI model. It is required to make a connection on a network, if your wireless gadget picks up on a wireless connection you have the access points MAC address.
To find the MAC address of the computer you are on right now goto a command prompt and type ipconfig /all (windows) you will get something back like this
Code:
Connection-specific DNS Suffix  . :
Description . . . . . . . . . . . : 802.11b WLAN PCI
Physical Address. . . . . . . . . : 00-08-A1-52-AE-DE
Dhcp Enabled. . . . . . . . . . . : No
IP Address. . . . . . . . . . . . : 192.168.0.3
Subnet Mask . . . . . . . . . . . : 255.255.255.0
Default Gateway . . . . . . . . . : 192.168.0.1
DNS Servers . . . . . . . . . . . : 192.168.0.1To find MAC address of other computers on your network type arp -a
Code:
Interface: 192.168.0.3 --- 0x3
Internet Address      Physical Address      Type\
192.168.0.1 00-18-4d-5e-46-XX dynamicThe only time that the MAC is not available may be when the Access point has MAC filtering turned on. This method blocks access via the MAC address of the gadget attempting to connect to it. Depending on router this will virtually make the access point invisible or in my case advertise the Access point but deny access. Many other methods may be available to prevent external access to a router which I will undoubtedly discover. Considering most users fail to even activate the simplest of security on there router I doubt this will be too much of an issue.
So all I need to do now is drive around the streets stop every time my laptop finds a wireless network use google earth to find longitude and latitude and we are set. I should finish my small town by 2010.
Alternatively I could use a program like net-stumbler with a GPS and drive around and get the laptop to do all the work. Considering it costs $1.80 a litre for fuel at the moment I cringe at the thought also how slow would I need to drive to make sure I get an accurate reading? Even at a log every second I'm several meters away from the actual hit point by the time it 's all saved to disk. I could put a laptop in a bag and cycle around with that but the weight and battery life come into the equation.
So I figure the solution is to make a unit about the size of two cigarette packets and strap it to the bike and go for gold.
Last edited: