bfgstew
Senior Member
Well after 18 months of head scratching, additions, and several versions I have finally finished my controller. Originally it was just going to be a single water drop controller to photograph water drop collisions, similar to the Cognysis system, but once I started it seemed to start to run away from me, more and more ideas came to me the more I searched the Internet for solutions, and it snowballed into the final version.
1 - Water drop controller for up to 4 solenoids with 3 drops avalable for each solenoid, valve timings are inputted via keypad and can be adjusted simply after each run.
2 - Photgate / lasergate, either using a small frame with a laser beam refected off both sides creating a laser barrier, anything passing triggers either flash or camera to fire, adjustable sensitivity to allow for slow or fast moving insects. Or a simple beam and receiver pointing at each other creating a laser 'tripwire' for small rodents, mamals or birds to be photographed if the pass the beam.
3 - Sound trigger, using the Rev-Ed sound circuit and coupled to the 40X2 comparitor pins, this allows the capture of popping balloons, and any other sound related photographic opportunity, again, simply adjustments allow for really fine tolerances to capture the slightest noise.
4 - Light trigger, a simple photodiode coupled to the other comparitor pin on the 40X2 gives this the flexibility to capture lightning, again, simple adjustment via a pot to give fine tuning to allow the slightest flash to be captured.
5 - Timer, this is for astro photograph mainly, exposure time and interval times can be fully adusted from 1 second to 24 hours and up to 9999 exposure if required.
6 - Macro rail, based on an earlier project posted on here, I have taken the IR controller out and can now set and adjust all functions via the keypad. I can have a travel of up to 36mm and steps from 1mm down to 0.01mm, zero return, abort function, zero set and speed adjustment.
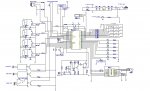
All based on the mighty 40X2 chip, using all 4 slots, the easy to read 20X4 OLED and a 4X3 keypad, 3 pots allow adjustment of trigger levels, a simple switch to allow camera review and focus (Nikon), reset button and 8 LED's to show what function is being used and if ready to go, 12v supply regulated own to 5v, it can be used with a small 3 or 4AA battery pack, but this will not run the solenoids or macro rail, but these are mainly for indoor use any way, so doesn't matter to much, but at least it gives flexibility to take out in the field.
View attachment bas file.zip

Schematics are still being completed but my laptop with all info is down at the moment so unable to finish.
Any questions or quries just PM me and will be glad to oblige.
1 - Water drop controller for up to 4 solenoids with 3 drops avalable for each solenoid, valve timings are inputted via keypad and can be adjusted simply after each run.
2 - Photgate / lasergate, either using a small frame with a laser beam refected off both sides creating a laser barrier, anything passing triggers either flash or camera to fire, adjustable sensitivity to allow for slow or fast moving insects. Or a simple beam and receiver pointing at each other creating a laser 'tripwire' for small rodents, mamals or birds to be photographed if the pass the beam.
3 - Sound trigger, using the Rev-Ed sound circuit and coupled to the 40X2 comparitor pins, this allows the capture of popping balloons, and any other sound related photographic opportunity, again, simply adjustments allow for really fine tolerances to capture the slightest noise.
4 - Light trigger, a simple photodiode coupled to the other comparitor pin on the 40X2 gives this the flexibility to capture lightning, again, simple adjustment via a pot to give fine tuning to allow the slightest flash to be captured.
5 - Timer, this is for astro photograph mainly, exposure time and interval times can be fully adusted from 1 second to 24 hours and up to 9999 exposure if required.
6 - Macro rail, based on an earlier project posted on here, I have taken the IR controller out and can now set and adjust all functions via the keypad. I can have a travel of up to 36mm and steps from 1mm down to 0.01mm, zero return, abort function, zero set and speed adjustment.
All based on the mighty 40X2 chip, using all 4 slots, the easy to read 20X4 OLED and a 4X3 keypad, 3 pots allow adjustment of trigger levels, a simple switch to allow camera review and focus (Nikon), reset button and 8 LED's to show what function is being used and if ready to go, 12v supply regulated own to 5v, it can be used with a small 3 or 4AA battery pack, but this will not run the solenoids or macro rail, but these are mainly for indoor use any way, so doesn't matter to much, but at least it gives flexibility to take out in the field.
View attachment bas file.zip
Schematics are still being completed but my laptop with all info is down at the moment so unable to finish.
Any questions or quries just PM me and will be glad to oblige.
") (Upload larger images {1366px wide?}... the forum will create the thumbnails for you.)
(Upload larger images {1366px wide?}... the forum will create the thumbnails for you.)