WHITEKNUCKLES
New Member
From sideboard thread.
BrendonP,
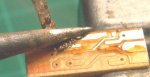
Nail hold-down is just that. Holding the component down with tweezers or toothpick means that position control is from the shoulder, at worst, or from the wrist. With the fingertip on the board and the nail on the component there is much less chance of movement. Fast and instructive, if you feel warmth you have taken too long.
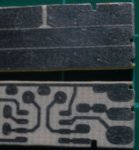
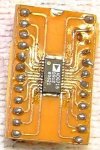
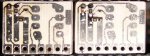
Using toner transfer, PCBs are easier and cheaper than ever, the only cost is the board and ferric chloride.
Searching the web, there are almost as many ways to solder SM as there are people, it is indeed a personal thing.
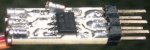
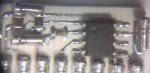
For SM, solder on the pad is almost essential.
I paint the freshly cleaned tracks with used solder-wick held in a small insulated crocodile clip as the brush.
With the whole surface fluxed, I flux the curved end of the 'brush', place it over the far end of the board, heat with the Iron and draw all towards me painting a narrow strip. More flux and another strip. Surprisingly little solder is needed but frequent fluxing is required and excess solder is easily removed in the same way using new solder-braid. Clean thoroughly.
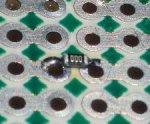
That part is quite therapeutic and in SMALL numbers somewhat absorbing, "Gosh that was easy" and grab another. The board in the photos was timed at 8 seconds start to finish, naw, the painting.
Narrow gauge multicored solder is helpful and a percentage of silver is recommend to prevent leaching.
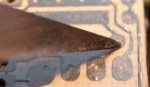
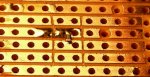
On the top right hand pad I place the tiniest amount of solder, flux the pads, place and hold the component, clean the iron, pick up the smallest possible amount of solder from the reel onto the pointed tip to aid thermal conduction and place the iron on the track touching the end of the component wiping up and away.
Brown jelly flux in a small tub with a small scrap of paper inserted vertically and lightly smeared with flux, the end of the solder is drawn up the paper then placed half way across the end of the opposite pin, touching both track and pin. The cleaned tip of the iron is placed on the track as close as possible to the pin without touching, the tiniest hesitation then slide the iron up to the solder, watch the melt (flash), slide up over the pin and away.
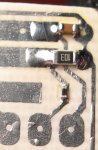
OK down to 0603 as yet.
So how to 0.5mm?
Dave
BrendonP,
Nail hold-down is just that. Holding the component down with tweezers or toothpick means that position control is from the shoulder, at worst, or from the wrist. With the fingertip on the board and the nail on the component there is much less chance of movement. Fast and instructive, if you feel warmth you have taken too long.
Using toner transfer, PCBs are easier and cheaper than ever, the only cost is the board and ferric chloride.
Searching the web, there are almost as many ways to solder SM as there are people, it is indeed a personal thing.
For SM, solder on the pad is almost essential.
I paint the freshly cleaned tracks with used solder-wick held in a small insulated crocodile clip as the brush.
With the whole surface fluxed, I flux the curved end of the 'brush', place it over the far end of the board, heat with the Iron and draw all towards me painting a narrow strip. More flux and another strip. Surprisingly little solder is needed but frequent fluxing is required and excess solder is easily removed in the same way using new solder-braid. Clean thoroughly.
That part is quite therapeutic and in SMALL numbers somewhat absorbing, "Gosh that was easy" and grab another. The board in the photos was timed at 8 seconds start to finish, naw, the painting.
Narrow gauge multicored solder is helpful and a percentage of silver is recommend to prevent leaching.
On the top right hand pad I place the tiniest amount of solder, flux the pads, place and hold the component, clean the iron, pick up the smallest possible amount of solder from the reel onto the pointed tip to aid thermal conduction and place the iron on the track touching the end of the component wiping up and away.
Brown jelly flux in a small tub with a small scrap of paper inserted vertically and lightly smeared with flux, the end of the solder is drawn up the paper then placed half way across the end of the opposite pin, touching both track and pin. The cleaned tip of the iron is placed on the track as close as possible to the pin without touching, the tiniest hesitation then slide the iron up to the solder, watch the melt (flash), slide up over the pin and away.
OK down to 0603 as yet.
So how to 0.5mm?
Dave
Attachments
-
 36.4 KB Views: 145
 -
 45.7 KB Views: 145
Last edited:

")