Rainwater tank controller

marzan

Senior Member
Hi everyone. I am starting a new project. I want to build a controller for my rainwater tank. I`ll explain:

Rainwater is hooked up to the toilet and the irrigation system.

Pressure pump is 12 v 20lpm running from Lead acid batteries recharged by solar panels.

I want the controller to:

Limit the pump to run for a maximum of 5 minutes before shutting off the pump UNLESS it is in a specified time period set to coincide with the irrigation system.

check the water level in the tank via a pressure sensor in the outflow pipe at the bottom of the tank.

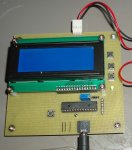
Lcd display to show how much water is left in the tank as well as menus to set time of an rtc chip, set time for automatic override for the irrigation system, daylight saving forward/back menu item, and manual override menu item.

Dorji 433 MHz modules to also receive info onto a remote lcd screen (or in a perfect world an app on my computer)and a piezo to operate when tank low or time exceeded.

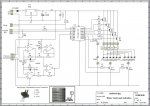
I have come up with the following circuit diagram. Sorry if it isn`t very neat:


tank controller.jpg


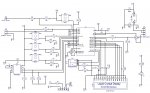
can anyone suggest any improvements to the circuit?

I thought this might be a good way to learn some new things. :)

Marz.
 

PaulRB

Senior Member
Looks pretty good to me!

Only suggestions I can think of are simplifications - doing more with less. If you want to use that 28x2 for a bigger project, you could probably use a 20m2 for this one.

How about ditching the power indicator led and use the lcd backlight instead? Saves a pin.

Paul
 

geoff07

Senior Member
You could run all the buttons off the same adc using a ladder approach (unless you were planning to have them interrupt).

I would check the power demand of the backlight as they can be heavy on the juice for a solar-powered device.

I would drive the power led off the Picaxe, so you can use it as a tell-tale (or turn it off entirely). Very useful when debugging.

Perhaps there is a way you can power off the lcd when you are not present to read it, save a few joules. First press on any button turns on the lcd, second press does whatever it was meant to do.
 

PaulRB

Senior Member
I would check the power demand of the backlight as they can be heavy on the juice for a solar-powered device.
Well, the OP has 330R on the backlight and the power led, so they would probably use around about the same current. But this raises a good point. That backlight may not be very bright with a 330R. I use around 100R with my 16x2 lcds. It would be ok in a dark room or at night, but a bit difficult to read at other times.
 

g6ejd

Senior Member
Well it's all feasible. I've just been looking at the various linear water pressure sensors around, they cost ~ £20 upwards, a voltage out of 1-5V of a typical water pressure range. I guess you just need to spend sometime working out your control logic to make programming the PICAXE easier and to do it quickly.
 
Last edited:
Tip about the water pressure sensor. The Freescale MPXV7002DP is brilliant for this. I did sample a couple of this for a job I did, and they are perfect to measure waterlevels. 0-5V out .Just connect a fuel-hose for model-planes to it and you got yourselves(?) a dept-sensor.
 

marzan

Senior Member
Thanks for all the input everyone.
I think that I am alright if the whole circuit is a bit power hungry. I have 50Ah storage and 160 watt charging capacity, but I think some of the ideas put forward here would be a good idea.
If I was to power the screen from a pin would it be a good idea to use a PNP transistor? changing the resistor for the backlight is easy. I have that connected to a pin so I could pwm if i wanted to.
@geoff07 you are correct that i was leaving my options open regarding using interrupts or not on the switches. I havent decided which way to go. I thought I would make a PCB with this circuit and then decide when programming which way to go.Also a good tip for turning off/restarting the lcd. I was thinking of something along those lines to stop screen burn. I will be using a 20X4 OLED, but diptrace didn`t have one in the library so I just used that one.
@Balderbraa Thanks for the post on the sensor. That looks easier than what I intended,so I might order one.

Thanks again everyone. I`m sure there will be many questions along the way.

Marz.
 

westaust55

Moderator
Your are intending to use the PCF8583 RTC chip. Any particular reason for that chip?
The datasheet does not claim high accuracy although section 11 indicates +/- 5 mins per year is possible.
http://www.nxp.com/documents/data_sheet/PCF8583.pdf
Seems you need a crystal with a capacitive load of around 10 to 12 pF (note that some RTCs use 12 pF and others need 6 pF for best accuracy).
There is also mention of addition a trimmer capacity between pin OSC1 and Vdd.(Not shown on your schematic).

Some other chips such as the DS3232 and similar achieve battery accuracy that the ubiquitous DS1307.

The DS1307 has an accuracy of around 20 ppm which equates to 1 minutes per month.
The DS3232 and similar in that DS32xx range have an accuracy of around 2 ppm ==> ~ 6 sec per month.
Chips such as the DS1338 with inbuilt crystal option achieve 10 ppm ==> ~ 30 sec per month.

The PCF858 is at 5 mins a year or ~ 25sec a month at best is akin to the DS1338 with input crystal.

At the end of the day, all down to what accuracy you desire versus cost.
 

marzan

Senior Member
@westy It`s just what I had on hand for another project that`s gone out the window due to other priorities. I didn`t know they were that bad. Not that good at reading datasheets. Looks like I will be changing chips !

Thanks for the heads up.

Marz.
 

SAborn

Senior Member
For a RTC, i purchased a couple of these recently and they work well, They are just as cheap as buying a DS1307 chip, and come with backup battery, all you need to do is wire it in and add it to program, the programming is the same as using a DS1307, with a few extra features should you choose to want to use them, Like temp, alarms, etc)

http://www.ebay.com.au/itm/mini-RTCpro-DS3231-high-precision-clock-module-environment-temperature-measure-/390521397685?pt=LH_DefaultDomain_0&hash=item5aece3a1b5#ht_2612wt_932
 

marzan

Senior Member
The controller will be in the shed where I put the pump to protect it from the elements, so probably use an OLED
 

marzan

Senior Member
Thanks for the info Pete. That sounds like the way to go. That's what I love about this forum. Lots of experienced people with really good ideas :)
 

SAborn

Senior Member
If want another thought on the pressure sensor you might like to check out a hack i done with a Fisher and Paykle washing machine water level / pressure sensor here.

http://ozelecforum.com/viewtopic.php?f=6&t=460

Its a interesting method they ues to vary a frequency, and you might be able to build your own if you are clever enough.
All the picaxe was required to do was monitor the output frequency and that is easy with Pulsin, then work between the empty reading and the full scale reading.
 

marzan

Senior Member
Pete. Read your article. Very interesting, and possibly easy to make with the machines At my disposal . Got any piccies of the sensor?

Marz.
 

Bill.b

Senior Member
Hi Marz

The pressure sensor mentioned in post 6 has a max range of 2 Kpa, I would check the outlet pressure of your tank before deciding on it. The pressure
will depend on the size / capacity of your tank.

An alternative would be this unit from Jacar. It has a max diff pressure of 10 Kpa.

http://www.jaycar.com.au/productView.asp?ID=ZD1904

I have used this transducer as a level indicator on my tank. It will require additional circuitry to set the span and zero as in my schematic.
This circuit is based on a tank level control published in Silicon Chip. The input to the picaxe is 0 - 2v for 0 to 100% level.

tanklevel.jpg

Bill
 

marzan

Senior Member
Hi Marz

The pressure sensor mentioned in post 6 has a max range of 2 Kpa, I would check the outlet pressure of your tank before deciding on it. The pressure
will depend on the size / capacity of your tank.

Bill
Yes i think some measuring needs to be done. I am warming to the idea of making a sensor like Saborn has mentioned. It`s worth a shot. Might be fun to see if it works properly..

Marz
 

marzan

Senior Member
For a RTC, i purchased a couple of these recently and they work well, They are just as cheap as buying a DS1307 chip, and come with backup battery, all you need to do is wire it in and add it to program, the programming is the same as using a DS1307, with a few extra features should you choose to want to use them, Like temp, alarms, etc)
I gather all I need to do is connect SCL,SDA.Power and ground and not worry about the other pins?
Marz.
 
Last edited:

SAborn

Senior Member
Yes i think some measuring needs to be done. I am warming to the idea of making a sensor like Saborn has mentioned. It`s worth a shot. Might be fun to see if it works properly..
It was a project i had intended to get back to one day but have not had time to, A thought i had was to try adapting a irrigation solenoid (the diaphragm part) and adding a coil with a ferrite rod attached to the diaphragm, as the rod moves in and out of the coil it effects the frequency.
That is the basics of how the original F&P sensor worked. (with a light spring loading to adjust the pressure range)
The reason for using a irrigation solenoid was to be able to use water pressure direct on the diaphragm and not air, as the air is subject to expansion and contraction due to temperature which effects the readings, and was the problem that the Silicon Chip design had also suffered with. (as reported in a later article by SC)
 

marzan

Senior Member
It was a project i had intended to get back to one day but have not had time to, A thought i had was to try adapting a irrigation solenoid (the diaphragm part) and adding a coil with a ferrite rod attached to the diaphragm, as the rod moves in and out of the coil it effects the frequency.
That is the basics of how the original F&P sensor worked. (with a light spring loading to adjust the pressure range)
The reason for using a irrigation solenoid was to be able to use water pressure direct on the diaphragm and not air, as the air is subject to expansion and contraction due to temperature which effects the readings, and was the problem that the Silicon Chip design had also suffered with. (as reported in a later article by SC)
Well i think I have some old irrigation solenoids somewhere, and Jaycar would probably have some ferrite rod, so might have a bit of a tinker on the weekend. Do you have a diagram of the driving circuit ?

Marz.
 

SAborn

Senior Member
Do you have a diagram of the driving circuit ?
Do you mean that of the 4069 hex inverter driver? if so thats in the link i posted to Ozelec about the hack.
If you mean the coil etc, well no as i never got that far, i think the original is still around here somewhere. (but so is everything else making things hard to find)
 

marzan

Senior Member
Do you mean that of the 4069 hex inverter driver? if so thats in the link i posted to Ozelec about the hack.
If you mean the coil etc, well no as i never got that far, i think the original is still around here somewhere. (but so is everything else making things hard to find)
Sorry Pete. Never saw the rest of the post. Only saw the first bit on my phone while at work. Looks reasonably easy to replicate :)

Marz
 
Last edited:

SAborn

Senior Member
I am guessing the coil is centre tapped to ground, although until i find the original F&P sensor im only guessing.

I would expect any ferrous metal would work in replacement of the ferrite rod, if you have an old FM radio then the antenna would have a ferrite core.

Its a bit like an older stick welder where the iron core is moved into the transformer core to increase amps, where in this case we are interested in the effect on frequency.

I see it as a lot of trial and error to get it to work but the theory is proven in industry.
 

marzan

Senior Member
So if the coil is centre tapped to ground, would that rule out using an irrigation solenoid?

Marz.
 

Bill.b

Senior Member
I have used similar transducers for mesuring the diameter of glass tubing.
they consist of two coils side by side on the one former.
one coil forms part of an oscillator (the good old 555) and the second coil provides the output signal.

This generally required rectification and amplification to be of use in a picaxe.

Bill
 

SAborn

Senior Member
I dont recall suggesting the use of a irrigation solenoid coil, only the diaphragm of the irrigation valve to move the ferrite rod in and out of the coil.
 

DakLak

New Member
I believe in Dumb-Simple and because I am lazy, as well, I try to avoid reinventing the wheel.

The first question I had is what is the purpose of your project: To read the water level by numbers; To read the water level by indicator; To use a PicAXE.

Of course, a clear plastic tube affixed to the side of the container with the lower end fed from the container and the level of tube liquid would indicate fluid levels, is the easiest.

Your problem is a common one in Third World countries as well Australia, Canada and the USA (think Doomsday Preppers).

The solution to this can be basic (direct contact sensing) through capacitive to ultra-sonic.

You might look at the following links:


Water reservoir automatic level control - http://www.redcircuits.com/Page129.htm

Water Level Alarm - http://www.radiolocman.com/shem/schematics.html?di=55405

Water-level Indicator - http://www.redcircuits.com/Page95.htm

**Water Level Indicator - http://www.radiolocman.com/shem/schematics.html?di=52233

Touch input used as liquid level sensor - http://www.picaxeforum.co.uk/archive/index.php/t-17328.html

Wireless PICAXE-based water tank level sensor - http://kayno.net/2010/02/11/wireless-picaxe-based-water-tank-level-sensor/

Water Level Indicator with alarm - http://www.electronic-circuits-diagrams.com/alarmsimages/alarmsckt6.shtml

**Build A Water Level Indicator - http://archive.siliconchip.com.au/cms/A_30607/article.html

IN THIS FORUM the following touch upon the subject:
http://www.picaxeforum.co.uk/archive/index.php/t-14224.html
http://www.picaxeforum.co.uk/archive/index.php/t-10075.html
http://www.picaxeforum.co.uk/archive/index.php/t-5313.html

Of the above **Build A Water Level Indicator is the most attractive, IMO, provided you move the transistor amplifier tank-side - to reduce the affect of noise.

The resultant output could easily be read by a PicAXE (see: Raibow Voltmeter - http://www.inklesspress.com/picax

About the sensors
Use, if you can Stainless Steel rod (aka round bar), cut to appropriate lengths. You can have a welder **braze** (with a flame) tips on one end of each rod. You can solder to braze, not bare SS. Then cover each rod with plastic sleeving, leaving the end one inch exposed (to the fluid). This should eliminate corrosion. Mine have lasted over 14 years to date.

I use ultrasonic to read my gas/petrol level in my motor-scooter ever since the old mechanical one quit working.
 

marzan

Senior Member
@DakLack I have read most of those posts. Some are close to what I want to do. I want an "all in one" solution to what I have seen on other posts including the cutoff and the override. So I have read the posts but at this stage I am just getting the electronic side sorted out for a prototype board that if planned out correctly will give me options as to what sensors I end up using. To me the pressure switch setup is the best option as there is a lot less work involved, but exactly which one I don`t know yet ( but a scrounge at the local dump might find me what I need)
@Bill.b thanks for the info. By the sounds of it it is still possible to build one as a last resort.

Marz.
 

nick12ab

Senior Member
Well I have a board that I`m happy with:
Critique time :)

The positioning of those switches on the right is very wasteful of PCB. If they need to be that far away from the rest of the circuit then can you instead attach a second board using ribbon cable?

There are a lot of 2 pin surface mount components with one pin not connected to anything.
 

Hemi345

Senior Member
I saw that too Nick. Maybe his ground pour/polygon isn't showing in that pic.

How will you solder the SMD parts? SMD electrolytic caps are a PITA to solder with an iron. I've resorted to making the cap footprints stick out an extra 1mm on each side so I have something to touch with the iron to melt the solder. I think I'll use up the current stock I have and go back to using leaded caps. I can handle soldering 0805 resistors and MSOP footprints on ICs, but SMD caps just aren't any fun!
 

marzan

Senior Member
Critique time :)

The positioning of those switches on the right is very wasteful of PCB. If they need to be that far away from the rest of the circuit then can you instead attach a second board using ribbon cable?

There are a lot of 2 pin surface mount components with one pin not connected to anything.
I know there is a lot of dead space, but the LCD mounts over the top so I was prepared to use a little extra PCB to get a solid mount to the LCD and to the housing. As Hemi345 says I haven`t shown the board in a poured state so the pins that look unconnected are connected to the ground plane. Also I havent encountered too many probs attatching SMD caps. Sure they`re fiddly, But so far (touch wood)I have never had to replace one.
 

marzan

Senior Member
Board built and it works ! Made a mistake on the programming socket though. Ya live and learn :)

tank.jpg

Marz
 

SAborn

Senior Member
Nice work, i tend to tuck the picaxe under the LCD and put the LCD on double row plug in header pins so the LCD can be inserted after assembly , the double pin header gives a sturdy mount even though only one row of pins is used, this way it keeps the board size smaller.

What did you decide on for a pressure sensor.
 

marzan

Senior Member
Hi Pete. I put the chip on the outside to make the traces easier. As for a sensor I found one that goes from 0R to 180R at .8Bar. I`m hoping that is enough pressure. Only got it today so I need to plumb it up to check. 180R dosen`t sound like much to put into a voltage divider setup. Is there some way I can do it differently, say with an OP AMP? ( i`ve never used one before so I`m only guessing )
Now the hunt is on for a tutorial on 20X4 OLED displays so I can get something on the screen.

Marz
 
Top