Philips EE & Picaxe: a happy marriage between old & new, sustainable for the future ...

kranenborg

Senior Member
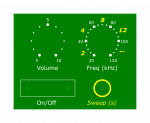
While preparing for the design of the wooden box I came by a very useful tool combo for defining the control panel and the knob scales on it, and I can really recommend it for use. The main tool that I use for the panel design is InkScape (a modern, open-source vector-based drawing program) for SVG documents. As InkScape allows extensions, I used the "Knob Scales" extension for rendering them: GitHub - leechwort/knob-scale-generator: Inkscape extension for generation of knob scales (this link includes installation instructions). I made two scales as part of the panel design, which has the following looks:

Frontplaat_v2.png

PS1: For me the extension did not work properly for InkScape 1.2, therefore I installed InkScape 1.1 instead.
PS2: SVG files cannot be attached in this forum, send me a PM instead in case of interest.

/Jurjen
 
Last edited:

bogbean

Well-known member
My enclosure build has been a learning curve, mainly in drilling and crimping. Here are 2 of my finished detectors with an acrylic sandwich construction. One has survived falling off my shed roof onto concrete so gives reasonable protection. I heard bats 2 nights ago so they're not hibernating yet here in London.

You'll see I completely sidestepped the issue of labelling the knobs but it's something I would like to try to improve the look of my projects. Do you intend to print your knob scale labels onto paper and stick them on? Or something more fancy?

Please keep us posted on your wooden enclosure progress, it sounds like a good project for winter evenings.
 

Attachments

papaof2

Senior Member
This link will generate a "meter face" but the example on the page looks like a control scale to me ;-) You'd need to adlust the diameter of the circle to fit your panel and maybe add a coat of clear varnish for wear protection unless you can laser print on the plastic "photo paper".
 

kranenborg

Senior Member
Here is the detector nicely encapsulated in a wooden box:

Chest_front_small.jpg Chest_mic_small.jpg

The box is made from a combination of plywood at the top and bottom (3mm thin, so very easy to process with a Dremel and some sanding inserts etc.), and thicker oak wood at the sides. The right picture shows the mic opening.
The label is designed in InkScape (see also post #41), printed on a adhesive sticker sheet and then a few layers of spray-varnish have been applied to it (and the box), to make it less susceptible to dirt and moisture, and then cut out and attached to (pressed onto) the box.
The speaker grille may look like some kind of wire but actually is a cut-out from a grill mat ..., I really like the looks of it!

/Jurjen
 
Last edited:
Top