One-Wire Devices / Networks

westaust55

Moderator
Using the DS2408 as a 256 step DAC

Just when folks thought it was safe to go back in the water . . . :)

I have done some trials using a DS2408 1-Wire 8-channel PIO as a DAC since the DS2890 digital pot IC is no longer readily available.

A couple of things to note are:
1. THE DS2408 outputs are open collector and so will not pull a line high so we must use a pull up resistor
2. The open collector pins only pull the lines down to around 0.03 volts when the current is 0.4mA and around 0.13 volts when the current into the pin is 2.2mA.

I have tried a couple of different variants based upon the basic R-2R network. One ignored the above points and the other tried to compensate for the above mentioned points.

The end result is that a moderately reasonable DAC output was created that was monotonic (ie as the data value increased the analogue voltage rose at each step) but the analog value was not exactly linear even though some care have been used with 1% MF resistors and check individual resistor values.

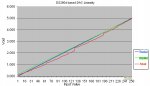
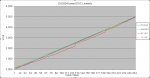
The attached chart from Excel shows the approx DAC output voltage as the value is increased.
- The pink line ignores the mentioned effects entirely
- The blue line tried to do some compensation
- the green line is a straight line representing the theoretical voltage output

I will attach some further details of the R-2R resistor networks and may try a few more resistor "tweaks" shortly.
 

Attachments

Last edited:

westaust55

Moderator
1-Wire DS2408 based DAC circuit

Here is the basic circuit for the 1-Wire DS2408 based 256 step DAC

I have used a 4k7 resistors for the inter bit stages and then a combination of a 4k7 + 2k4 + 2k2 resistors for each bit "branch.

The three resistors in series give 9k3 Ohms from Vcc for each branch which is approximately double the value of the 4k7 ohm resistor for the R-2R network.

The 2k2 resistors also act as the pull-up resistors for the DS2408 outputs and limit the current to 2.2 mA per pin (the total current into the DS2408 across all 8 pins is 20mA).

Since the DS2408 pins do not go down to 0V (and this does make a different if one bench tests an R-2R circuit with the data lines going to Vcc and oV)
the output has slightly less resistance (ie 7k1 Ohms) in each branch to help pull the inter bit nodes slightly lower than would be the case if the full 2R value were between the DS2408 and the inter-bit nodes.
Hope that description all makes sense.

This circuit and values give a monotonic output in that every step increases at least slightly and there is never a situation where a higher "input" value across the R-2R network creates a lower Vout than a for a lower "input" value. There are however some larger increments in Vout when bits 5, 6 and 7 change from low to high (for example, the R-2R "input" value goes from 31 to 32).


Edit:
Attached also is a graph showing the Vout versus rising binary input values to the R-2R network. As can be seen, the slope is somewhat lower than theoretical but the upper bits create a step-up which by default help bring the Vout back closer to the theoretical and interpolated values.


Edit2:
I should also mention that to experiment with this circuit, I have used the DS2408 example program as posted back at post 68 and change the line:
PIO_Latch = 255- counter​
to read
PIO_Latch = counter​
at two locations.

Reason is that for a zero/low state (~ 0.0 volts, well at least as low in volts as we can get) we need all the outputs on to put the resistor network inputs low. Hence do not invert the data sent to the PIO Latch be removing the "255 -" part of the program line
 

Attachments

Last edited:

westaust55

Moderator
DS2408 1-Wire 8-channel based 256 step DAC

Taking into account the constraints mentioned previously, being:
1. need for a pull-up resistor and
2. the DS2408 output voltage when "on"

Some further tests have identified that:
1. need to keep the pull-up resistor component for the circuit to lowest possible value. 2k2 Ohms is that value. Using higher values introduces non-monotonic progression of Vout as the R-2R network input value increases.

2. Higher values for the "R" component of the R-2R network result in less error so that the Vout value is closer to the theoretical values.

Using R= 11K, the 2R branch = 20k and the pull-up as 2k2 so relative to Vcc the total 2R value is 22k2 gives far better values.

The attached diagram shows the improvement compared to the earlier network with R= 4k7.

At this point I conclude that the DS2408 1-Wire 8-channel GPIO chip can be used to drive an R-2R network and create an acceptable 256 step DAC.
 

Attachments

Last edited:

westaust55

Moderator
One-Wire Network schematics

I have finally been drafting some final schematic diagrams up from the assorted sketches and PEBBLE format layout diagrams I developed when building a series of 1-Wire network modules.
Currently have assembled a total of 5 assorted small "demo" type boxes each with around 3 1-Wire chips in each.

Attached is the base module/box which is driven in my case by a 40X1 (any X1 or X2 part with 1-wire IO commands could be used).

This first/base module provides:
  • a 4-pole switch to select between normal and programming mode which also physically isolates internal non EPROM devices (to prevent the "magic smoke" escaping)
  • a converter to generate the 12Vdc supply (from 2 x AA cells) used to program 1-wire EPROM (as opposed to EEPROM) devices,
  • a FET based circuit for switching the 12V supply when programming devices with EPROM memory
  • a DS2406 dual PIO with EPROM
  • a DS2433 EEPROM chip
  • a DS18B20 temperature chip
  • a switch and LED connected to the DS2406 PIO pins
  • a stereo socket (same as PICAXE programming socket) for 1-Wire network extension.


Hopefully others who are interested in 1-Wire networks or devices may find this useful. May add more schematics at a later date
 

Attachments

Last edited:

westaust55

Moderator
Attached is the schematic for a second of the 1-Wire Network modules I constructed for my experiments that others may also be interested in.

This module used:
  • a DS2890 Digital pot as a form of 256 step DAC (Dig Pot courtesy of KTarke)
  • a DS2408 8-Chan PIO with R-2R network as a second form of 256 step DAC
  • a DS2413 dual PIO to select which DAC output will be directed to an analogue meter (scaled 0 to 5V)
  • a 74HC4053 triple 2-chan Analogue switch (same as CD4053)
 

Attachments

westaust55

Moderator
1-Wire RTC and 4-Channel ADC with 8 LEDs

Attached today in a further schematic for those who may be interested.

This module contains:
  • DS2417 Time Chip counter - has interrupt but not used here
  • DS2450 4-Channel ADC input
  • DS2408 8 x PIOs - driving 8 x LEDs as status indication
The DS2450 can operate at up to 16-bit resolution for ADC with Full Scale set as 2.54 Volts or 5.12 Volts.

The DS2417 uses a 32.768 kHz crystal for accuracy but has no back-up battery pin. It is not a RTC like the DS1307/DS1338 but instead has a 4 byte binary counter which increments every second.
The interrupt if used can trigger at interval ranging from 1 sec to 36.41 hours in 7 non-equal steps
 

Attachments

westaust55

Moderator
Attached is a further schematic. This time for a 1-Wire LCD driver including backlight control, a single LED indicator and a receptor for up to 4 iButtons.

The chips used in this module are:
  • DS2408 8-channel PIO used for 8-bit parallel data to LCD and Enable pulse
  • DS2413 2-channel PIO used for the LCD 'RS' pin control and backlight control
  • DS2405 1-channel PIO - this just toggles an LED on/off each time it is accessed

As per previous posts in this thread, the LCD driver via 1-wire at standard speed is relatively slow at around 65msec per character.
 

Attachments

westaust55

Moderator
One-Wire Devices / Networks - Demo Modules 5

And here is the next (and for now last) schematic.

This module includes:
  • a DS2408 8-channel PIO chip with IO 0 to 3 used to drive LEDs and IO 4 to 7 to monitor 4 switches.
  • a DS2433 EEPROM chip - just to store some data for demo purposes
  • a DS18B20 Temp sensor

A PICAXE program in a much earlier post in this thread gave a demo program using the DS2408 portion with the 4 LEDs and 4 switches.

In having the five boxes/modules constructed thus far, each containing an assortment of 1-Wire chips, the duplication and multiple DS18B20 temp sensors provide the opportunity to create programs for not only multiple chips but also working with multiple chips of the same type on a 1-Wire network.

After a break of some months from creation of the modules detailed to date, I am now about to create a 1-Wire keypad module for which code and schematics will be posted at a future date.
 

Attachments

westaust55

Moderator
One-Wire Devices / Networks - A 1-Wire keypad

Most controller systems require some form of input.

Previously I had developed 1-Wire modules with various outputs systems such as LED displays, LCD 2x16 displays, analog signals (driving analog meter in my demo.

Input devices thus far had included analog such as from potentiometers, and 1-bit input signals such as by switches and some temperature sensors.

For greater input/control capability I have now assembled a 4x4 keypad which is interfaced using a DS2408 8-channel (IO) interface chip where 4 channels are used as inputs for keypad columns and 4 IO are used as outputs for the keypad rows.

While others have posted here in the past on using a keypad and resistor network to monitor a keypad via a single analog input, some advantages of the 1-wire method are:
  • if you already have a 1-wire network then this 1-Wire keypad approach does not require any further PICAXE IO, and
  • would not suffer from problems such as volt drop on the analogue line when long distances eg 100 or 300 metres are involved

In may case I have also done a bit of surgery as mentioned in Ron Hackets book (PICAXE® Microcontroller Projects for the Evil Genius) on a conventional 4x4 keypad as available from Jaycar and other sources.
In my case, I rearranged the keys starting with 0,1 , 2, 3 in the top row and progressing down to C, D, E, F on the bottom row. The "E" and "F" were the star and hash keys with Dymo type labels (black text on white background) over the keyface.

Keypad columns are interfaced to the DS2408 on IO pins 0 to 3 and keypad rows are conencted to IO pins 4 to 7. Schematic to follow later

Attached is the PICAXE demonstration code to monitor the keypad and display the identifier "0" to "9" and "A" to "F" in the PE [F8] terminal window when a key is pressed.

The code around the keypad scanning routine is quite simple. The program
1. searches for a DS2408 and sets up the control register
2. sets all rows low and clears the IO activity latches
3. in a loop checks the activity latches for any key press
4. when a keypress detected then scans the full keypad by rows
5. decodes the row and column data to a value 0 to F and displays the key ID
6. waits until all keys are released and returns to step 2.


Have fun in a PICAXE world :)
 

Attachments

Last edited:

westaust55

Moderator
1-Wire 4x4 matrix keypad schematic

As a follow up to the PICAXE program code posted above, attached is the schematic for the 1-Wire 4x4 matrix keypad circuit. This has another DS18B20 temp sensor added just to have more of each device on the Network for experimentation/demo purposes.
 

Attachments

westaust55

Moderator
One-Wire Devices / Networks - Search & Validation

For those who are interested in the use of the 1-Wire network with PICAXE X1 and X2 parts, the attached PICAXE program example may form a starting point or template for future programs.
The program example as attached has data in SYMBOL statements which relate to some of my own 1-Wire network modules and the user of the program will need to alter the lists accordingly to reflect their own 1-Wire devices. The program in this template does not perform any tasks such as monitoring keypad, reading temp sensors, flash LED’s or the output of data to a 1-wire LCD. The program template only seeks to verify the specified components are connected to the 1-wire network in preparation for use of the devices for some task or activity.
From a review of some thirty (30) 1-Wire chips that I currently have which includes multiples of various chips and iButtons such as DS18B20, DS2406, DS2408, DS2413, DS2433, DS1993, DS1994, it would appear that for most purposes the use of the device family code and the crc8 checksum alone is sufficient to uniquely identify each 1-Wire device.
The 1-Wire network search routine has been based upon that which forum member hippy has posted early in this thread since not only is it smaller thus saving some program space, but it is also faster than the version that I had previously written and posted early in this thread.
The attached program code template provides:
1. A simple check to see if a valid list of 1-Wire devices existing within the PICAXE internal EEPROM from a past 1-Wire network search.
2. If a valid list of devices is not found or if a flag is set, then undertake a 1-Wire network search and record the valid serial numbers in the PICAXE internal EEPROM memory.
3. A search to ascertain whether a user specified 1-Wire device is included in the device list within EEPROM memory
4. Code to ascertain if the specified 1-Wire device is currently connected to the 1-Wire network if the list is from a 1-Wire network search undertaken in the past – this is tentatively not required if a search has been undertaken since the last energisation of the PICAXE.
The program template as attached includes code to identify five of my 1-Wire devices (under the label “Check_Devs:”) by way of example to demonstrate how each device can be verified with around 20 bytes of additional code per 1-Wire device over and above the primary routines.

This is basically a Revision “A” release and as I undertake some further 1-Wire network programming further fine tuning may prove necessary or advantageous for speed or program size.

Forum program file size limitations have meant that I need to split the program template in half and post in two sections here. Just load the first in the PE and then cut and paste the content of the second file into the first to create the full single file.


Trust that others may find this template and the included routines useful in any 1-Wire network related programs/projects.


EDIT: see update template in post 92 below
 

Attachments

Last edited:

westaust55

Moderator
One-Wire Devices / Networks Search and Validation Templates revised

Realised that the 1-Wire Network template that I posted yesterday did not include a crc16 routine.

Also reassigned some of the variable aliases so that further variables are re-used and thus keep more of the limited number of variables (28 on X1 chips) free for the main program.

The crc16 is not utilised in the search and validation routines but added for completeness as working with EPROM and EEPROM memory such as DS2406 and DS2433 typically requires crc16 checks as used in example programs for chips posted much earlier in this thread.

Attached are the revised code parts.
Again open the first part in the PE and then open, cut and paste the second part to the bottom to create the full template.
 

Attachments

Last edited:

westaust55

Moderator
1-Wire network demo - using keypad LCD and multiple temp sensors

Still experimenting and developing some code for the 1-Wire network.

Clearly it is not possible to create and post code which is immediately useful to all since few will build exactly the same modules that I have constructed.
However, the attached program should provide a lot of examples within a single program.

The program uses parts of the following modules I have posted details on before:
1. Base module (used for a DS18B20 temp sensor plus some message data in EPROM/EEPROM))
2. LCD module (used for the LCD module)
3. Keypad module (used for the keypad entry and the DS18B20 temp sensor)
4. Optionally, the expansion module, if connected is used for a 3rd DS18B20 temp sensor.

The code includes a lot of comments so folks should find the program easy to follow.
The program includes a lot of output (SERTXD) or data to the programming terminal, some of which duplicates data sent to the 1-Wire LCD module so the user can see the steps undertaken.

As posted, the program occupies 4036 (out of 4096) bytes of program space in an X1 PICAXE chip.

The program has been left open which does occupy some further space but improves readability. Removal of some messages to the programming terminal screen and careful optimisation could save quite a lot of program space at the expense of readability.

The attached file has the extension changes so that it can be loaded as a single file.
Just change the .dsn file extension to .bas to open in the programming editor or even in Notepad.

Have fun in a PICAXE world :) :) :)
 

Attachments

westaust55

Moderator
DS28EA00 1-Wire Temp Sensor

Came across the Maxim DS28EA00 1-Wire temp sensor with dual IO (not that it a new device as the Rev 2 datasheet is from 2009):
http://www.maxim-ic.com/datasheet/index.mvp/id/5355
http://www.youtube.com/watch?v=dzA5eEbRt_g


Where there are only or predominantly multiple temps sensors used in a 1-Wirenetwork, the use of the chain function will enable easier identification of device serial numbers corresponding to a device location and save on the need to hold a lot of data in EEPROM.


The uSOP package will present some interesting times to use the chip:
http://pdfserv.maxim-ic.com/package_dwgs/21-0036J.PDF
 

Captain Haddock

Senior Member
Some more serials for you, once again all DS18B20's as all I've got
40/46/169/51/3/0/0/95
40/93/182/51/3/0/0/141
40/187/223/51/3/0/0/244
40/65/188/51/3/0/0/22
40/79/232/51/3/0/0/143
40/88/200/51/3/0/0/169
40/243/208/51/3/0/0/79
40/7/182/51/3/0/0/108
40/96/207/51/3/0/0/180
40/51/163/51/3/0/0/243
I've just colour coded them all with blobs of nail varnish and written the numbers down beside the codes.
 

westaust55

Moderator
Thanks CH.

The need for some serial numbers has however long passed.
The request was at a time when I was endeavouring to prove the adequacy/correctness of the network device search routine and related crc generation/check routine.
 

westaust55

Moderator
One observation that still follows is that while the 1-wire serial numbers must roll over and repeat every 2^48 devices, the chances of one person having two with the same serial number is extremely low.
Thus while you must send the full 64 bit number to address a chip, for internal checks even with multiple types of device it is usually possible to just use the first and last bytes (family code = device type, and CRC value) to verify if a "known" devices is present or for Lookup about device location for LCD/OLED display info etc.
 

gtslabs

Member
Westaust55,
I have been trying to digest your code for reading in the SN of the DS18B20's. I want to do something similar but I want to save the SN's of up to 8 devices. When I reset my chip I want it to look at what sensors are now in the system. This way if I have to repalce one I dont have to reprogram the eeprom. I am not sure what type of memory I should be saving this to as I am currently using the 40X1 but will probably go to the 28X2 soon.
I would have 64 bytes +1 (Device count). Should I be looking at Peek / Poke instead of eeprom read write? Would this be cleaned out when I reset the chip?

The goal would be to then poll what ever sensors are in the current system for measurements.
Exreme nubie here.
 

westaust55

Moderator
While for 40X1 space reasons, I had the device search as a separate program, that can be installed at the start of the main program.

POKE and PEEK will allow you to update the contents of EEPROM while the program is operating (ie after a program has been downloaded) and the read the values back.
You can save the SN’s in Scratchpad RAM memory which will retain the data until the power is disconnected. You would then use the PUT and GET commands. There is also the ptr, @ptr, @ptrinc, @ptrdec commands which can allow quick reading of consecutive memory locations and save on variable useage.

The PICAXE manual does not categorically state whether a reset will clear RAM such as scratchpad and non variable areas – something to test.

EDIT: after a re-read of the manual 2 with respect to RAM memory, it does in fact state: "It loses all data when the power is removed or reset."
RAM variables include general purpose, scratchpad, storage, and special function.


For changing 1-Wire sensors on the fly, that is certainly possible, but you will need to consider how you will keep the SN’s in memory and likely need to use pointers if you need to uniquely identify which sensor is which. You also need to keep in mind that when a new network scan for devices takes place where one device is replaced with another the network search routine can shuffle the order of the order the devices are found and saved into memory.
 
Last edited:
Top