Metronome rotary switch to push button

joliebrise

New Member
Metronome for Tai Chi has been prototyped with 6 pole rotary switch for 6 breathing times a variable resistor for volume control.
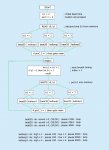
I now want to replace the hardware with push buttons. Below is simple 08m2 circuit to test new codes C.1, 2 & 4 output leds and c.3 switch input

full details of circuits and codes for switch & VR at http://www.sailservo.co.uk/picaxe/picaxe.html#pic20

Results - C.2 comes on and stays on. Pressing the button does nothing.


; switch test start.bas, Metronome for Tai Chi
;
; 3 fixed breathing times. beat25 = 2.5sec. beat30 = 3.0sec. beat35 = 3.5sec.
;
; When b1 = 2 then beat30 is selected immediately metronome is turned on.
; Led stays on looping through until the button is pushed on or metronome turned off.
; When the button is pressed the next beat is selected, b1 = b1 + 1
; When the button is pressed during final beat it is directed back to the first beat
;
; When the programme is working "b1 = 2" will be changed to "peek 10, b1 so the user's last setting is remembered,
; sound c.0, (50,50) will be added later

init:

; peek 10, b1 added later

b1 = 2 ; changed to b1 = b1 taking value from peek

if b1 = 1 then beat25
if b1 = 2 then beat30
if b1 = 3 then beat35

main:

pinC.3 = 0 ; waiting for button to be pressed
if pinC.3 = 1 then ; button pressed

b1 = b1 + 1 ; next breath timing
endif

if b1 = 1 then beat25
if b1 = 2 then beat30
if b1 = 3 then beat35
if b1 = 4 then beat25 ; goes back to timing 1 beat25

goto main

beat25: do: b1=1 : high c.1 : pause 2106 : loop 'poke 10, 1 in front of loop added later
beat30: do: b1=2 : high c.2 : pause 2563 : loop 'poke 10, 2
beat35: do: b1=3 : high c.4 : pause 3080 : loop 'poke 10, 3

Thanks Tony
 

lbenson

Senior Member
If you single-step your code in the simulator, you will probably see what is happening--you are looping forever with no exit whenever you go to one of your routines.
 

AllyCat

Senior Member
Hi Tony,

Yes, the simulator in the PE should help you find most of the issues, or just compare that section of the program with the "rotary switch" version in your other post. There is also an issue with the "if b1 = 4 then ...." part of the program (what happens the next time the button is pressed ?).

If you want a setting to be "remembered" after a power down, you need to use the READ / WRITE (DATA / EEPROM) commands, not PEEK / POKE. But beware that an excessive number of WRITEs can eventually "wear out" the PICaxe. It won't happen quickly, but generally you should NOT cause a WRITE every few seconds. Probably just combine the WRITE with the Incrementing (b1 = b1 + 1) part of the program.

Cheers, Alan.
 

joliebrise

New Member
If you single-step your code in the simulator, you will probably see what is happening--you are looping forever with no exit whenever you go to one of your routines.
All OK with PE and correct led light c.2 stayed on. It is designed to loop continuously with the sound beeping every 3 sec. Pressing the button was intended to breake the loop by indexing to next beat code 3. this did not happen. Am I missing a piece of code?
Thanks Tony
 

joliebrise

New Member
Hi Tony,

Yes, the simulator in the PE should help you find most of the issues, or just compare that section of the program with the "rotary switch" version in your other post. There is also an issue with the "if b1 = 4 then ...." part of the program (what happens the next time the button is pressed ?).

If you want a setting to be "remembered" after a power down, you need to use the READ / WRITE (DATA / EEPROM) commands, not PEEK / POKE. But beware that an excessive number of WRITEs can eventually "wear out" the PICaxe. It won't happen quickly, but generally you should NOT cause a WRITE every few seconds. Probably just combine the WRITE with the Incrementing (b1 = b1 + 1) part of the program.

Cheers, Alan.
PE found no issues.
if b1 = 4 is my method of simply indexing the code back to the first code 1

I find much of the codes far to complex to copy or get ideas from. Hence the purpose of my website. I start at the basics then progress checking as I go
Can I swap the words poke/peak directly into write/read. What is the purpose of serin/serout? in this situation.
Take your point in avoiding putting "Write" inside a loop.

Regards Tony
 

lbenson

Senior Member
PE found no issues.
Do you mean "found no syntax errors"?

If you actually run the code in the simulator, you will see that the code in main: is never executed, so you cannot respond to a button press. Perhaps you want to set up an interrupt on pinC.3.

Or perhaps you want multiple starts (on M2 chips). This is very poorly documented in Manual 2. About the best clue I've seen there is under the "Resume" command--but it's only a clue.
 
Last edited:

joliebrise

New Member
Do you mean "found no syntax errors"?

If you actually run the code in the simulator, you will see that the code in main: is never executed, so you cannot respond to a button press. Perhaps you want to set up an interrupt on pinC.3.

Or perhaps you want multiple starts (on M2 chips). This is very poorly documented in Manual 2. About the best clue I've seen there is under the "Resume" command--but it's only a clue.
I have never used the simulator before. Yes I see it only goes to beat30 and stops. That's what I wanted it to do. The user will infrequently reset the breath timing once it has been chosen.
I assumed that once the button had been pressed the following code would be inacted resulting the next beat35 beeing processed.

If that assumption is incorrect could you show me how to to solve the problem.

Regards Tony
 

lbenson

Senior Member
I've never used the M2 multitasking with start0, start1, etc., but this appears to work in the simulator:
Code:
; switch test start.bas, Metronome for Tai Chi
;
; 3 fixed breathing times. beat25 = 2.5sec. beat30 = 3.0sec. beat35 = 3.5sec.
;
; When b1 = 2 then beat30 is selected immediately metronome is turned on.
; Led stays on looping through until the button is pushed on or metronome turned off.
; When the button is pressed the next beat is selected, b1 = b1 + 1
; When the button is pressed during final beat it is directed back to the first beat
;
; When the programme is working "b1 = 2" will be changed to "peek 10, b1 so the user's last setting is remembered,
; sound c.0, (50,50) will be added later

start0:

; peek 10, b1 added later
b1 = 2 ; changed to b1 = b1 taking value from peek

main:

  do
    if pinC.3 = 1 then ; button pressed
      pause 50 ' for debouncing
      do while pinC.3 = 1: loop ' wait until release
      b1 = b1 + 1 ; next breath timing
      if b1 > 3 then: b1 = 1: endif
    endif
  loop

start1:
do
  beat25: do until b1<>1 : high c.1 : pause 2106 : loop 'poke 10, 1 in front of loop added later
  low C.1
  beat30: do until b1<>2 : high c.2 : pause 2563 : loop 'poke 10, 2
  low C.2
  beat35: do until b1<>3 : high c.4 : pause 3080 : loop 'poke 10, 3
  low C.4
loop
 
Last edited:

Buzby

Senior Member
.. I write websites using Xhtml, PHP & MySql so well versed in logic. I cannot see any logic faults.
beat25: do: b1=1 : high c.1 : pause 2106 : loop

Thinking about it logically, where does the processor go after executing 'loop' ?.

It goes back to the 'do' and repeats. It never gets a chance to read any buttons, so how is it ever going to change the beat ?.

Also, the simulator is not very explicit when executing multiple statements on single lines. It is better to view the action if you split the code to make just one command per line.

Code:
beat30:
do
     b1=2
     high c.2 
     pause 2563 
loop
And finally, the statements like 'b1=2' are being executed in every iteration of the loop, whereas they only need setting once just before the 'do'. ( Not important, but I don't like inefficient code. )

Cheers,

Buzby
 

lbenson

Senior Member
What, in fact, is the difference between a loop which pauses for 2106 milliseconds repeatedly until a button is pressed and a loop which pauses for 2563 milliseconds repeatedly until a button is pressed and a loop which pauses for 3080 milliseconds repeatedly until a button is pressed? Do you mean to toggle the corresponding LED?

If in fact you want to toggle the LED on C.1, C.2, C.4 at different rates, this works in the simulator without multiplexing:
Code:
; switch test start.bas, Metronome for Tai Chi
;
; 3 fixed breathing times. beat25 = 2.5sec. beat30 = 3.0sec. beat35 = 3.5sec.
;
; When b1 = 2 then beat30 is selected immediately metronome is turned on.
; Led stays on looping through until the button is pushed on or metronome turned off.
; When the button is pressed the next beat is selected, b1 = b1 + 1
; When the button is pressed during final beat it is directed back to the first beat
;
; When the programme is working "b1 = 2" will be changed to "peek 10, b1 so the user's last setting is remembered,
; sound c.0, (50,50) will be added later

; peek 10, b1 added later
symbol pauseTime=w13
symbol pLED=b2
b1 = 2 ; changed to b1 = b1 taking value from peek

main:
  do
    if pinC.3 = 1 then ; button pressed
      low C.1: low C.2: low C.4
      pause 50 ' for debouncing
      do while pinC.3 = 1: loop ' wait until release
      pause 50 ' debounce release
      b1 = b1 + 1 ; next breath timing
      if b1 > 3 then: b1 = 1: endif
    endif
    select b1
      case 1: pLED=C.1: pauseTime=2106
      case 2: pLED=C.2: pauseTime=2563
      case 3: pLED=C.4: pauseTime=3080
    endselect
    do: toggle pLED: pause pauseTime : loop while pinC.3=0 
  loop
 
Last edited:

joliebrise

New Member
beat25: do: b1=1 : high c.1 : pause 2106 : loop

Thinking about it logically, where does the processor go after executing 'loop' ?.

It goes back to the 'do' and repeats. It never gets a chance to read any buttons, so how is it ever going to change the beat ?.

Also, the simulator is not very explicit when executing multiple statements on single lines. It is better to view the action if you split the code to make just one command per line.

Code:
beat30:
do
     b1=2
     high c.2
     pause 2563
loop
And finally, the statements like 'b1=2' are being executed in every iteration of the loop, whereas they only need setting once just before the 'do'. ( Not important, but I don't like inefficient code. )

Cheers,

Buzby

I went back to draw up a flow chart which I supose I should have done earlier. I looked at other commands until I found Do... loop.. until. works on PE but how can I replicate pressing the button?

; Rewritten 4 June

b1 = 2 ; to initiate initial setup

read 10, b1 ; retrieve b1 from memory

pinC.3 = 0 ; switch not pressed

if b1 = 1 then beat25 ; code stops when button is pressed
if b1 = 2 then beat30
if b1 = 3 then beat35


if pinC.3 = 1 then ; button pressed
let b1 = b1 + 1 ; next breath timing
endif

if b1 >3 then let b1 = 1 ; return counter to 1
endif

write 10,b1 ; put b1 into memory

if b1 = 1 then beat25
if b1 = 2 then beat30
if b1 = 3 then beat35

beat25: do: b1=1 : high c.1 : pause 2106 : loop until pinC.3 = 1 ; until button pressed
beat30: do: b1=2 : high c.2 : pause 2563 : loop until pinC.3 = 1
beat35: do: b1=3 : high c.4 : pause 3080 : loop until pinC.3 = 1
 

joliebrise

New Member
What, in fact, is the difference between a loop which pauses for 2106 milliseconds repeatedly until a button is pressed and a loop which pauses for 2563 milliseconds repeatedly until a button is pressed and a loop which pauses for 3080 milliseconds repeatedly until a button is pressed? Do you mean to toggle the corresponding LED?

If in fact you want to toggle the LED on C.1, C.2, C.4 at different rates, this works in the simulator without multiplexing:
Code:
; switch test start.bas, Metronome for Tai Chi
;
; 3 fixed breathing times. beat25 = 2.5sec. beat30 = 3.0sec. beat35 = 3.5sec.
;
; When b1 = 2 then beat30 is selected immediately metronome is turned on.
; Led stays on looping through until the button is pushed on or metronome turned off.
; When the button is pressed the next beat is selected, b1 = b1 + 1
; When the button is pressed during final beat it is directed back to the first beat
;
; When the programme is working "b1 = 2" will be changed to "peek 10, b1 so the user's last setting is remembered,
; sound c.0, (50,50) will be added later

; peek 10, b1 added later
symbol pauseTime=w13
symbol pLED=b2
b1 = 2 ; changed to b1 = b1 taking value from peek

main:
  do
    if pinC.3 = 1 then ; button pressed
      low C.1: low C.2: low C.4
      pause 50 ' for debouncing
      do while pinC.3 = 1: loop ' wait until release
      pause 50 ' debounce release
      b1 = b1 + 1 ; next breath timing
      if b1 > 3 then: b1 = 1: endif
    endif
    select b1
      case 1: pLED=C.1: pauseTime=2106
      case 2: pLED=C.2: pauseTime=2563
      case 3: pLED=C.4: pauseTime=3080
    endselect
    do: toggle pLED: pause pauseTime : loop while pinC.3=0
  loop
The values 2106, 2563, 3080 are pause time 2.5, 3.0, 3.5 second breathing times setting to within 1 sec per minute. They are set on the metronome by the 6 pole rotary switch which I am replacing with a single push button. They not toggled. Beat25 etc. have their own individual code
I have rewritten the code in another post

Thanks Tony
 

AllyCat

Senior Member
Hi,
pinC.3 = 0 ; switch not pressed
< .... >
beat25: do: b1=1 : high c.1 : pause 2106 : loop until pinC.3 = 1 ; until button pressed
beat30: do: b1=2 : high c.2 : pause 2563 : loop until pinC.3 = 1
beat35: do: b1=3 : high c.4 : pause 3080 : loop until pinC.3 = 1
I'm surprised the top line above isn't thrown as a syntax error. PINC.3 refers to an input so it's "strange" to assign a value to it (note that PINC.3 = 123 isn't rejected as an error either). Normally you would put it after an IF, or for example in SERTXD(#PINC.3) to read/show the status of the pin.

The program also has several other issues: You have, for example, a HIGH C.1 to presumably switch on a LED, but nowhere can I see a LOW C.1 (or TOGGLE) to switch the LED OFF again. Also, when the button is pressed during the timing loop(s) above, the program will "fall through" into the next line. That will indeed change the timing period to the next speed, but will not update the WRITE value. Also, after the beat35: the program will just stop.

EDIT: To replicate pressing a button, in the simulator just click on the appropriate Leg in the symbol/outline pane.

Cheers, Alan.

PS: It would help if you gave a link to your "another post" (or kept everything related in the same thread) and put your program listings within [code ] [/code] tags.
 
Last edited:

lbenson

Senior Member
If by "replicate" you mean "perform in the simulator", you click on the pin in the image. It will have become yellow to indicate that it is an input.

In the code as you had it, c.1 or c.2 or c.4 goes high and never changes. What difference do you intend the varying pause times to make, since as written they make no difference at all.
 

joliebrise

New Member
Everything is getting too confused so back to the beginning. What is the purpose?

User instructions
The metronome offers three settings for breathing in or out at 2.5, 3.0 and 3.5 seconds.
On first turning on, the breathing rate and volume have already been set at 3.0sec and mid position. Try out different settings. All settings are kept for next time you turn on. Lights will flash every minute to indicate setting.

Logic diagrams
Sound of the timing beat and LEDs indicators are separate but related functions. (parallel codes). Pressing the button can deactivate and/or activate events.
1. Sound “sound c.1, (50,50) : pause 2160” “Pause” gives the time gap between beats and (sound frequency, length of sound)
Different breathing rates codes are assigned 1 = beat25, 2 = beat30, 3 = beat35
Pushing the button indexes the next code/time gap.
If the setting is already at beat 3 then next button press will return it to beat 1.

2. LEDs are to indicate which breathing rate has been chosen either at turning on the metronome or by changing the rate. This is linked to and controlled by the chosen breathing rate.
To reduce power consumption the LEDs are to go on for 3 seconds every minute

In some of the posts it was suggested that the programme has two separate functions, sound and lights and could use Picaxe’s “Start “ features with parallel programming. This made sense so I rewrote my flow chart and code.
The only problem was downloading the code was stopped “start” must be the first line of the code.

I give up. Back to simple codes and I may try two or three separate Picaxe chips.

; Rewritten 7 June

b1 = 2 ; to initiate initial setup

pinC.3 = 0 ; switch not pressed

Start0:
if b1 = 1 then bt25
if b1 = 2 then bt30
if b1 = 3 then bt30
goto main

Start1:
if b1 = 1 then led1
if b1 = 2 then led2
if b1 = 3 then led2
goto main

main:

if pinC.3 = 1 then

let b1 = b1 + 1 ; next breath timing
endif

if b1 >3 then let b1 = 1 ; return counter to 1
endif

bt25: do: sound c.0, (50,50) : pause 2106 : loop while pinC.3 = 0
bt30: do: sound c.0, (50,50) : pause 2563 : loop while pinC.3 = 0
bt35: do: sound c.0, (50,50) : pause 3080 : loop while pinC.3 = 0

led1: do: high c.1 : pause 100 : low c.1 :pause 9000 : loop while pinC.3 = 0
led2: do: high c.1 : pause 100 : low c.1 :pause 9000 : loop while pinC.3 = 0
led3: do: high c.1 : pause 100 : low c.1 :pause 9000 : loop while pinC.3 = 0
 

Attachments

lbenson

Senior Member
If you use the simulator and change Start0 and Start1 to something which passes syntax, you will see that there is still no way for your code to ever reach main:

You should be able to modify the code in either post 8 (using M2 multitasking) or post 10 (using single-tasking) to achieve what you want.

There is no need for multiple picaxe chips.
 

AllyCat

Senior Member
Hi,
On first turning on, the breathing rate and volume have already been set at 3.0sec and mid position. .......... All settings are kept for next time you turn on.
So which is it? Does it always start at 3 seconds ("cold start"), or the value the last time it was used ("warm start") ?

You really shouldn't need more than one (08M2) PICaxe for a program that can be written in less than 100 bytes. ;)

Here's my attempt ; the button is only read after the "beat" (as I believe is yours) and the LED switches in synchronism (so not always ON for exactly 3 seconds) but otherwise I believe it meets your specification. I've changed the timings a little to take into account that most instructions in the simulator take much longer to execute than "real time".

Code:
#picaxe 08m2
#no_data             ; Comment out for a "Cold Start" into mode 2
data 10 , (0)           ; To force a Cold Start
symbol beat = w2
symbol led = b6
symbol mode = b7
symbol prom = 10
symbol pushb = pinc.3

read prom , mode
if mode < 1 or mode > 3 then
    mode = 2
    write prom , mode
endif
do
    if pushb = 1 then
        inc mode
        if mode > 3 then : mode = 1 : endif
        write prom,  mode
        time = 0
    endif
    lookup mode , (0 , c.1 , c.2 , c.4) , led
    lookup mode , (0 , 2106 , 2563 , 3080) , beat        ; Trim as required
    lookup mode , (0 , 1000 , 2000 , 3000) , beat        ; DELETE - Used for simulation only
    low  c.1 : low c.2 : low c.4                         ; Switch LED(s) off
    if time < 6 then                                        ; Allows for simulation delay, normally about 3
        high led
    endif
    sound c.0 , (50 , 50)
    pause beat
    sertxd ("time= " , #time , cr , lf)            ; DELETE - used for simulation only
    if time > 59 then : time = 0 : endif       ; Each minute
loop
Cheers, Alan.
 

joliebrise

New Member
Thanks AllyCat for your post. I have never come across "lookup" before and think I understand what is happening. I will come back this this later.
In writing my Picaxe tutorial website I am explaining what and why. In effect I write what I learn.
My interest in Picaxe is related to my building model boats and controlling servos with Transmitters and Receivers. I use to sell servos and during that time I researched the whole area and you have to forget what you know. SailServo technical info
 
Top