Interfacing the low cost DX LCD/Keypad (shield) with the PICAXE AXE401 Shield

inglewoodpete

Senior Member
I found this LCD-Keypad Shield while browsing the Deal Extreme website. The price AU$8.50/US$8.99/EU8.05 includes free shipping - great value if you're prepared to wait the 20-30 day delivery time. For under 9 dollars, I was prepared to take the risk and have not been disappointed.

Hardware

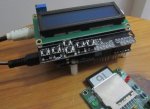
The LCD Keypad Shield (DealExtreme SKU 118059) has a blue backlit LCD with built-in N/S/E/W/Select(& Reset) keys in a small keypad. It is 100% compatible with the PICAXE AXE401 Shield: just a matter of plugging it into the AXE401, develop and download some driver software and play!

The LCD uses the 4-bit parallel interface to a Hitachi HD44780 compatible driver chip. The backlight is wired to accept PWM, allowing software control of the illumination and, consequently, power drain. So the unit uses 4 data, 2 control & 1 pwm output pins from the 28X2.

The keypad uses a resistor ladder, so key presses are decoded using an ADC channel. The values are steady, so only 8-bit ADC is required.

The contrast is controlled by the (blue) multi-turn pot located in the top left of the photos. The backlight LED can be seen at the right of the display screen. The trusty PICAXE AXE401 shield can be seen, almost hiding, under the LCD/Keypad board.
DX-LCD_Unlit_LoRes.JPGDX-LCD_Lit_LoRes.JPG

Software

Attached (in the next two posts) is the test software that I wrote to test the LCD and keypad. I have included routines to write data to the LCD from EEPROM and RAM. Routines to allow byte and word values to be written to the screen, with and without leading-zero-blanking. The code uses just 2 registers (plus b0, with contents preserved) and 23 bytes of RAM. Some of that RAM is only used for the demo, as is a few bytes of EEPROM.

The keypad code places the key value in RAM after the release of a button, so that a single keypress does not get accidently reused. If you want, you could use a background timer to double the number of key outputs to 10 by including press-and-hold key values.

Demo Code

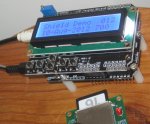
The demonstration code accepts input from the Up/Down keys that increments and decrements a byte variable that is displayed in the top row of the LCD, with no LZB. The Left/Right(Spelled Rigth on the PCB!) keys control the brightness of the backlight, with the PCM value being displayed with LZB in the bottom row of the LCD.

The demo software is attached to post #2 while the I/O interface routines are attached to post #3. I think the code is well commented and should be self explanatory. If not, just ask questions:).
 
Last edited:

inglewoodpete

Senior Member
Due to the 10,000 character limit for posts, the first half of the demo software is attached here. All the I/O subroutines can be found in post #3.

Code:
Symbol Version = 3 't0.03 1103 bytes 15-Jan-2016 Rev-Ed have advised that in certain circumstances,
' BinToASCII with multiple @bPtrInc location pointers can produce unexpected results.
'  The BinToASCII command with multiple @bPtrInc parameters has been disabled in the V6 Editor.
'
Symbol Major = 0
'
#PICAXE 28X2
#Terminal 9600
'
' **** Pins ****
Symbol iKPad      = S.A0        'A.0 ADC0
Symbol oLCDpin4   = outpinB.1
Symbol oLCD4      = S.4
Symbol oLCDpin5   = outpinB.5
Symbol oLCD5      = S.5
Symbol oLCDpin6   = outpinB.6
Symbol oLCD6      = S.6
Symbol oLCDpin7   = outpinB.7
Symbol oLCD7      = S.7
Symbol oLCDRS     = S.8
Symbol oLCDEn     = S.9
Symbol oLCDBkLite = S.10
Symbol oLED       = S.13
'
' **** Registers ****
'
Symbol tKeyCharUsed  = bit0
Symbol tKeyResolved  = bit1   'Key no (1-26) identified
Symbol tKeyTimeOut   = bit5   'Key has been held, timer has expired
Symbol tKeyUnreslvd  = bit6   'Keypress occurred, not resolved
Symbol tKeyDown      = bit7   'Key identified was still held at last read
'  Interrupt routine saves and restores preexisting values to RAM
'
Symbol bKBDStatus    = b0     'Temp vars.  Persistant values stored in RAM
Symbol bKBDValue     = b1     '            Any preexisting values also stored in RAM
Symbol bTimerStatus  = b0
'
Symbol bKeyTimer     = b53    '0-254x100mS = 0-25.5 Seconds [255=disabled]
' All generic LCD routines use w27/b54/b55 (plus b0, which is preserved)
Symbol wLCDPWM       = w27    'backlight
Symbol wLCDVal       = w27
Symbol bLCDVal       = b54
Symbol bKeyVal       = b54
Symbol bAlogKeyVal   = b54
Symbol bEEPROMPtr    = b54
Symbol bChrCtr       = b54
Symbol bLCDChar      = b55
'
' **** Constants ****
'
'       Misc Constants
Symbol False            = 0
Symbol True             = 1
Symbol cSpace           = 32        'Space (blank) character
'      LCD Commands
Symbol cLCDDisplayClear = %00000001 'Clear Display   (takes 1.7mS)
Symbol cLCDCursorHome   = %00000010 'Home            (takes 1.7mS)
Symbol cLCDEntryModeSet = %00000110 'Entry Mode Set b2:1 b1:1 move char position forward (b1:0 for backwards)
Symbol cLCDDisplayOff   = %00001000 'Display Off b3:1, b2:0(display off), b1:0(csr off), b0:0(csr flash off)
Symbol cLCDDispCurOn    = %00001110 'Display On  b3:1, b2:1(display on),  b1:1(csr on),  b0:1(csr flash)
Symbol cLCDDispCurOff   = %00001100 'Display On  b3:1, b2:1(display on),  b1:1(csr on),  b0:1(csr flash)
Symbol cLCDCursorShift  = %00010000 'b4:1, b3:0 (move cursor)/1(move display), b2:0 (sh left)/1(sh right)
Symbol cLCDFunctionSet  = %00110010 'b5:1, b4:1(8-bit data), b3:1(2 line LCD) b2:0 (5x7 dots)/1 (5 x 10 dots)
'Symbol cLCDCharGenAddr   = %01cccrrr ccc: 8 CG chars; rrr: 8 rows of 5 bits (CG data byte follows: ...xxxxx)
Symbol cLCDPosnRow0     = %10000000 'Posn cursor to 1st row (b3-b0 = Col 0 to 15) %1000xxxx $8x
Symbol cLCDPosnRow1     = %11000000 'Posn cursor to 2nd row (b3-b0 = Col 0 to 15) %1100xxxx $Cx
Symbol cLCDPWMFreq      = 199       '10kHz @ SetfFreq = 8MHz
Symbol cPWM75           = 700       'Initial Backlight ~70% intensity
'       Timer Constants
Symbol cKeyTimerDisabled= 0
Symbol cTimerStart      = 1
Symbol cKeyHeldTimeOut  = 10        'Range: 0 - 255 in 10ths of seconds (0 to 25.5 seconds)
Symbol mskBGTimer       = %10000000 'When only the timer is running
Symbol flgBGTimer       = %10000000 'When only the timer is running
Symbol tmrIntOn1stTick  = 65535     'Interrupt to be caused by roll over on first major tick
Symbol tmr100mS_8x4     = 62411     '= 65536 - (Treq * 1,000,000 / Clk / 256)
                                    ' Where: Treq = Reqd Time in uS; Clk = 8,000,000.
Symbol tMainTimer       = bit0      'Main Timer event has occurred
'       Keypad Constants
Symbol cNoKey           = 0    'Identity
Symbol cKeyRight        = 1
Symbol cKeyUp           = 2
Symbol cKeyLeft         = 3
Symbol cKeyDown         = 4
Symbol cKeySelect       = 5
Symbol cKeyRightHeld    = 6    'Key is not released until key timer has expired
Symbol cKeyUpHeld       = 7
Symbol cKeyLeftHeld     = 8
Symbol cKeyDownHeld     = 9
Symbol cKeySelectHeld   = 10
'ADC cut off points for Key recognition
Symbol cKValR_U         = 16   ' Right<n;     Up>n
Symbol cKValU_D         = 55   '    Up<n;   Down>n
Symbol cKValD_L         = 100  '  Down<n;   Left>n
Symbol cKValL_S         = 150  '  Left<n; Select>n
Symbol cKValS_N         = 210  'Select<n;  NoKey>n
Symbol cLVNoKey         = 255  'Indicates no keypress is detected
'
'      RAM Pointers
Symbol rSaveB0          = 56   'Temp Store for 1 byte
Symbol rSaveRegsInt     = 57   'Store for 2 byte registers when using Interrupt routine.
Symbol rLastKey         = 59   'Non-zero value indicates unactioned key press
Symbol rPreviousKeyVal  = 60   'ADC value of last detected key press
Symbol rStringBuffer    = 62   '17 bytes: ASCIZ string of up to 16 chars
Symbol rLCDBackLight    = 79   ' 2 bytes: PWM Value 0-1023
Symbol rTimersStatus    = 81   'Contains bit flags for software timers: tMainTimer, tDelayTimer, tEventTimer.
Symbol rKBDStatus       = 82
'
'       EEPROM and Pointers
Symbol eMsgStart         = 0
EEPROM eMsgStart, ("Shield Demo", 0)
'
'  Macro Definitions
'
#Macro WordToAscii(wvar,n1,n2,n3,n4,n5)
  n1 = wvar / 10000      + "0"
  n2 = wvar / 1000 // 10 + "0"
  n3 = wvar / 100  // 10 + "0"
  n4 = wvar / 10   // 10 + "0"
  n5 = wvar        // 10 + "0"
#EndMacro
#Macro ByteToAscii(bvar,n1,n2,n3)
  n1 = bvar / 100  // 10 + "0"
  n2 = bvar / 10   // 10 + "0"
  n3 = bvar        // 10 + "0"
#EndMacro
'
'  Test routine
'  
Init:
Output oLCD4, oLCD5, oLCD6, oLCD7, oLCDRS, oLCDEn, oLED, oLCDBkLite
'
High oLED                       'Indicate Bootup
Pause 600
Low oLED, oLCDEn
SerTxd ("Boot Ver ", #Major, ".", #Version, CR, LF)
wLCDPWM = cPWM75
Poke rLCDBackLight, Word wLCDPWM
GoSub InitLCD
Poke rPreviousKeyVal, cLVNoKey  'Init keypad value
ADCSetup = %0000000000000001    'Keypad init: Enable only channel 0
'
'Demonstration Code
'
bEEPROMPtr = eMsgStart          'Point to EEPROM Message
GoSub EEPROM2LCD                'Output Message from EEPROM to LCD
'
'Write a byte value (with leading zeroes) to the top row of the LCD
bLCDChar = cLCDPosnRow0 + 13    'Top Row, 8th character position
GoSub Cmd2LCD                   'Position cursor (input point)
b6 = 12
bLCDVal = b6
GoSub Byte2LCD                  'Send byte value to LCD (Value 0-255)
'
'Write a word value (using LZB) to the top row of the LCD
bLCDChar = cLCDPosnRow1 + 12    'Top Row, 13th char posn
GoSub Cmd2LCD                   'Posn cursor (input point)
Peek rLCDBackLight, Word wLCDVal'Fetch Backlight intensity
GoSub W2LCDLZB                  'Send byte value to LCD (Value 0-65535)
'
'Demonstrate writing from RAM to LCD
bPtr = rStringBuffer            'Preload RAM with a string for this demo
For b5 = 0 To 11                'Load the date into RAM as a 12-character string
   LookUp b5, ("15-Jan-2016", 0), @bPtrInc'The zero is for ASCIZ string
Next b5
'
'The following code starts the background timer that runs continuously
TOFlag = False
Timer = tmrIntOn1stTick         '
SetTimer tmr100mS_8x4           'Expires after 100 mS
SetIntFlags flgBGTimer, mskBGTimer'Set timer 0 to interrupt
bKeyTimer = cKeyTimerDisabled   'Not currently running
'
'Copy the date from RAM to the 1st char position of bottom row of LCD
bLCDChar = cLCDPosnRow1         'Bottom Row, 1st char posn
GoSub Cmd2LCD                   'Position cursor (input point)
bPtr = rStringBuffer
GoSub RAM2LCD
'
Do
   Peek rLastKey, bKeyVal
   If bKeyVal > cNoKey Then
      SerTxd ("Key pressed=", #bKeyVal, CR, LF)
      Select Case bKeyVal
      Case cKeyRight      'Make backlight brighter
         bLCDChar = cLCDPosnRow1 + 12 'Bottom Row, 13th char position
         GoSub Cmd2LCD                'Posn cursor
         Peek rLCDBackLight, Word wLCDPWM
         wLCDPWM = wLCDPWM + 100 Max 1000
         PWMOut oLCDBkLite, cLCDPWMFreq, wLCDPWM 'Set Backlight level
         Poke rLCDBackLight, Word wLCDPWM'wLCDPWM is the same variable as wLCDVal
         GoSub W2LCDLZB               'Send byte value to LCD (Value 0-65535)
      Case cKeyLeft      'Make backlight dimmer
        bLCDChar = cLCDPosnRow1 + 12  'Bottom Row, 13th character position
        GoSub Cmd2LCD                 'Posn cursor
        Peek rLCDBackLight, Word wLCDPWM
         wLCDPWM = wLCDPWM Min 100 - 100
         PWMOut oLCDBkLite, cLCDPWMFreq, wLCDPWM 'Set Backlight level
         Poke rLCDBackLight, Word wLCDPWM'wLCDPWM is the same variable as wLCDVal
         GoSub W2LCDLZB                'Send byte value to LCD (Value 0-65535)
         bLCDChar = " "                'Trailing blank
         GoSub Chr2LCD
      Case cKeyUp         'Increment byte value in top row of LCD
         bLCDChar = cLCDPosnRow0 + 13  'Top Row, 8th char posn
         GoSub Cmd2LCD                 'Posn cursor
         Inc b6: bLCDVal = b6
         GoSub Byte2LCD                'Send byte value to LCD (Value 0-255)
      Case cKeyDown      'Decrement byte value in top row of LCD
         bLCDChar = cLCDPosnRow0 + 13  'Top Row, 8th char posn
         GoSub Cmd2LCD                 'Posn cursor
         Dec b6: bLCDVal = b6
         GoSub Byte2LCD                'Send byte value to LCD (Value 0-255)
      Case cKeySelectHeld'Clear the whole LCD
         GoSub ClrLCD
      Case cKeySelect   'Clear just the top row
         bLCDChar = cLCDPosnRow0       'Top row, col 0 address
         GoSub Clr1Row
      EndSelect
      Poke rKBDStatus, 0               'Clear all keypad status bits
      Poke rLastKey, cNoKey            'Clear the key ID
   EndIf
Loop
' Add the I/O subroutines from the next post here
 
Last edited:

inglewoodpete

Senior Member
Part #3. Finally, the all-important I/O subroutines for interfacing to the LCD and Keypad hardware...

Code:
'
'  Subroutines
'  
' **** Initialise LCD
'Select 4-bit, no cursor mode and set backlight level
'Regs Used: bLCDChar
'
InitLCD:Low oLCD7, oLCD6
     High oLCD5, oLCD4      'Pattern %0011 ("Function Set")
     PulsOut oLCDEn, 2      'Pulse enable pin 3 times to initialise
     Pause 50               'Minimum 4.1mS (all clock speeds)
     PulsOut oLCDEn, 2      '2nd Function Set
     Pause 4                'Minimum 100uS (all clock speeds)
     '
     bLCDChar = cLCDFunctionSet  '$32 3rd Function Set, then 4-bit data, 2-line display
     Gosub Cmd2LCD
     bLCDChar = cLCDDisplayOff   '$08 Reset Display
     Gosub Cmd2LCD
     bLCDChar = cLCDDispCurOff   '$0C Display On-no cursor
     Gosub Cmd2LCD
     bLCDChar = cLCDEntryModeSet '$06 Cursor movt
     Gosub Cmd2LCD
     bLCDChar = cLCDDisplayClear '$01 Clear Display
     Gosub Cmd2LCD
     Pause 35                    '~4mS Required to let LCD clear (all clock speeds)
     Peek rLCDBackLight, Word wLCDPWM        'Get default backlight level
     PWMOut oLCDBkLite, cLCDPWMFreq, wLCDPWM 'Set Backlight level
     Return
'  
' **** Write Single Byte to LCD
'
'Two different entry points: Send command or character to LCD
'Regs Used: bLCDChar (also b0 but any preexisting value is preserved)
'           bLCDChar is unchanged on exit
'
Cmd2LCD: Low oLCDRS       'Point to command register (default is otherwise character reg)
         '
Chr2LCD: Poke rSaveB0, b0 'Preserve
         b0 = bLCDChar    'It's easier to get the bits out of b0
         oLCDpin4 = bit4  'High nibble is sent first
         oLCDpin5 = bit5
         oLCDpin6 = bit6
         oLCDpin7 = bit7
         PulsOut oLCDEn, 2'Clock 4 high bits of data into LCD
         oLCDpin4 = bit0  'Followed by the low nibble
         oLCDpin5 = bit1
         oLCDpin6 = bit2
         oLCDpin7 = bit3
         PulsOut oLCDEn, 2'Clock 4 low bits of data into LCD
         High oLCDRS      'Next received byte defaults to displayable character
         Peek rSaveB0, b0 'Restore
         Return
'  
' **** Clear One or More Rows of the LCD
'
'Two different entry points: Clear entire LCD or Clear just one row
'If clearing just one row, bLCDChar must be pointing to the address of the start of row
'Regs Used: bLCDChar (also b0 but any preexisting value is preserved)
'
ClrLCD: bLCDChar = cLCDPosnRow0 'Top row, column 0 address
        GoSub Clr1Row           'Clear top row
        bLCDChar = cLCDPosnRow1 'Bottom row, column 0 address
Clr1Row:Gosub Cmd2LCD           'Point to start of req'd row
        bLCDChar = cSpace
        For bChrCtr = 1 to 16   'Write 16 space chars to LCD
           GoSub Chr2LCD
        Next bChrCtr
        Return
'  
' **** Write an ASCIZ String from EEPROM to LCD
'
'Entry: bEEPROMPtr points to beginning of string in EEPROM
'Exit:    Data transfer stops when a character < 32 is encountered
'Regs Used: bEEPROMPtr, bLCDChar
'
EEPROM2LCD:Read bEEPROMPtr, bLCDChar
         Do
            GoSub Chr2LCD
            Inc bEEPROMPtr
            Read bEEPROMPtr, bLCDChar
         Loop Until bLCDChar < 32
         Return
'  
' **** Write an ASCIZ String from RAM to LCD
'
'         Entry: bPtr points to beginning of string in RAM
'         Exit:    Data transfer stops when a character value < 32 is encountered
'         Regs Used: bPtr, bLCDChar
'
RAM2LCD: bLCDChar = @bPtrInc
         Do
            GoSub Chr2LCD
            bLCDChar = @bPtrInc
         Loop Until bLCDChar < 32   '0-31 are non-printing values
         Return
'  
' **** Write a Word Value to LCD
'
'Note: Always shows leading zeros (No LZB)
'Entry: wLCDVal   Word value (0-65535)
' Exit: Data transfer stops when a character value < 32 is encountered
'Regs Used: bPtr, bLCDChar (also b0 but any preexisting value is preserved)
'
Word2LCD:Poke rSaveB0, b0  'Preserve
      bPtr = rStringBuffer 'Point to start of buffer
      For b0 = 0 To 16     'Clear 17 bytes of string buffer
         @bPtrInc = 0
      Next b0
      bPtr = rStringBuffer 'Point to start of buffer
      'BinToASCII wLCDVal, @bPtrInc, @bPtrInc, @bPtrInc, @bPtrInc, @bPtrInc
      WordToAscii(wLCDVal, @bptrinc, @bptrinc, @bptrinc, @bptrinc, @bptrinc)
      Peek rSaveB0, b0     'Restore
      bPtr = rStringBuffer 'Point to start of buffer
      GoSub RAM2LCD        'Transfer RAM to LCD
      Return
'  
' **** Write a Word Value to LCD with Leading Zero Blanking
'
'Note: Only displays significant digits
'Entry: wLCDVal   Word value (0-65535)
'Exit:  Data transfer stops when a character value < 32 is encountered
'Regs Used: bPtr, bLCDChar (also b0 but any preexisting value is preserved)
'
W2LCDLZB:Poke rSaveB0, b0     'Preserve
      bPtr = rStringBuffer 'Point to start of buffer
      For b0 = 0 To 16     'Clear 17 bytes of string buffer
         @bPtrInc = 0
      Next b0
      bPtr = rStringBuffer 'Point to start of buffer
      WordToAscii(wLCDVal, @bPtrInc, @bPtrInc, @bPtrInc, @bPtrInc, @bPtrInc)
      bPtr = rStringBuffer 'Point to start of buffer
      For b0 = 1 to 4      'Blank over maximum of 4 digits
         If @bPtr = "0" Then
            Inc bPtr
         EndIf
      Next b0 
      Peek rSaveB0, b0     'Restore
      'bPtr = rStringBuffer 'Point to start of buffer
      GoSub RAM2LCD        'Transfer RAM to LCD
      Return
'  
' **** Write a Byte Value to LCD
'
'Note: Always shows leading zeros (No LZB)
'Entry: bLCDVal   Byte value (0-255)
'Exit:    Data transfer stops when a character value < 32 is encountered
'Regs Used: bPtr, bLCDChar (also b0 but any preexisting value is preserved)
'
Byte2LCD:Poke rSaveB0, b0     'Preserve
      bPtr = rStringBuffer 'Point to start of buffer
      For b0 = 0 To 16     'Clear 17 bytes of string buffer
         @bPtrInc = 0
      Next b0
      bPtr = rStringBuffer 'Point to start of buffer
      'BinToASCII bLCDVal, @bPtrInc, @bPtrInc, @bPtrInc
      ByteToAscii(bLCDVal, @bptrinc, @bptrinc, @bptrinc)
      Peek rSaveB0, b0     'Restore
      bPtr = rStringBuffer 'Point to start of buffer
      GoSub RAM2LCD        'Transfer RAM to LCD
      Return
'  
' **** Write a Byte Value to LCD with Leading Zero Blanking
'
'Note: Only displays significant digits
'Entry: bLCDVal   Word value (0-255)
'Exit:    Data transfer stops when a character value < 32 is encountered
'Regs Used: bPtr, bLCDChar (also b0 but any preexisting value is preserved)
'
B2LCDLZB:Poke rSaveB0, b0  'Preserve
      bPtr = rStringBuffer 'Point to start of buffer
      For b0 = 0 To 16     'Clear 17 bytes of string buffer
         @bPtrInc = 0
      Next b0
      bPtr = rStringBuffer 'Point to start of buffer
      'BinToASCII bLCDVal, @bPtrInc, @bPtrInc, @bPtrInc
      ByteToAscii(bLCDVal, @bptrinc, @bptrinc, @bptrinc)
      bPtr = rStringBuffer 'Point to start of buffer
      For b0 = 1 to 4      'Blank over maximum of 4 digits
         If @bPtr = "0" Then
            Inc bPtr
         EndIf
      Next b0 
      Peek rSaveB0, b0     'Restore
      'bPtr = rStringBuffer'Point to start of buffer
      GoSub RAM2LCD        'Transfer RAM to LCD
      Return
'
' **** Interrupt handler
'
'KBDStatus (b0)
'  0 %00000000      No key being pressed or processed
'
'Any registers used here are preserved in the poke statement
Interrupt:
   If TOFlag = True then
      'Timer event has occurred
      '
      Poke rSaveRegsInt, bKBDStatus, bKeyVal 'b0,b1 Preserve variables - whatever happened to be in the registers at the time
      '
      Peek rKBDStatus, bKBDStatus
      ReadADC 0, bAlogKeyVal                 'iKPad, Pin S.A0
      If bAlogKeyVal > cKValS_N Then         'No key currently pressed
         tKeyDown = False
         Peek rPreviousKeyVal, bAlogKeyVal   'Check previous ADC value
         Select Case bKeyVal                 'Resolve key identity from previous ADC value
          Case < cKValR_U: bKeyVal = cKeyRight
          Case < cKValU_D: bKeyVal = cKeyUp
          Case < cKValD_L: bKeyVal = cKeyDown
          Case < cKValL_S: bKeyVal = cKeyLeft
          Case < cKValS_N: bKeyVal = cKeySelect
          Else: bKeyVal = cNoKey
         EndSelect
         If tKeyTimeOut = True And bKeyVal > 0 Then 'Valid key was held
            bKeyVal = bKeyVal + 5            'Offset value by +5
         EndIf
         bKeyTimer = cKeyTimerDisabled       'Reset (disable) timer
         Poke rLastKey, bKeyVal
         Poke rPreviousKeyVal, cLVNoKey      'Clear the keypress 'memory'
      Else                                   'A key is currently pressed, so....
         If tKeyDown = False Then            'This is the first reading of a new keypress
            tKeyDown = True                  'Indicate that a key is now pressed
            tKeyUnreslvd = True
            bKeyTimer = cTimerStart
         EndIf
         Poke rPreviousKeyVal, bAlogKeyVal   'Save latest key value for future use
      EndIf
      '
      If bKeyTimer <> cKeyTimerDisabled Then 'Keypad key is currently held
         Inc bKeyTimer
         If bKeyTimer = cKeyHeldTimeOut Then 'Key held timer has expired
            bKeyTimer = cKeyTimerDisabled    'Reset (disable) timer
            tKeyTimeOut = True
         EndIf
      EndIf
      Poke rKBDStatus, bKBDStatus
      '
      Peek rTimersStatus, bTimerStatus       'Fetch status for all software timers
      '
      Timer = tmrIntOn1stTick                'Reset the timer
      SetIntFlags flgBGTimer, mskBGTimer     'Set timer 0 to interrupt
      TOFlag = False                         'Clear the flag
      '
      Poke rTimersStatus, bTimerStatus       'Save status for all software timers
      '
      Peek rSaveRegsInt, bTimerStatus, bKeyVal 'Restore variables
   EndIf
   Return
' ***********
 
Last edited:

Proe Pro

New Member
Thank you from a community college instructor in Glendale, Arizona, USA.

I've been using PICAXE boards in my Intro to Engineering class for about four years, to give freshmen students a taste of embedded processors and programming. PICAXE BASIC is a pretty easy segue from another topic of the course, MATLAB. After a few intro exercises with an 08M2, from very basic switch/LED control to an I2C datalogger (with a small TinyRTC board, holding a DS1307 RTC, DS18B20 temp sensor, and AT24C32 EEPROM), I then have teams design and prototype a commercially viable product (game, toy, educational kit or information appliance).

Starting from zero, I like to provide pre-tested and documented subprograms, so they can concentrate on the logic of the main program. Usually one student on a four member team has had a couple programming classes, but often non of them have built circuits on a breadboard. I've had mixed results, but I think they all come away with an appreciation that microcontrollers are everywhere, and that you can start using them with just a little cut-and-paste from the trailblazers like yourself.

Thanks for sharing - I've had one of these and an AXE401 for about a year, waiting for me to find the time to stumble through a rudimentary demo.
 

John West

Senior Member
Looks like good stuff, Pete. Thanks. Just as a note though for users of the DX/LCD Keypad, the pins from each connector may be on .1 inch centers, but the connectors themselves are not all on the same grid of .1 inch. One connector, (the connector under the words "Keypad Shield",) is .05 inches off from the others.

It might be correct for the AXE401, and other "shields," but it makes it impossible to mount the bd on a .1 inch center-to-center prototyping bd unless you bend or cut off those 8 pins.
 
Last edited:

inglewoodpete

Senior Member
One connector, (the connector under the words "Keypad Shield",) is .05 inches off from the others.

It might be correct for the AXE401, and other "shields," but it makes it impossible to mount the bd on a .1 inch center-to-center prototyping bd unless you bend or cut off those 8 pins.
It is an unfortunate feature of the shield 'standard'. The deliberate 'misaligning' of one of the digital connector strips of the shield has been often criticised by Arduino users. The AXE401 datasheet, released in March 2011, described the problem in "5.2 Why the double parallel socket beside outputs S.8 to S.13?" and Rev-Ed's welcome solution.
 

John West

Senior Member
Yep, I read it when I went through the AXE41 info when I was trying to figure the exact pin-out info for the LED/SW module. I'm just glad I know how to solder and build from scratch, and don't usually mess with the plug together "shield" nonsense. But I got this LED/SW module from Premelec, as we are seeing if we can put together an interesting sig-gen project (based on matherp's sig-gen work that used this module,) and it is a nice looking display with switches, so I figured I'd use it.

I'm planning on adding a sweep mode, buffered 50 Ohm output, and better output filtering for the higher sig-gen frequencies. Those mods meant a larger base circuit bd for the project, and that's when I ran into the connector mis-alignment. It's no problem to solder in the wiring, but I was hoping to socket each of the modules on the mother bd.

Since the Arduino bd connector is misaligned, then this display bd, apparently designed to work with it, is misaligned, as will be any other bds designed to work with the Arduino. Ah, such a mess created by defacto "standards."

You mentioned it was deliberate. Do you know their reasoning, however bad it was? Just curious.

BTW, Deal Extreme now has the modules for $6.57 U.S..
 
Last edited:

hippy

Technical Support
Staff member
Do you know if the Arduino people did that mis-alignment intentionally, or did they just drop the connector on the wrong .05" center during layout?
I believe their official acknowledgement was that it was an unintentional error which happened in the last minute rush to get their initial boards to the manufacturer before a deadline; no one noticed the connector had inadvertently moved off-grid until the PCB's came back. They chose to proceed with using those rather than scrap the boards and order another batch.
 

John West

Senior Member
Thanks, hippy. That's what I was figuring. Now these other vendors are reproducing the error in their products, making it far worse. I'll have to be careful about using any module with this pin-out, as they will be showing up everywhere for years to come. Sometimes the electronics industry cracks me up.

This sort of sloppiness convinces me I should avoid the Arduino altogether, and stick to products like the Rev. Ed. offerings such as the AXE401, where you pay attention to getting the details right. I make enough mistakes of my own that I don't need to compound them with those of manufacturers.
 
Last edited:
Top